Copyright Notice and Disclaimer
© Strumis Limited 2017. All rights reserved.
This document has been prepared by or on behalf of Strumis Limited and all intellectual property rights therein (including without limitation copyright) are reserved by Strumis Limited.
It has been produced and provided for your use only and strictly for the purposes provided. You may not, except with the express prior written consent of Strumis Limited, distribute or commercially exploit the content (in whole, in part and regardless of whether modified or adapted from the original).
Whilst every effort has been made to ensure the accuracy and completeness of the content Strumis Limited does not warrant the content nor does it make any representation in respect thereof. You use the materials at your own risk. Strumis Limited together with each of its group companies disclaims any and all liability in respect thereof including without limitation any losses, damages, claims or expenses you or any third party might suffer or incur as a consequence of your use or reliance upon the content.
Trademarks
The following trademarks are acknowledged:
Microsoft, Windows, Internet Explorer, Word, Excel, Visual Basic and all other trademarks that are registered trademarks of Microsoft Corporation.
Edition notice
This manual is intended for use with version 10.1 and later of the STRUMIS software package from STRUMIS Limited.
Support
Please direct any questions as follows:
§ For licensing issues, please contact:
licensing@strumis.com
+44 (0) 1332 545800
§ In the UK, for issues other than licensing issues, please contact:
uk.support@strumis.com
+44 (0) 1332 545804
If you are not in the UK, please contact your nearest STRUMIS office or distributor. See our website at www.STRUMIS.com for more information.
Contents
Contents
Welcome to STRUMIS
Chapter 1
Getting started with STRUMIS
Log in to STRUMIS
Find your way around
Work with forms
Work with grids
Work with records
Create a record
Find and edit an existing record
Add notes to a record
Define custom fields for a record
Attach external documents to a record
View basic information about a record
Delete a record
Work with reports
What's next?
Chapter 2
Managing your customers
About customers
Create a customer record
Import customer records
Customer reports
Find and edit a customer record
Customer reports
What's next?
Fields and buttons
Chapter 3
Enquiries and quotations
About enquiries and quotations
Create an enquiry
Set up a parent enquiry
Add customer contacts
Create and print a quotation
Find and edit an enquiry
Enquiry reports
What's next?
Fields and buttons
Chapter 4
Producing estimates
About estimates
Create an estimate
Add a subsection to the estimate
Add a steel item to the subsection
Add labour for a steel item
Add a fitting to a steel item
Add a non steel item to the subsection
Add a free line item to the subsection
Add an assembly to the subsection
Batch update take-off or BOQ lines
Move items to another subsection
Add extras
Import an estimate
Resolve unrecognised items
Find and edit an estimate
Estimate reports
What's next?
Fields and buttons
Chapter 5
Managing contracts
About contracts, budgets and scope changes
Contracts
Contract budgets
Change orders
Chapter 6
Working with preliminary lists and preliminary nesting and ordering
Preliminary listing
Preliminary nesting and ordering
Chapter 7
Working with detailed lists
About detailed lists
Detailed list terminology
Create a detailed list
Import a detailed listing from a CAD file
Resolve unrecognised mark items
Resolve invalid marks
Resolve invalid dimensions
Create a detailed listing
Add a drawing
Add a mark
Add a mark item
Import marks from a prelim listing
Batch update marks
Batch update mark items
Use a black flag to indicate removed items
Import CAM/DSTV files
About revising a detailed list
Revision options
Phase and lot changes
Item (section size) changes
Mark item length changes (linear items)
Mark item quantity increase or new mark item added
Mark item quantity decrease
Mark item removed
Find and edit a detailed list
Detailed list reports
What's next?
Fields and buttons
Chapter 8
Lotting
About Lotting
Open lotting information for a contract
Define lots for a contract
Assign marks to a lot
Release marks for nesting and ordering
Batch update marks
Lotting reports
What's next?
Fields and buttons
Chapter 9
Production nesting and ordering
About production nesting and ordering
Select mark items to nest
The Nesting Wizard
Manual Nesting
Batch update required sections
Weld selected lengths together
Batch update nesting results
Open a saved nest
Nesting reports
What's next?
Fields and buttons
Chapter 10
Work orders
About work orders
Create a work order using the Generate Contract Work Orders Wizard
Create a work order manually
Un-issue a work order
Find and edit a work order
Batch update marks
Batch update mark items
Find and edit a work order
Work order reports
What's next?
Fields and buttons
Chapter 11
Ordering, receiving and returning goods
About ordering, receiving and returning goods
Suppliers
Purchase orders
Purchase order receipts
Purchase invoices
Purchase order returns
Chapter 12
Maintaining the inventory
About the inventory
Search the inventory
Transfer inventory
Change classification
Allocate or un-allocate inventory
Exchange bars
Issue to contract / work order
Add inventory
Inventory adjustment
Inventory batch update
Edit inventory
View item history
View shape
Cutting Plan Viewer
UpdatePricing
Inventory reports
Chapter 13
Production
About production
Production control
Production console
Receive from work order
Employee timesheets
Production delivery notes
Chapter 14
Sales orders, deliveries and invoices
About sales orders, deliveries and invoices
Process a sales order
Sales orders
Sales order deliveries
Sales invoices
Chapter 15
Document management
About document management
Contacts
Documents
Transmittals
Requests for information (RFI)
Welcome to STRUMIS
Hello and welcome to STRUMIS!
STRUMIS is an information management system that has been designed specifically for the steel fabrication industry. It provides management access to the information that is produced at every stage of a steelwork contract, from tendering, through procurement to manufacturing and delivery to site.
Several types of licence are available, depending on your requirements. They allow you to access one or more of these modules: the main management information system, BIM Review (this is STRUMIS software that allows you to view and manage building information models and data), the STRUMIS estimating software, the STRUMIS planning software, and a no-nonsense interface for workstation operators. Please note that BIM Review is not covered in this documentation.
Chapter 1
Getting started with STRUMIS
What's in this chapter?
Log in to STRUMIS
Find your way around
Work with forms
Work with grids
Work with records
Create a record
Find and edit an existing record
Add notes to a record
Define custom fields for a record
Attach external documents to a record
View basic information about a record
Delete a record
Work with reports
What's next?
Log in to STRUMIS
Use the following instructions to log into STRUMIS:
1. To start STRUMIS, go through your Windows menu system or click the STRUMIS icon  .
.
The Login screen is displayed:
(The full login screen is shown below. Click the Options button to display or hide the extra fields.)
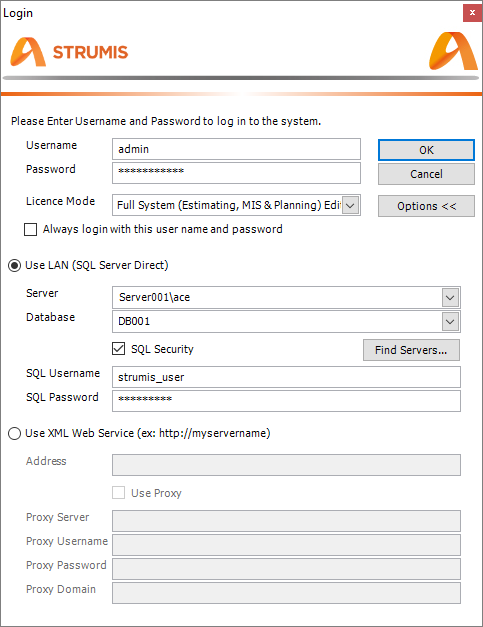
2. Type in your username and password and check that the licence mode is correct.
3. Click OK.
The STRUMIS software is launched.
Find your way around
The illustration below shows the main STRUMIS screen. Each of the labelled items is described in detail below.
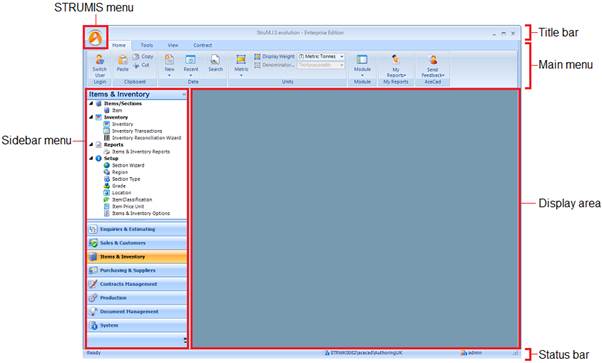
Title bar
The title bar tells you which edition of STRUMIS you are running and has the standard controls to minimise, maximise and close the screen.
STRUMIS menu
When you click the STRUMIS logo, the following menu is displayed:

The available options are listed in the table below:
|
Option
|
Description
|
|
New
|
Allows you to create new records.
|
|
Save
|
Saves the active open record.
|
|
Import and Export
|
Opens the Import and Export Wizard, which allows you to import files into, or export files from STRUMIS.
|
|
Close
|
Closes the active open record.
|
|
Close All
|
Closes all records.
|
|
Print
|
Saves a screen capture of the active open form to a PDF file.
|
|
Switch User
|
Restarts STRUMIS so that you can log in as a different user.
|
|
About
|
Click this button to:
§ View STRUMIS contact details
§ View your licence details and a list of software versions that you have installed (with access to release notes)
§ Upgrade or activate your licence
|
|
Exit STRUMIS
|
Click this button to close the STRUMIS software.
|
Main menu
There are four tabs on the main menu; Home, Tools, View, and Contract. More detail is given in the tables below:
Home
|
Option
|
Description
|
|
Login
|
The Switch User option restarts STRUMIS so that you can log in as a different user.
|
|
Clipboard
|
Use these options to cut, copy and paste to the clipboard.
|
|
Data
|
§ New
Allows you to create new records.
§ Recent
List the records that you recently accessed.
§ Search
When you choose this option, the General Search form is displayed, allowing you to search for records.
See Find and edit an existing record.
|
|
Units
|
Select the units for use throughout the system. The options are:
§ Metric
§ Imperial
If you select Imperial units, you can also choose a denominator to specify the granularity that you want to be displayed throughout the system. The options are a half, a quarter, an eighth, a sixteen or a thirty-secondth of an inch.
§ Imperial decimal inch
You can also select weight units.
|
|
Module
|
Click this button to display a particular module in the sidebar menu.
|
|
My Reports
|
Click this button to list custom reports by module.
|
|
AceCad
|
Click this button to send an email to STRUMIS support.
|
Tools
|
Option
|
Description
|
|
Data Tools
|
The Data Tools options allows you to:
§ Run the Setup Wizard
§ Backup your SQL database
§ Install a hotfix
§ Run the Import and Export Wizard
|
|
Local Data
|
The Local Data options allow you to:
§ Reset grid layouts to factory settings
§ Refresh the data in drop-down lists (combos)
|
View
|
Option
|
Description
|
|
View
|
The View option allows you to:
§ Toggle the sidebar menu on and off.
§ Toggle the System Navigation screen on and off
|
|
CAD/CAM Viewers
|
This option allows you to view model data using one of the following viewers:
§ BIM Review viewer
§ StruCNC CAM viewer
§ Drawing viewer
|
|
Window
|
The Window option allows you to:
§ Display the welcome screen and videos
§ Configure the display area to show tabbed or non-tabbed windows
§ Launch the on-line help system
§ Display the start page
|
Contract
The options on the Contract Ribbon are very useful when you are carrying out a lot of work on one particular contract. You can specify the contract on which you are working, and then use the buttons along the Contract Ribbon to access various aspects of work particular to the selected contract. For example, if you are working with a contract called C-0100, select it from the Contract drop-down list. If you want to view the detailed listing for C-0100, simply click the Detailed Listing button; you do not have to go through the menu system or search forms.
You can also update contract information from the database (Refresh Contract Information) or create a new contract.
Sidebar menu
Click a module in the sidebar menu to display a list of associated tasks and records in the upper half of the sidebar menu.
Display area
When you select a menu option that requires a form, the form is displayed here.
Status bar
Shows the status of the STRUMIS system, the database that you are using, and the user that is currently logged in.
Work with forms
The term form is used to refer to the screen on which a STRUMIS record is displayed. Examples are the Customer form, the Purchase Order form and the Production Workstation form. The illustration below shows you what a simple form looks like. It is the Customer - Details form.
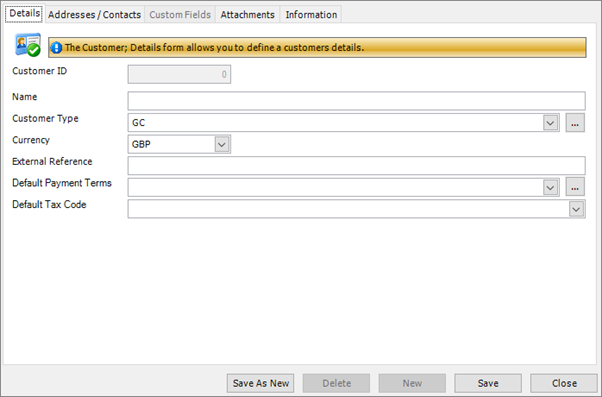
Forms have core features that are common through the system. They are fields, grids and buttons.
Fields
You will find text, numeric, date, drop-down list, and check box type fields in the STRUMIS system. They are frequently displayed on tabs or in smart filters (similar to tabs). Fields, tabs and smart filters are described on a case-by-case basis throughout this documentation.
Grids
Many STRUMIS forms contain grids with sophisticated control mechanisms.
See Work with grids.
Buttons
On each form, you will find one or more of the buttons in the following table:
|
Button
|
Description
|
|
Actions
|
Lists the various operations that you can do to the record.
|
|
Grid Options
|
See Work with grids
|
|
Save
|
Saves the record.
|
|
Save As New
|
If you are creating more than one record of the same type with similar details, use the Save As New button.
When you have completed and saved the first record, you can simply change the name and click Save As New to save the same details under the new name.
|
|
Delete
|
Deletes the record from the database. You cannot retrieve a record when it has been deleted.
|
|
Close
|
Closes the record.
|
Work with grids
Grids feature on many STRUMIS forms. They have their own controls, which are listed when you click the Grid Options button. Before you begin to set grid options, however, you can:
§ Click a column header to sort information into alphabetic or numeric order. Click it again to sort the information into reverse alphabetic or numeric order.
§ Rearrange the columns in the grid. To do this, click, hold and drag a column header to a different location.
Grid Options
The following options are available when you click the Grid Options button.
§ Select All
Selects all of the rows in the grid. You can also click a row and press Ctrl A to select all of the rows.
§ Expand All and Collapse All
Some grids contain rows that you can expand to display extra information (click the + sign at the beginning of the row) or collapse to hide the information (click the - sign at the beginning of the row). Here's an example from the Cutting Plan Viewer:

To expand or collapse all of the rows in this type of grid, use the Expand All or Collapse All options respectively.
§ Print Preview
This option displays the Print Preview form, where you can check and then print the grid:

§ Export to Excel
Opens Microsoft Excel and exports the information in the grid.
§ Copy to Clipboard
Copies the information in the grid to the clipboard. You can then paste the information into a third-party software package.
§ Autofit Columns
Increases or decreases the width of the columns so that the grid fits into the window.
§ Group By
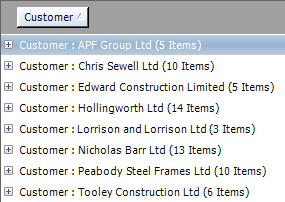
This option allows you to group the information in the grid by a specific column. When you select the option, a message, Drag a column header here to group by that column, is displayed at the top of the grid. The example below shows how to group contracts by customer name. Drag the Customer column header to the grey area as shown:
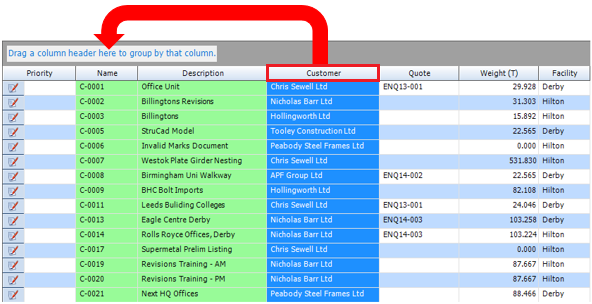
You can see that the grid now lists the customers and allows you to expand each row to display the associated contracts.
To display the information in its original format, simply drag the column header from the grey area back to the grid.
§ Filter Columns
See Filter columns below.
§ Row Summaries
This option allows you to add various summaries to the bottom of a column. The range of summary types that are available depends on the column; for example, Average and Sum are only available when being applied to columns containing numeric values.
When you select this option, a summary icon is added to the column headers in the grid. To select a summary:
a. Click the icon.
The Summaries form is displayed.
b. Select one or more types of summary and click OK.
c. The summary is added to the bottom of the column.

§ Show/Hide Columns
See Show/Hide columns below.
§ Reset Grid Layout
Resets the grid layout to the factory settings.
§ Reset Sort Order
Resets the sort order of the grid to the factory settings.
Filter columns
STRUMIS provides a sophisticated facility that allows you to filter grids so that they display the exact information that you require. For example, on the Contracts Search form, you could list the jobs that you won this month, by building type, tonnage and sales area.
The available filter options are described below.
When you select the Filter Columns grid option, an extra row is displayed at the top of the grid. The various utilities in this row allow you to display very specific information in the grid by filtering the information to show only the details in which you are interested.
The example below shows the extra row for the Contracts Search form.

The following table tells you about the numbered features in the illustration:
|
Number
|
Description
|
|
1.
|
This button, at the beginning of the row, clears all filter criteria for the grid.
|
|
2. and 3.
|
These features are available for every column. They are displayed when you click the filter row for a particular column
Click the button (feature number 2.) to display the filter operators; they are:
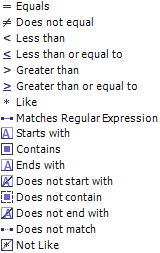
Select an operator and then type in an operand (at feature number 3.). These terms may be unfamiliar to you, so let's take a look at an example.
Imagine that you had a list of contracts for a variety of customers. You want to review the contracts for Peabody Steel Fames Ltd. On the Contracts Search form, enable the Filter Columns grid option. In the Customer column, select the Contains operator and type in the operand Peabody. The grid is filtered as you type. It now shows only the contracts for customers with Peabody in their name.
|
|
4.
|
This button is available for every column. It is displayed when you click the filter row for a particular column.
When no filters have been applied to the column, the drop-down list contains every unique record in the column along with the following options.
§ Custom
You can define a sophisticated custom filter using the operator/operand information given above for features 2. and 3.
§ Blanks
You can filter the information to show only records that have blanks for this column.
§ NonBlanks
You can filter the information to show only records that have non-blanks for this column.
If you have applied filters, the drop-down list shows only records that match the filter criteria.
Select an option from the drop down list.
|
|
5.
|
This button is available for every column. It is displayed when you click the filter row for a particular column. Click the button to clear the filter criteria for the column.
|
Show or hide columns
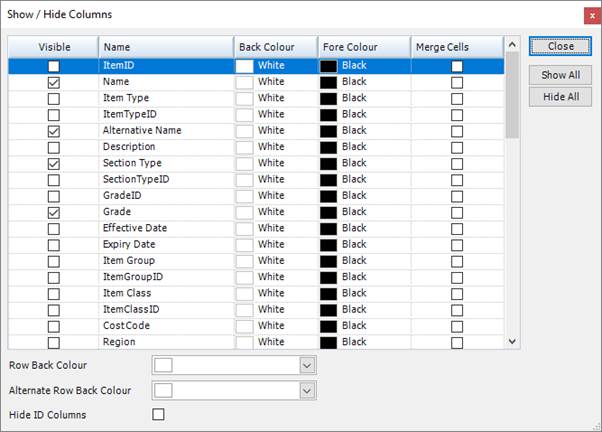
Throughout the system, the grids typically show a subset of the information that is available. When you select the Show/Hide Columns grid option, the Show/Hide Columns form is displayed. It allows you to choose the columns that you want to see in the grid and colour code them for easy viewing.
Work with records
There are many types of record in STRUMIS. For example, a customer record stores the name and contact details for a customer, and a contract record stores details of a job that you are undertaking for a customer.
Create, edit and delete records
Usually, you create, edit and delete STRUMIS records using standard methods. These are listed below. Instructions for dealing with records that deviate from the standard, are included in the relevant sections throughout this documentation.
§ Create a record
§ Find and edit an existing record
§ Delete a record
Common elements
Different types of record often have common elements. Specifically, you can:
§ Add notes to most records
This is a simple process and is described in Add notes to a record.
§ Define your own custom fields for many records
Although this is a simple process, the custom fields that you define are used for the record type rather than for an individual record. For example, if you define a custom field for a specific purchase order, it appears in all purchase order records. For this reason, adding custom fields requires careful consideration and is usually carried out by an experienced STRUMIS user, a member of your IT staff, or your STRUMIS administrator. It is described in Define custom fields for a record.
§ Attach external documents to most records
This is a simple process and is described in Attach external documents to a record.
§ View basic information for all records
This is a simple process and is described in View basic information about a record.
Create a record
There are many different types of record in the STRUMIS system and you can create most of them using the following instructions. Other methods are available; they are listed in the notes below.
1. Click a module in the sidebar menu.
The menu items for the module are listed at the top of the sidebar menu.

2. Click the type of record that you want to create.
The search form for the record type is displayed.
3. Click the New button in the top right-hand corner of the search form.
The form for the record type is displayed.
4. Fill in the necessary information and click Save.
A new record is created.
|

|
There are other ways to create a record. They are listed below:
§ If you are creating more than one record of the same type with similar details, use the Save As New button.
When you have completed and saved the first record, you can simply change the name and click Save As New to save the same details under the new name.
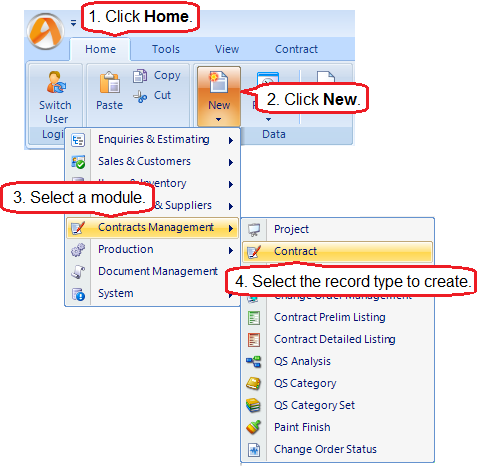
§ From the main menu:
Click Home, then New. Select a module and the type of record that you want to create.
The form for the record type is displayed and you can fill in the necessary information and click Save.
§ From the System Navigation form:
First, make sure that system navigation is switched on. To do this, in the main menu, click View, then click Display Navigation View until the button turns yellow and the System Navigation form is displayed.
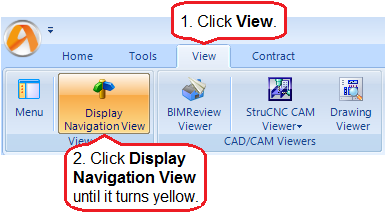
Now, when you click a module in the sidebar menu, the System Navigation form shows a flow diagram of the major steps required for the module. Some of the steps are to create new records. Click a box to create the record.

|
Find and edit an existing record
The following instructions tell you how to find and open a record for editing. If you carry out the instructions and there are still too many records to look through, apply a filter to the grid to narrow down the number of records listed. See Work with grids.
1. Click a module in the sidebar menu.
The menu items for the module are listed at the top of the sidebar menu.
2. Click the type of record for which you want to search.
The search form for the record type is displayed and all of the records of the selected type are listed.
3. Type your search criteria into the fields at the top of the form.
The example below shows the search criteria for a supplier record; you can search for the name of the supplier company. The search returns a list of suppliers with the term *co* somewhere in their name.

4. Set the Max Rows and Only Show Open Records parameters.
The maximum number of matching records is typically set to 1000. If there are more than that, you should consider narrowing your search.
As you use the STRUMIS system, you will open new records and close old ones. To limit your search to open records, select the Only Show Open Records check box.
5. Click Search.
Records matching your search criteria are listed.
6. Double-click a record in the list to edit it.
The form for the selected record is displayed.
7. Fill in the necessary information and click Save.
Your changes are saved and the form is closed.
|

|
§ If you leave the search fields blank, all records for the module are listed.
§ Click Clear to reset the search criteria.
§ Search criteria are not case sensitive.
§ You can use the following characters in the search fields:
*
Use the asterisk as a wildcard. If, for example, you wanted to show every member with a grade of –S275, type in *-S275. Every record in the module that ends with -S275 is displayed.
_
Use an underscore to represent any character; for example, _275 lists all records in the module with four characters that end with 275.
%
Use a percent sign to match any character that occurs multiple consecutive times. For example, C%per* would find both Cooper Steel Construction and Caper Fabrication Ltd.
[ ]
Use square brackets to denote a character range; for example, *U[B-C]* lists all UB codes and UC codes.
|
Add notes to a record
You can add notes to most records in the STRUMIS system. Typically, you can type free text directly into the note field, or you can add one or more predefined notes. The most common place to add notes is on a record's Notes tab. The example below shows the Notes tab for a purchase order record.

Predefined notes
To access predefined notes
Click the Predefined Notes button. (If you are adding a predefined note somewhere other than on a Notes tab, this button may have an alternative label, but its purpose will be obvious.)
The Predefined Notes form is displayed.

To define a note
On the Predefined Notes form:
1. Click the New button.
The New Note form is displayed.

2. Specify a name for the new note and click OK.
The name is added to the list on the Predefined Notes form.
3. Select the name in the list and type the note text into the Preview/Edit Notes area.
4. Click Save.
To add a predefined note to a record
On the Predefined Notes form:
1. Select a note from the list.
If you want to append the note to other that are already present on the Notes tab (or other location), clear the Replace existing notes check box.
If you want to use the selected note to replace other notes that exist on the Notes tab (or other location), select the Replace existing note check box.
2. Click Add.
The note is added
3. When you have added the required notes, click Close.
Define custom fields for a record
The data fields in STRUMIS cover most aspects of steel fabrication, but there may be instances when you need to collect data and there is no suitable field in which to store it within the STRUMIS system. You can define custom fields to accommodate such cases. Although this is a simple process, the custom fields that you define are used for the record type rather than for an individual record. For example, if you define a custom field for a specific purchase order, it appears in all purchase order records. For this reason, adding custom fields requires careful consideration and is usually carried out by an experienced STRUMIS user, a member of your IT staff, or your STRUMIS administrator.
Use the following instructions to define custom fields:
1. Create or open a record.
See Create a record or Find and edit an existing record.
2. Click the Custom Fields tab.
It looks like this:

Any previously defined custom fields are listed here.
3. Click the Define... button.
The User Field Define form is displayed.

4. Scroll down the list and you will see that you can define up to 22 text fields, 8 numeric fields, 6 data fields and 4 check box fields.
5. In the Field Name column, next to the type of field that you want to define, type in a field name. Select the Active check box to make your new custom field live, and select the Mandatory check box if you want to force users to populate the field.
6. When you have added the custom fields that you need, click OK.
The custom fields are listed on the Custom Fields tab for all records of this type.
Attach external documents to a record
Use the following instructions to attach external documents to a STRUMIS record:
1. Create or open a record.
See Create a record or Find and edit an existing record.
2. Click the Attachments tab.
It looks like this:
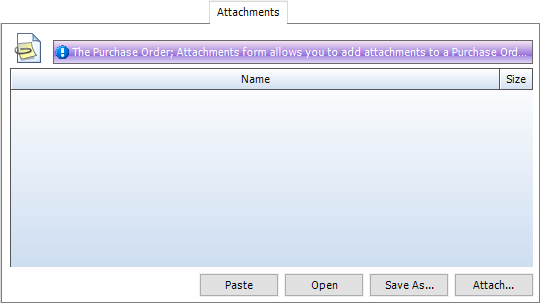
3. Click the Attach button and browse for the external document.
The document that you select is attached to the record and listed in the grid.
|

|
§ You can attach a document to a record using standard copy and paste utilities.
Copy a document in File Explorer, then click the Paste button here on the Attachments tab.
§ You can open an attached document.
Select the document in the grid and click the Open button.
§ You can save an attached document to a location in File Explorer.
Select the document in the grid, click the Save As... button, and browse for the location.
|
View basic information about a record
Use the following instructions to view basic information for a record.
1. Create or open a record.
See Create a record or Find and edit an existing record.
2. Click the Information tab.
It looks like this:

More information is available for some record types.
Delete a record
The following instructions tell you how to delete a record.
1. Search for the record.
See Find and edit an existing record if you need help with this.
2. On the Search form, select the record that you want to delete.
3. Press the Delete key on your keyboard.
You are prompted to confirm the deletion.
4. Click Yes to delete the record.
|

|
This operation deletes the record from the database. You cannot undo it.
|
|
|
You cannot delete a record if it used elsewhere in the system.
|
Work with reports
STRUMIS reports are categorised as follows:
§ Standard reports
These are supplied with the system.
Please refer to the online help system for a list of standard STRUMIS reports.
§ User-defined reports
These are reports that you create specifically for use in your business. Please contact STRUMIS Support for further information.
§ Batch reports
There are many places in STRUMIS where you can print a report. The most commonly used are:
§ From the sidebar menu
Each module has a reports section, which you can access from the sidebar menu. For example:
To access reports that are related to the inventory, go to Items & Inventory > Items & Inventory Reports.
To access reports that are related to purchase orders, go to Purchasing & Suppliers > Purchasing & Suppliers Reports.
You can print reports here (select a report and click the Run button) and you can add reports to a list of favourites that you access from the Contract Ribbon.
§ From the Contract Ribbon
There are two reporting options on the Contract Ribbon. The first, Contract Reports, allows you to view and print reports that contain information related to the default contract. The second, My Contract Reports, allows you to view and print your favourite reports.
§ From an Actions button
Actions buttons are available on many forms throughout the system. A Print or Report option allows you to print reports related to the form.
The following sections tell you how to add reports to your list of favourites, and how to print a report.
Add a report to your list of favourites
The following instructions use item and inventory reports as an example, but they apply to all reports.
1. From the sidebar menu, go to Items & Inventory > Items & Inventory Reports.
The Items & Inventory Reports - Details form is displayed.
2. Select a report in the list and click Actions (button) > Add To My Reports.
The selected report is added to your favourites.
You can remove reports from your favourites in a similar way by using the Remove From My Reports option.
To access your favourite reports, click the My Contract Reports button on the Contract Ribbon.
Print a report
When you print a report using one of the methods mentioned above, the Run Report form is displayed. The fields on the form differ according to the report that you run, but here is an example for a Purchase Order Report.
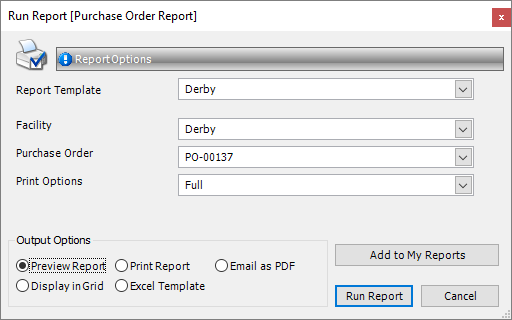
Specify the information for the report and select an output option.
|
Output option
|
Description
|
|
Preview Report
|
Displays the report on the screen. See Preview_a_report, below.
|
|
Print Report
|
Automatically sends the report to the printer without preview.
|
|
Email As PDF
|
Opens your default email system and attaches the report as a PDF file.
|
|
Display In Grid
|
Sends the information in the report to a grid on a new tab. You can customise the grid (see Work with grids) and export the information to Microsoft Excel. The grid report layouts are saved so that you can run the same report at a later date.
|
|
Excel Template
|
|
Now, click the Run Report button.
Preview a report
If you elect to preview a report, the Report Preview form is displayed. It shows the report and gives you the following options:
|
Option
|
Description
|
|

|
Refresh
Refreshes the preview after you make changes to the data contained in the report.
|
|

|
Email
Opens you default email system (for example, Microsoft Outlook), attaches the report, and allows you to enter a recipient and a message before sending.
|
|

|
Add To/Remove From My Reports
|
|

|
Print
Prints the report to your default printer.
|
|

|
Copy
Copies the report to the clipboard. You can then paste the report into a third-party software package such as Microsoft Excel.
|
|

|
Single Page View
|
|

|
Multiple Page View
When you click this button, you can select the number of pages of the report that you want to display on the preview form.
|
|

|
Continuous scroll
This is a toggle that allows you to either scroll up and down a single page, or to scroll continuously through the document.
|
|

|
Zoom
The zoom controls allow you to zoom in and out, or to type in the zoom level that you require.
|
|

|
Page scroll
Use these controls to go to the next page, previous page, or to type in the page that you want to view.
|
|


|
Backward and Forward
You may have viewed page 1 of the report, then page 6, then page 10. These buttons allow you to step back and forth between the pages that you have viewed.
|
|

|
Annotation
You can annotate a report. Use the following instructions:
3. Click the Annotation icon
A menu is displayed.
4. Click-and-drag a shape from the menu onto the report.
5. Right-click the shape.
You have the option to view the properties of the shape, or to delete it.
6. Select Properties.
The Annotation Properties form is displayed.
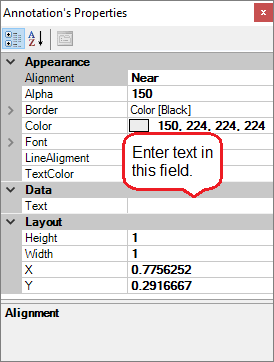
7. Edit the shape properties as required. For the text, arrow, balloon and line annotations, you can enter notes in the Text field.
8. Close the form.
|
|
|
Use this button to export the report to one of the following formats:
Excel
PDF (Acrobat)
HTML (Web Page)
RTF (Word)
Tiff (Image)
Text (CSV)
Text (Tab)
Email As PDF
|
What's next?
Now that you have logged in and had a first look around STRUMIS, you can begin to add data. Creating a customer is a good place to start.
Chapter 2
What's in this chapter?
About customers
Create a customer record
Import customer records
Customer reports
Find and edit a customer record
Customer reports
What's next?
Fields and buttons
About customers
When a potential customer contacts you for information such as a quote or a detailed estimate, you can record their name and contact details in STRUMIS. These details can be amended at any time and are used for any future dealings with the customer. You can choose to record one customer at a time, or you can import customer details from Microsoft Outlook or a csv file by using the Setup Wizard.
Access
To access customer records, from the sidebar menu, go to Sales & Customers > Customer.
When you create or edit a customer record, you will use the Customer form.
Create a customer record
The following instructions tell you how to create a customer record.
1. Go to Sales & Customers > Customer.
A list of customers is displayed.
2. Click New.
The Customer form is displayed.

It has the following tabs:
§ Details
Specify basic information for the customer. This includes their company name, type and payment terms.
See Customer - Details for a full list of the fields and buttons on this tab.
§ Addresses/Contacts
Specify one or more contacts and addresses for the customer.
See Customer - Addresses for a full list of the fields and buttons on this tab.
§ Custom Fields
If you need to collect data that is relevant to this type of record, but there are no appropriate fields, use this form to define your own custom fields.
See Define custom fields for a record for a full list of the fields and buttons on this tab.
§ Attachments
Use this form to attach external documents to a STRUMIS record.
See Attach external documents to a record for a full list of the fields and buttons on this tab.
§ Information
Use this form to view the creation date of the record, the date when it was last updated, and the users who made the changes.
See View basic information about a record for a full list of the fields and buttons on this tab.
3. Add basic customer information in the Details tab.
4. Add one or more addresses (for example a delivery address and a billing address) and contacts in the Addresses/Contacts tab.
To add addresses and contacts:
a. Type into the fields Address Type, Line 1, Line 2 and so on. When you begin to type, a plus sign (+) is displayed at the beginning of the address line (circled in red below).

b. Click the + to display the contact information fields.

c. Type in your contact information.
Press F1 if you need help.
d. To add multiple contacts for this address, click the button circled in red below.

e. Click the Default Contact check box to indicate the default contact.
5. Click Save.
|

|
If you are creating multiple customer records, use the Save As New button When you have completed and saved the first set of customer details, you can simply change the customer name and click Save As New to save the same details under the new customer name.
|
Import customer records
You can import customer records into STRUMIS. To do this, use the Setup Wizard (go to System > Setup Wizard), which leads you through the process.
Customer reports
You can access reports from the sidebar menu. Go to Sales & Customers > Sales & Customers Reports.
See also:
Work with reports
List of reports
Find and edit a customer record
1. Open the Search form from the sidebar menu.
To do this, go to Sales & Customers > Customer.
2. Enter search criteria and click the Search button.
Records that match your search criteria are listed.
3. Double-click a record to edit it.
For complete information, see Find and edit an existing record.
Customer reports
You can access reports from the sidebar menu. Go to Sales & Customers > Sales & Customers Reports.
See also:
Work with reports
List of reports
What's next?
When you have set up a customer record, you can move on to create a quote (enquiry) or an estimate for the customer.
See About Enquiries and About estimates
If you have already won the order, you can go on to create a contract for your new customer.
See About contracts
Fields and buttons
Customer - Details
Use this form to enter basic customer details.
Fields
|
Field
|
Description
|
|
Customer ID
|
Populated automatically from the fields below.
|
|
Name
|
Type in or edit the name of the customer.
|
|
Customer Type
|
Do one of the following:
§ Select a customer type (for example, architect or engineer) from the drop-down list.
§ Add and select a new customer type in the look-up dialog, which you can access by clicking the ellipsis (...).
|
|
Currency
|
Select a currency from the drop-down list. This is the currency that your customer uses for business transactions.
|
|
External Reference
|
This is a free text field where you can store an extra reference number for your customer, for example, their reference number from your accounting system.
|
|
Default Payment Terms
|
Select payment terms from the drop-down list. A typical example is Net 90, which means that payment is required 90 days after the invoice date.
|
|
Default Tax Code
|
Choose a tax code from the drop-down list. For example, if your customer is based in the USA, tax codes can be associated with a state sales tax, which is automatically added to the invoice. In the UK, you can use this field to add VAT to the invoice.
|
Customer - Addresses
Use this form to add contacts and addresses for a customer.
Address fields
|
Field
|
Description
|
|
Address ID
|
System generated
|
|
Version
|
System generated
|
|
AddressSourceTypeID
|
System generated
|
|
SourceKey
|
System generated
|
|
Address Type
|
Specify the type of address, for example, the head office or billing address.
|
|
Lines 1, 2, 3 and 4
ZIP/Postal Code
Country
|
Type in the address details.
|
Contact fields
|
Field
|
Description
|
|
Contact ID
|
System generated
|
|
Version
|
System generated
|
|
Name
|
System generated
|
|
AddressID
|
System generated
|
|
Default Contact
|
Select this check box to indicate the default contact for this address.
|
|
Title
First Name
Surname
Job Title
Company Telephone
Home Telephone
Cell/Mobile
Fax
|
Type in the contact details.
|
|
Email
Alternative Email
|
Type in an email address. The button at the end of the line opens a blank email where the recipient is populated with this email address.
|
Chapter 3
What's in this chapter?
About enquiries and quotations
Create an enquiry
Set up a parent enquiry
Add customer contacts
Create and print a quotation
Find and edit an enquiry
Enquiry reports
What's next?
Fields and buttons
About enquiries and quotations
When a potential customer requests a quotation, use the Enquiry module to store information about the details of the project, including contacts and key requirements. You can then create a quotation (using boiler plate text if required) and send it to the potential customer.
Access
To access enquiries and quotations, click the Enquiry button on the Contract Ribbon. Alternatively, from the sidebar menu, go to Enquiries & Estimating > Enquiry & Quotation.
When you create or edit an enquiry/quotation, you will use the Enquiry form.
Create an enquiry
The following instructions tell you how to create an enquiry.
1. Go to Enquiries & Estimating >Enquiry.
A list of enquiries is displayed.
2. Click New.
The Enquiry form is displayed.
 It has the following tabs:
§ Details
Enter basic details about the enquiry. You can specify the status of the enquiry, customer contact details, links to any associated estimates, and the type of building involved along with details of the area and weight of material required.
See Enquiry - Details for a full list of the fields and buttons on this tab.
§ Design Details/Contacts
Record contact details for the people who are involved in the project. You can also specify the type of work to be carried out and the period during which the design work is to be undertaken.
See Enquiry - Design Details/Contacts for a full list of the fields and buttons on this tab.
§ Final Details
Enter information about the project when the details have been finalised.
See Enquiry - Final Details for a full list of the fields and buttons on this tab.
§ Quotation Details
Specify the text to include the Enquiry Quotation report.
See Enquiry - Quotation Details for a full list of the fields and buttons on this tab.
§ Key Requirements
Record the key requirements for the project These include the scope of the work, materials, certifications, and administration requirements.
See Enquiry - Key Requirements for a full list of the fields and buttons on this tab.
§ Project Meetings
Add notes for up to five project meetings.
See Enquiry - Project Meetings for a full list of the fields and buttons on this tab.
§ Notes
You can add free text notes or predefined notes to this record.
See Add notes to a record for a full list of the fields and buttons on this tab.
§ Custom Fields
If you need to collect data that is relevant to this type of record, but there are no appropriate fields, use this form to define your own custom fields.
See Define custom fields for a record for a full list of the fields and buttons on this tab.
§ Attachments
Use this form to attach external documents to a STRUMIS record.
See Attach external documents to a record for a full list of the fields and buttons on this tab.
§ Information
Use this form to view the creation date of the record, the date when it was last updated, and the users who made the changes.
See View basic information about a record for a full list of the fields and buttons on this tab.
3. Fill in the required information and click Save.
Set up a parent enquiry
You can build a two-tier enquiry hierarchy where multiple child enquiries are linked to a parent enquiry. You can link an estimate to each of the child enquiries. These are listed in the parent enquiry. The following instructions tell you how to set up the hierarchy.
§ For the parent enquiry:
On the Enquiry - Details form, leave the Parent Enquiry and Link To Estimate fields blank.
§ For each child enquiry:
On the Enquiry - Details form, in the Parent Enquiry field, select the name of the parent that you set up above. In the Link To Estimate field, select an estimate that is associated with this enquiry.
When you return to the parent enquiry, the Parent Enquiry and Link To Estimate fields on the Enquiry - Details form are unavailable and the linked child enquiries and estimates are listed in the grid, as shown below.

Add customer contacts
Use the following instructions to add customer contacts to the enquiry. You can add a new contact or include one or more existing contacts.
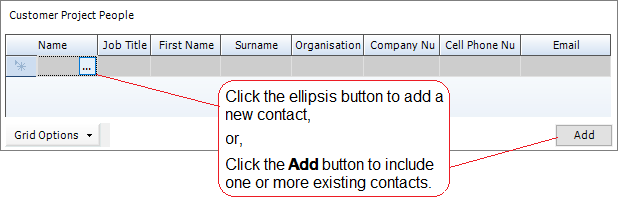
To add a new contact
1. On the Enquiry - Design Details/Contacts form, in the Customer Project People grid, click in the Name column, then click the  ellipsis button.
The Contact form is displayed.
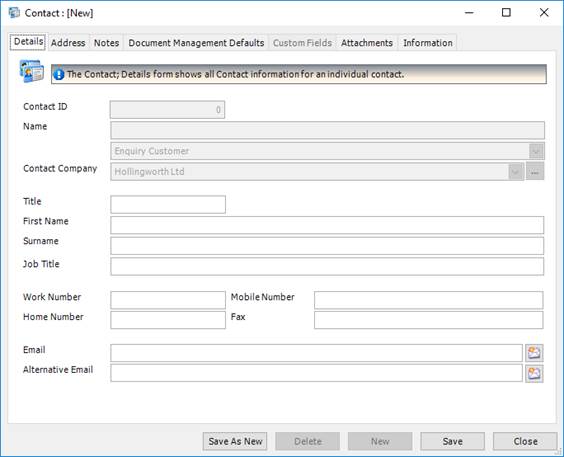
2. On the Contact - Details form, specify the person's name, job title, telephone numbers and email address and click Save.
3. On the Contact - Address form, specify the person's full address and click Save.
To include multiple existing contacts
1. On the Enquiry - Design Details/Contacts form, click the Add button.
The Contact Search form is displayed. It lists all of the contacts that have been previously defined.
2. Scroll down the list and select the contacts that you want to add to the enquiry.
To do this:
§ Press Ctrl A to select all lines, or
§ Press the Ctrl key and click several non-contiguous lines, or
§ Press the Shift key then click the first and last lines in a range.
3. Click the Add button.
The contacts are added to the Customer Project People grid on the Enquiry - Design Details/Contacts form.
Create and print a quotation
Carry out the following steps to create and print a quotation.
1. Create an enquiry.
See Create an enquiry.
2. Create an estimate.
See Create an estimate.
3. Link the estimate to the enquiry.
To do this, select an estimate in the Link to Estimate field on the Enquiry - Details form.
If you use a parent-child enquiry hierarchy, you can link multiple estimates to an enquiry. See Set up an enquiry hierarchy.
4. Complete the Enquiry - Quotation Details form.
See Enquiry Quotation - Details.
5. Print the Enquiry Quotation report.
To do this, click the Actions button on the Enquiry form, and select Print Enquiry Quotation Report.
See also:
Work with reports
List of reports
Find and edit an enquiry
1. Open the Search form from the sidebar menu.
To do this, go to Enquiries & Estimating > Enquiry & Quotation.
2. Enter search criteria and click the Search button.
Records that match your search criteria are listed.
3. Double-click a record to edit it.
For complete information, see Find and edit an existing record.
Enquiry reports
You can access reports from the sidebar menu. Go to Enquiries & Estimating > Enquiries & Estimating Reports.
See also:
Work with reports
List of reports
What's next?
If an initial enquiry leads to your company winning a contract for work, you can continue on to produce a detailed estimate.
See About estimates.
Fields and buttons
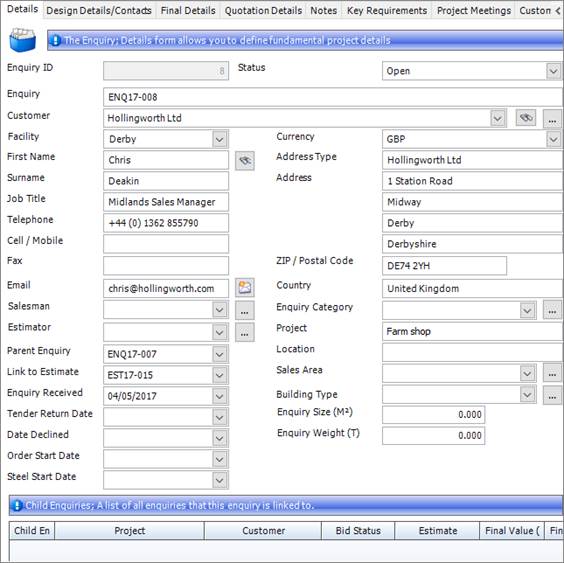
Enquiry - Details
When a customer contacts you to request a quotation, use this form to enter basic details about the enquiry. You can specify the status of the enquiry, customer contact details, links to any associated estimates, and the type of building involved along with details of the area and weight of material required.
Fields
|
Field
|
Description
|
|
Status
|
When you first create an enquiry, the status is set to Open. When the enquiry is complete, you can set it to Closed so that it no longer appears on the search form.
|
|
Enquiry
|
This field is automatically populated if the auto-naming/numbering option is turned on in Enquiries & Estimating Options; otherwise, type in a unique name for the enquiry.
|
|
Customer
|
Select a customer from the drop-down list. You can also use the  button to search for a customer or the ellipsis button to create a new customer. button to search for a customer or the ellipsis button to create a new customer.
See Create a customer record.
|
|
Facility
|
This field is populated when you select a customer. You can change it if necessary.
See About facilities.
|
|
First Name, Surname, Job Title, Telephone, Cell/Mobile, Fax, Email, Address Type, Address, ZIP/Postal Code, Country
|
These fields are populated when you select a customer. You can change them if necessary.
|
|
Salesman
|
Select the name of the sales person from the drop-down list. You can also use the ellipsis button to create a new sales person.
|
|
Estimator
|
Select the name of the estimator from the drop-down list. You can also use the ellipsis button to create a new estimator.
|
|
Parent Enquiry
|
You can build an enquiry hierarchy where several child enquiries are linked to a parent enquiry. You can link an estimate to each of the child enquiries. These are listed in the parent enquiry. For full information, see Set up an enquiry hierarchy.
|
|
Link to Estimate
|
When a customer makes an enquiry, you typically respond by creating an estimate for them. Use this field to link to an estimate that is associated with this enquiry. Alternatively, you can populate the Link to Enquiry field on the Estimate form.
You cannot link an estimate to a parent enquiry.
|
|
Enquiry Received
|
This field is automatically populated with today's date. You can change it if necessary.
|
|
Tender Return Date
|
Specify the date by which you are expected to return the tender.
|
|
Date Declined
|
Specify the date on which you declined to submit a tender.
|
|
Order Start Date
|
Specify the date by which the purchasing department should start to place orders.
|
|
Steel Start Date
|
Specify the date on which fabrication should begin so that you can meet the customer's expected delivery date.
|
|
Currency
|
This field is populated when you select a customer. You can change it if necessary.
|
|
Enquiry Category
|
Select a category from the drop-down list. You can also use the ellipsis button to create a new category, for example, Full or Design.
|
|
Project
|
Type in the name of the project for which you have been asked to tender.
|
|
Location
|
Type in the geographical location of the project, for example the town and county.
|
|
Sales Area
|
Select a sales area from the drop-down list. You can also use the ellipsis button to create a new area, for example, South East or Midlands.
|
|
Building Type
|
Select a building type from the drop-down list. You can also use the ellipsis button to create a new type, for example, Miscellaneous steelwork or Handrail and balustrade.
|
|
Enquiry Size
|
Specify the total surface area of steelwork expected for this project. This is usually indicated on the customer's enquiry documents.
|
|
Enquiry Weight
|
Specify the total weight of steelwork expected for this project. This is usually indicated on the customer's enquiry documents.
|
Grid
If this is a parent enquiry, the child enquiries are listed here.
If this is not a parent enquiry, the grid is not populated.
See Set up an enquiry hierarchy.
Actions button
|
Option
|
Description
|
|
Print Enquiry Report
|
Prints the enquiry details.
|
|
Print Enquiry/Quotation Report
|
Prints the quotation details.
|
|
Email Enquiry Report As PDF
|
This option makes a PDF version of the report, which is attached to a blank email using your default email system.
|
|
Email Enquiry/Quotation Report As PDF
|
This option makes a PDF version of the report, which is attached to a blank email using your default email system.
|
Enquiry - Design Details/Contacts
Use this form to record contact details for the people who are involved in the project. You can also specify the type of work to be carried out and the period during which the design work is to be undertaken.
Fields
|
Field
|
Description
|
|
Design Type
|
Select a design type from the drop-down list. You can also use the ellipsis button to create a new type, for example, Build Only, Design Only or Build and Design.
|
|
Project Manager, Designer, Architect, Engineer, Quantity Surveyor
|
Select the key people who will work on this project from the drop-down lists. You can also use the ellipsis button to create new contacts.
|
|
Design Start Date
Design Finish Date
|
Specify the dates on which the design work will start and finish.
|
Customer Project People Grid
Use this grid to record the customer contacts that are involved in the project. You can add existing contacts to the list or define new ones. See Add customer contacts.
Buttons
The Actions button options are the same as those on the Enquiry - Details form.
Enquiry - Final Details
Use this form to record information about the project when the details have been finalised.
Fields
|
Field
|
Description
|
|
Bid Status
|
Select a status from the drop-down list. You can also use the ellipsis button to create a status. The following default options are available:
§ Won
The bid was successful.
§ Lost
The bid was not successful.
§ Unknown
Either the bid is still being processed or you have decided not to submit a quotation. This is the default status.
|
|
Bid Date
|
Specify the date on which the quotation/bid was submitted.
|
|
Date Won
|
Specify the date on which you were notified of your successful bid.
|
|
Final Weight
|
Shows the total weight of the project as determined by the linked estimate(s).
|
|
Final Area
|
Shows the total area of the project as determined by the linked estimate(s).
|
|
Final Value
|
Shows the total value of the project as determined by the estimate(s).
|
|
Percent Return
|
Specify the percentage of the total value expected as profit.
|
Buttons
The Actions button options are the same as those on the Enquiry - Details form.
Enquiry - Quotation Details
This form allows you to specify the text to include the Enquiry Quotation report. Each of the four main fields can be included or excluded from the report using the Include in Report check boxes. You can type directly into the fields or use the Predefined Notes buttons to add standard text (see Add notes to a record).
Fields
|
Field
|
Description
|
|
Terms and Conditions
Include in Report
Predefined Notes
|
Specify the legal clauses that you want to include in the report. Please note that your terms and conditions must be approved by a legal body.
|
|
Quotation Scope
Include in Report
Predefined Notes
|
Specify the scope of the services that will be provided by your company.
|
|
Quotation Includes
Include in Report
Predefined Notes
|
Specify the details of specific items that are included in your quotation.
|
|
Quotation Excludes
Include in Report
Predefined Notes
|
Specify details of specific items that are excluded from your quotation.
|
|
Quotation Weight and Value
|
This field is automatically populated from the linked estimate(s) and can be used in the quotation by selecting the Use Final Weight for Quotation check box and the Use Final Value for Quotation check box.
If you want to round either of the figures up or down, type the amounts into the Adjusted Weight and Adjusted Value fields.
|
Buttons
The Actions button options are the same as those on the Enquiry - Details form.
Enquiry - Key Requirements
The options that are available for each of the fields on this form are user-defined in lookup windows. You can select a previously defined option from the drop-down list, or use the ellipsis button to create a new option.
General fields
|
Field
|
Description
|
|
NDA Agreement
|
If you have a non-disclosure agreement with your customer, you can link it here. Click the ellipsis button and select the document. Click the View button to open the document.
|
|
Prequalification
|
|
General Scope of Work fields
|
Field
|
Description
|
|
Design
|
Specify the level of design work that is to be undertaken. Examples are:
§ Full design
§ No design
§ Connections only
|
|
Fab
|
Specify whether the project includes fabrication. You may only need to define Yes and No options.
|
|
Prep
|
Specify whether the project includes the preparation of column bases. You may only need to define Yes and No options.
|
|
Erection
|
Specify whether you are going to erect the structure. Examples of the options that you may define are:
§ Supply only
§ Supply and erect
|
|
BIM
|
Specify whether you are supplying a model. You may only need to define Yes and No options.
|
|
Detail
|
Specify who will implement the detailing, for example, Customer or Third Party.
|
|
Paint
|
Specify the required paint finish, for example, Galvanised or Shop Paint PS2.
|
|
Freight
|
Specify whether freight costs should be considered. You may only need to define Yes and No options.
|
|
Other
|
Use these fields to specify other key requirements.
|
Materials fields
|
Field
|
Description
|
|
LEED
|
|
|
Unique Material Criteria and Inspection
|
|
|
Buy American
|
|
|
Domestic Only
|
|
Fabrication Erection fields
|
Field
|
Description
|
|
Paint Certifications
|
|
|
Erector Certification
|
|
|
Local Workforce Participation
|
|
|
Shop Certifications
|
|
|
Shop NDT
|
|
|
Inspections (by SchM/W/SBE)
|
|
|
Participation
|
|
|
Market Retention
|
|
Administration Requirements fields
|
Field
|
Description
|
|
Sales Tax
|
Specify the sales tax, if applicable. Examples are 6% or 20%VAT.
|
|
Warranty Period
|
Specify the length of time for which the work is under warranty. Examples are:
§ 6 months
§ 12 months
§ 10 years
|
|
LD's/Penalties
|
Specify whether you will pay liquidated damages to the customer in the event of a breach of contract or late delivery. You may only need to define Yes and No options, or you could specify the amounts payable to the customer after a certain time.
|
|
Bid Bond
|
Specify whether you will provide a bid bond to the customer to guarantee that you will undertake the project if selected. You may only need to define Yes and No options, or you could specify the value of the bond.
|
|
Performance Payment Bands
|
Specify whether your customer will pay you a bonus if a phase of the project is completed ahead of schedule. You may only need to define Yes and No options, or you could specify the bands and the amounts payable.
|
|
Other Taxes
|
Specify any other taxes.
|
|
Payment Terms
|
Specify the payment terms, for example, Payment In Advance or Net 90.
|
|
Retention Terms
|
Specify the monetary amount that your customer intends to retain to fix defects. Examples are:
§ 5% for 12 months
§ 1% for 6 months
|
|
Certified Payroll
|
|
|
OCIP/CCIP
|
Specify whether there is an Owner Controlled Insurance Program (OCIPs) or Contractor Controlled Insurance Program (CCIPs) in place for the project. You may only need to define Yes and No options, or you could specify the bands and the amounts payable.
|
Buttons
The Actions button options are the same as those on the Enquiry - Details form.
Enquiry - Project Meetings
Fields
There are five areas on this form, where you can note future project meetings that you have scheduled with your customer along with an agenda for the meeting. When the meeting has taken place, you can also record the minutes of the meeting here. You can type directly into the fields, or you can use predefined notes (see Add notes to a record).
Buttons
The Actions button options are the same as those on the Enquiry - Details form.
Chapter 4
What's in this chapter?
About estimates
Create an estimate
Add a subsection to the estimate
Add a steel item to the subsection
Add labour for a steel item
Add a fitting to a steel item
Add a non steel item to the subsection
Add a free line item to the subsection
Add an assembly to the subsection
Batch update take-off or BOQ lines
Move items to another subsection
Add extras
Import an estimate
Resolve unrecognised items
Find and edit an estimate
Estimate reports
What's next?
Fields and buttons
About estimates
The STRUMIS Estimating module allows you to produce cost estimates using a drawing take off or bill of quantities method.
Take off estimating is the typical way of producing a list of material requirements from drawings, which are then weighted and priced. You can include additional material allowances (by percentage or value), and allow for labour times and costs by applying material or labour extras from a customisable library.
Bill of quantity estimating is similar to take off estimating. It is prepared using a “taking off” process in which the cost of a building or other structure is estimated from measurements in the architect's drawings. These are used to create a cost estimate based on the area of walls and roofs and the numbers of doors and windows. This method combines labour and material costs into a single rate that is then adjusted with regard to material quantities.
Access
To access estimates, click the Estimate button on the Contract Ribbon. Alternatively, from the sidebar menu, go to Enquiries & Estimating > Estimate.
When you create or edit an estimate, you will use the Estimate form.
Create an estimate
The following instructions tell you how to create an estimate.
1. Go to Enquiries & Estimating >Estimate.
A list of existing estimates is displayed.
2. Click New.
The Estimate - Details form is displayed.

It has the following tabs:
§ Details
Specify basic information for the estimate. This includes a description, whether the estimate is a take off or a bill of quantities, and a list of quotes that are associated with the estimate.
See Estimate - Details for a full list of the fields and buttons on this tab.
§ Take Off or BOQ
This form is the main hub of the estimating module. It allows you to add and edit steel items, non-steel items and assemblies to the estimate. You can also add free line items, labour, fittings and extras.
See Estimate - Take Off for a full list of the fields and buttons on this tab.
§ Data
Specify paths to CAD, CAM, and BIMReview files for the estimate.
See Estimate - Data for a full list of the fields and buttons on this tab.
§ Hidden Fields
Use this form to hide some of the estimating fields that you do not use.
See Estimate - Hidden Fields for a full list of the fields and buttons on this tab.
§ Custom Fields
If you need to collect data that is relevant to this type of record, but there are no appropriate fields, use this form to define your own custom fields.
See Define custom fields for a record for a full list of the fields and buttons on this tab.
§ Attachments
Use this form to attach external documents to a STRUMIS record.
See Attach external documents to a record for a full list of the fields and buttons on this tab.
§ Information
Use this form to view the creation date of the record, the date when it was last updated, and the users who made the changes.
See View basic information about a record for a full list of the fields and buttons on this tab.
3. Enter basic details for the estimate. This includes typing in a description, specifying whether the estimate is a take off or a bill of quantities (this is important as you cannot change it after you save the estimate for the first time), and specifying whether you will be adding fittings and labour costs.
4. Click Save.
The estimate details are saved and you can continue on to add estimate items on the Take Off or BOQ form.
Add a subsection to the estimate
You can add a subsection to an estimate in several ways:
§ Add an individual subsection
§ Add a subsection set
§ Copy an existing subsection from any estimate into the current estimate
These are described in more detail in the following sections.
Add an individual subsection
Use the following instructions to add a subsection to an estimate:
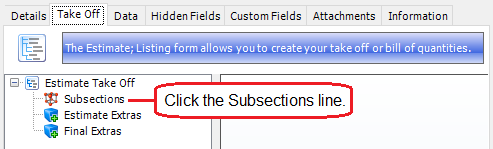
1. On the Estimate - Take Off or BOQ form (depending on the setting for the Estimate Type on the Estimate - Details form), click the Subsections line.
2. Click the Add Subsection button.
The Estimate Subsection form is displayed.
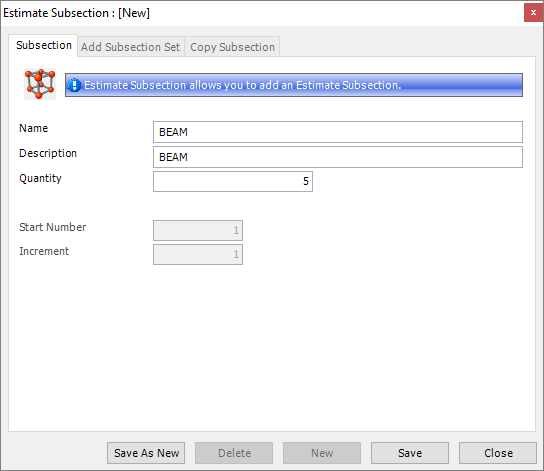
3. Give the subsection a name and description, specify the quantity that you need, and click Save.
You can now add steel items, non-steel items, free line items and assemblies to the subsection.
Add a subsection set
Use the following instructions to add a subsection set to an estimate.
See About subsection sets).
1. Click the Subsections line, as above.
2. Click the down-arrow to the right of the Add Subsection button as shown below:

3. Select Add Subsection Set.
The Estimate Subsection - Add Subsection Set form is displayed.
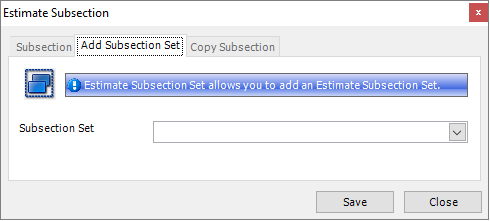
4. Select a subsection set from the drop-down list and click Save.
The subsections from the group are added to the estimate.
Copy existing subsections
Use the following instructions to copy subsections from another estimate.
1. Click the Subsections line, as above.
2. Click the down-arrow to the right of the Add Subsection button as shown below:
3. Select Copy Subsection.
The Estimate Subsection - Copy Subsection form is displayed.
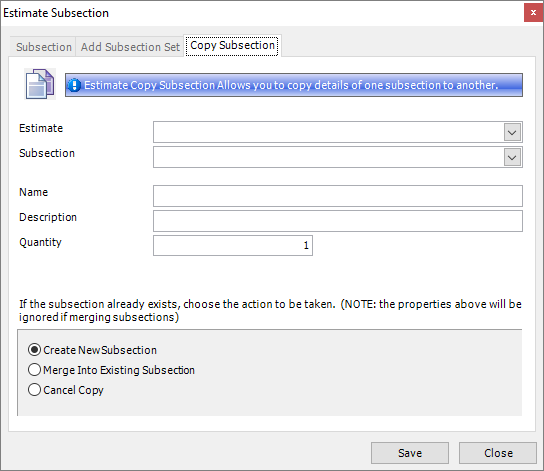
4. Select the estimate and subsection that you want to copy.
Specify a name, description and quantity for the subsection that you want to create.
Specify what you want to do in the event that the subsection already exists in the current estimate. You can create a new subsection, merge the copied subsection and the existing subsection, or cancel the copy action.
5. Click Save.
The subsection is copied to the current estimate.
Add a steel item to the subsection
Use the following instructions to add a steel item to a subsection:
1. On the Estimate - Take Off or BOQ form (depending on the setting for the Estimate Type on the Estimate - Details form), click a subsection.

2. Click the Add Steel Item button.
The Estimate Steel Item form is displayed.
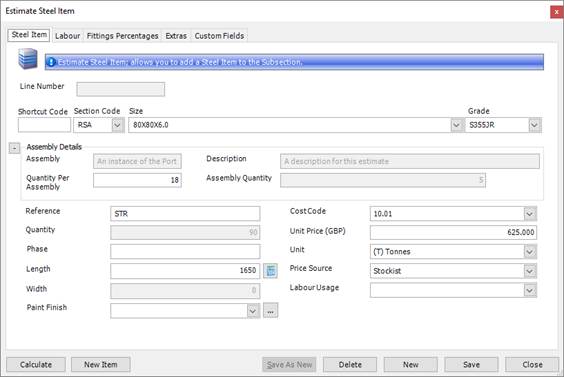
3. Use the Section Code, Size and Grade fields to specify the steel item that you want to add to the estimate.
Populate the other fields as required. See
Estimate Steel Item - Steel Item
Estimate Steel Item - Labour
Estimate Steel Item - Fittings
Estimate Steel Item - Extras
4. Click Save.
The steel item is added to the subsection.
|

|
On the Estimate - Take Off or BOQ form, you can edit steel items that have been previously added. To do this, double-click the steel item in the grid.
The Estimate Steel Item - Steel Item form is displayed.
|
Add labour for a steel item
There are two ways to apply labour to a steel item. They are:
§ Add labour on the Estimate Steel Item - Labour form
§ Add labour automatically by matching the labour usage name and the subsection name
In both cases, you must set the Apply Labour Usages field on the Estimate - Details form to Yes.
The above options are described in more detail in the following sections.
Add labour on the Estimate Steel Item - Labour form
When you add a steel item to a subsection, or when you edit a steel item that was previously added to a subsection, you use the Estimate Steel Item form. You can use the form to add labour for the steel item.
§ To add a labour usage:
Select a labour usage from the Labour Usage drop down list either on the Estimate Steel Item - Steel Item form, or here on the Estimate Steel Item - Labour form. This is the same field, simply displayed in two different places.
The processes that are associated with the labour usage are listed.
Click Calculate, then Save.
§ To add a process:
Click the down arrow in the Process column and select a process, as shown below:
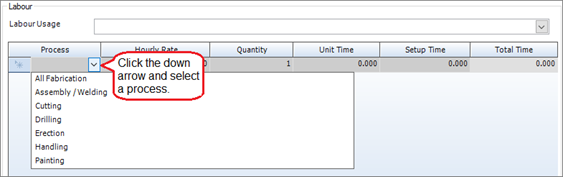
Type in an hourly rate, quantity, unit time and setup time if necessary.
Click Calculate, then Save.
§ To delete a process from the list, select the process row and press the Delete key on your keyboard.
Add labour automatically
You can automatically include labour when you add a steel item to a subsection. To do this:
1. Select the Automatically apply labour usages by matching the subsection name check box on the Estimate - Details form.
2. When you add a steel section on the Estimate - Take Off or BOQ form (depending on the option that you selected above for Estimate Type), the related labour usage is added if it exists and if the name of the labour usage is the same as the name of the subsection.
Add a fitting to a steel item
There are three ways to apply fittings to a steel item. They are:
§ Add fittings manually, on the Estimate - Take Off or BOQ form
§ Add fittings automatically, by way of a labour usage
§ Add fittings as a percentage on the Estimate - Details form
These options are described in more detail in the following sections.
To apply a fitting to a steel item manually
To apply a fitting to a steel item using this method, the Apply Fittings field on the Estimate - Details form must be set to Yes.
Use the following instructions to add a fitting to a steel item:
1. On the Estimate - Take Off or BOQ form (depending on the setting for the Estimate Type on the Estimate - Details form), expand a subsection.
2. Expand a steel item line.
3. Click the Fittings line.
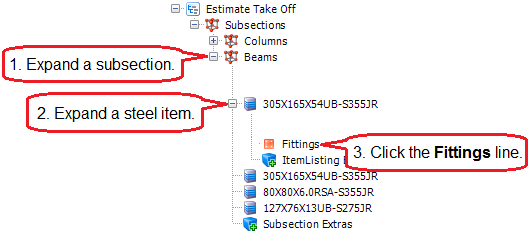
4. Click the Add Fitting button (in the bottom right corner of the form).
The Estimate Steel Item Fitting- Fitting Item form is displayed.
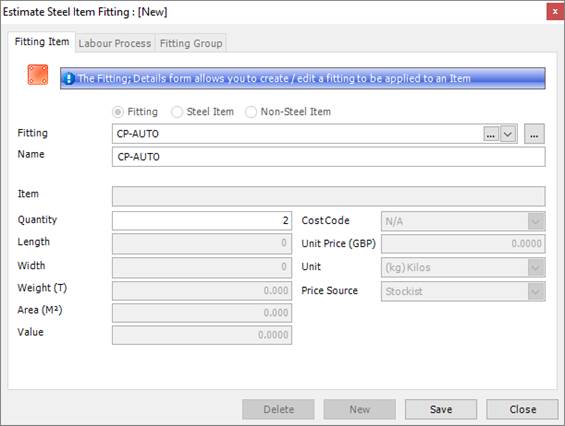
5. Select a fitting from the drop-down list, give it a name, and specify a quantity.
6. Click Save.
The fitting is added to the steel item line. The check box in the Fittings column on the Estimate - Take Off or BOQ form is selected to show that fittings have been applied to this item.
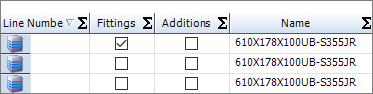
|

|
You can also add a fitting group:
1. Click the Fitting line as above, then click the down arrow to the right of the Add Fitting button.
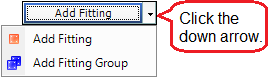
2. Select Add Fitting Group.
The Estimate Steel Item Fitting - Fitting Group form is displayed.

3. Select a fitting group from the drop-down list and specify a quantity.
4. Click Save.
The fittings from the group are added to the steel item.
|
To apply a fitting to a steel item using a labour usage
When you define a labour usage, you can specify the fittings that are required for a steel item. When you then add that steel item to an estimate, and apply a labour usage to it, the associated fittings are automatically added to the estimate.
To apply a labour usage to a steel item, you must set the Apply Labour Usages field to Yes on the Estimate - Details form.
To apply a fitting to a steel item, you must set the Apply Fittings field to Yes on the Estimate - Details form.
See About labour usage and Labour Usage Fittings.
To apply fittings to a steel item as a percentage
If you do not need to account for fittings in detail, you can use this method to add fittings to your estimate in more general way. You can specify the weight of the fitting as a percentage of the parent bar, the price of the material required, the number of hours that it will take to apply fittings, and the cost of the labour.
To begin with, on the Estimate - Details form, set the Apply Fittings fields to Use Percentages. You can now estimate the cost of fittings in the following places:
§ On the Enquiries & Estimating Options form
Set up default values that are used by every estimate. The values can be edited on an estimate-by-estimate basis.
§ On the Estimate - Details form
When you specify values here, they are applied to all of the steel item lines that you add to a take off or BOQ subsection.
§ On the Labour Usage - Fitting Percentages form
When you define a labour usage, you can specify fitting percentage values for a steel item. When you then add that steel item to an estimate, and apply the labour usage to it, the associated fitting values are automatically added to the estimate.
See Labour Usage Fitting Perc.
§ On the Estimate Steel Item - Fittings Percentages form
To access this form, double-click a steel item in the Take Off or BOQ grid. You can then amend the fitting information specifically for the steel item.
On each of these forms, the following fields are available:
|
Field
|
Description
|
|
Fittings Weight
|
Specify the weight of the fitting as a percentage of the parent bar, for example the required fittings may be an additional 10% of the parent bar.
|
|
Rate Per <weight unit>
|
Specify the price of the material required for the fitting, for example, GBP 250.00 per tonne.
|
|
Hours Per <weight unit>
|
Specify the number of hours required to add the fitting(s), for example, GBP 2hrs per tonne.
|
|
Fabrication Rate Per Hour
|
Specify the cost of fabrication per hour.
This field is not available on the Labour Usage - Fitting Percentages form or the Estimate Steel Item - Fittings Percentages form. The value from the Estimate - Details form is used.
|
When you click the Calculate button in an estimate, the following values are calculated:
Fitting Weight = (Fittings Weight % / 100) x Member Weight
Fitting Value = Fitting Weight x Rate Per (<weight unit>)
Fitting Labour Hours = Fitting Weight x Hours Per (<weight unit>)
Fitting Labour Value = Fitting Labor Hours x Fabrication Rate Per Hour
They are included on the Estimate report. You can also view them in the Take Off or BOQ grid when you select a subsection (you need to select the fixings options on the Show/Hide Columns form).
Add a non steel item to the subsection
Use the following instructions to add a non-steel item to a subsection:
1. On the Estimate - Take Off or BOQ form (depending on the setting for the Estimate Type on the Estimate - Details form), click a subsection.
2. Click the down-arrow to the right of the Add Steel Item button as shown below:
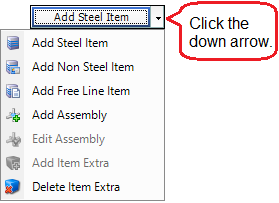
3. Select Add Non Steel Item.
The Estimate Non Steel Item form is displayed.
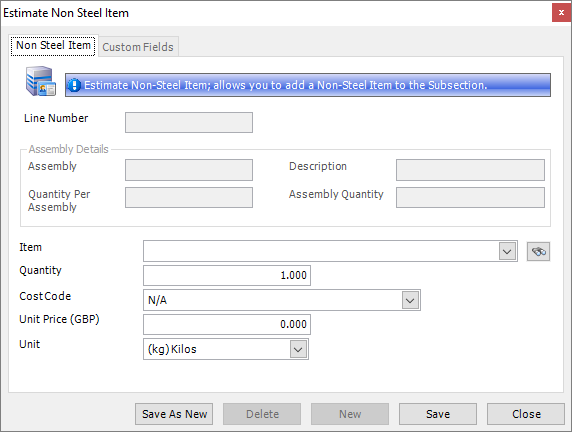
4. Complete the fields using the information in the following table:
|
Field
|
Description
|
|
Line Number
|
The presence and usage of this field depends on the setting that you specified for the Apply Line Number field on the Estimate - Details form.
In brief, if enabled, it allows you to cross-reference items on a drawing with items that you add to the estimate.
|
|
Assembly
|
|
|
Description
|
|
|
Quantity Per Assembly
|
|
|
Assembly Quantity
|
|
|
Item
|
From the drop-down list, select the non-steel item that you want to add to the subsection.
|
|
Quantity
|
Specify the quantity of the non-steel item to add to the estimate.
|
|
Cost Code
|
Select a cost code from the drop-down list.
See About cost codes and cost centres.
|
|
Unit Price
Unit
|
When you select a non-steel item, the unit price and price unit fields are automatically populated with information from the item library. You can edit these fields if necessary.
|
5. Click Save.
The non-steel item is added to the estimate.
Add a free line item to the subsection
Use the following instructions to add a free line item to a subsection:
1. On the Estimate - Take Off or BOQ form (depending on the setting for the Estimate Type on the Estimate - Details form), click a subsection.
2. Click the down-arrow to the right of the Add Steel Item button as shown below:
3. Select Add Free Line Item.
The Estimate Free Line Item form is displayed.
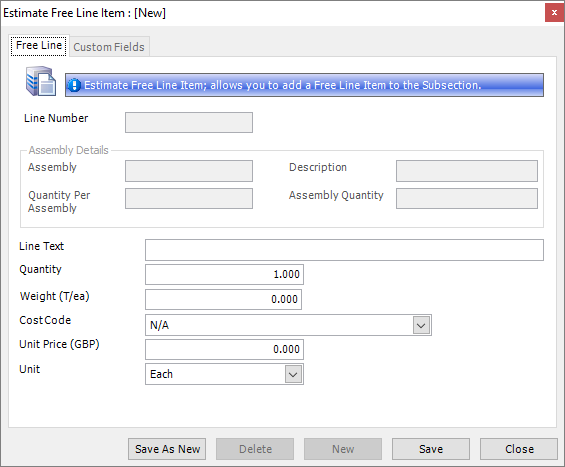
4. Complete the fields using the information in the following table:
|
Field
|
Description
|
|
Line Number
|
The presence and usage of this field depends on the setting that you specified for the Apply Line Number field on the Estimate - Details form.
In brief, it allows you to cross-reference items on a drawing with items that you add to the estimate.
|
|
Assembly
|
|
|
Description
|
|
|
Quantity Per Assembly
|
|
|
Assembly Quantity
|
|
|
Line Text
|
Type in text to describe the free line item that you want to add to the estimate.
|
|
Quantity
|
Specify the quantity of the free line item to add to the estimate.
|
|
Weight
|
If there is a weight associated with the free line item, specify it here.
|
|
Cost Code
|
Select a cost code from the drop-down list.
See About cost codes and cost centres.
|
|
Unit Price
Unit
|
Specify a price and unit for the free-line item.
|
5. Click Save.
The free line item is added to the estimate.
Add an assembly to the subsection
See About estimate assemblies.
Use the following instructions to add an assembly to a subsection:
1. On the Estimate - Take Off or BOQ form (depending on the setting for the Estimate Type on the Estimate - Details form), click a subsection.
2. Click the down-arrow to the right of the Add Steel Item button as shown below:
3. Select Add Assembly.
The Add Estimate Assembly form is displayed.

4. Select an assembly from the drop-down list.
Enter an assembly name and description for the instance of the assembly that is to be added to the estimate.
Specify the number of assemblies that you want to add to the estimate.
5. Click OK.
The assembly is added to the estimate.
|

|
§ You can create an assembly on the Add Estimate Assembly form. To do this, click the New button. The Estimate Assembly form is displayed. See Create an estimate assembly.
§ When you have added an assembly, you can edit the assembly name, description and quantity. To do this, use the Edit Assembly menu option (see the instructions above). The Edit Estimate Assembly form is displayed.
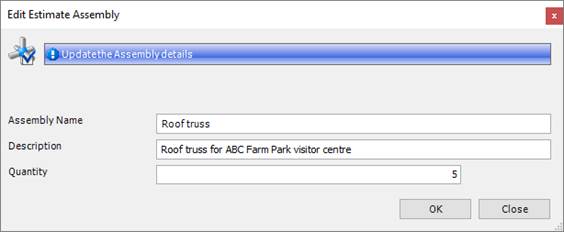
Make the required amendments and click OK.
|
Batch update take-off or BOQ lines
Use the following instructions to batch update steel items, non-steel items, and free line items.
1. On the Estimate - Take Off or BOQ form (depending on the setting for the Estimate Type on the Estimate - Details form), click a subsection.
The items associated with the subsection are listed in the grid.
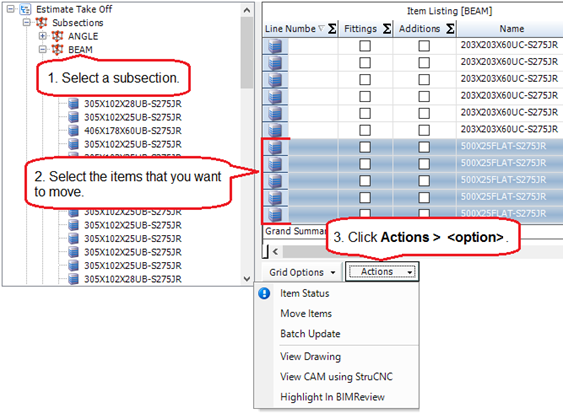
2. In the grid, select the items that you want to update.
To do this:
§ Press Ctrl A to select all lines, or
§ Press the Ctrl key and click several non-contiguous lines, or
§ Press the Shift key then click the first and last lines in a range.
3. Click Actions > Batch Update.
The Update Take Off Lines form is displayed. The fields on this form depend on the type of items you selected in the grid. See below.
4. Complete the form.
In all cases, the Only Selected Rows check box is selected by default. Clear the check box if you want to update all of the lines in the grid.
5. Click Batch Update.
The selected lines are updated.
Batch update steel items
If the selected rows are steel items, you can update details about the steel item, the labour that is associated with the steel item, and the fittings that are associated with the steel item.
To update the steel item details, use the Update Take Off (or BOQ) Lines - Steel Item form.
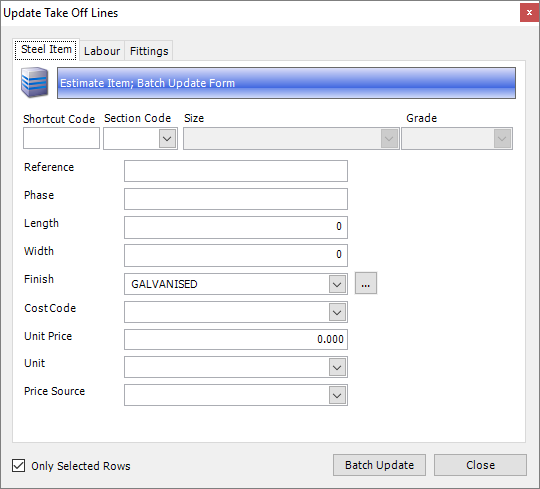
You can change the section code, size and grade of the steel item and you can update the reference, phase, length, width, finish, cost code, unit price, unit and print source.
To update the labour associated with the steel item, use the Update Take Off (or BOQ) Lines - Labour form.
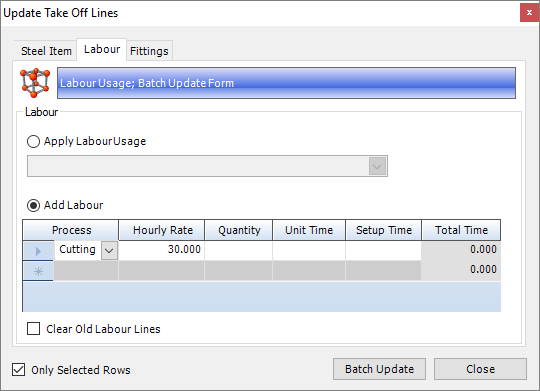
You can apply a labour usage to all of the selected steel item rows, or you can add processes one-by-one.
To update the labour associated with the steel item, use the Update Take Off (or BOQ) Lines - Fittings form.

You can add fittings and fitting groups to each of the selected steel item rows.
Batch update non-steel items
If the selected rows are non-steel items, the following form is displayed when you batch update.
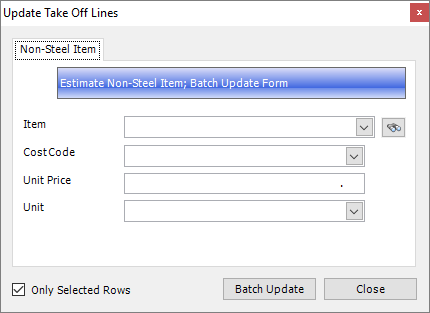
You can change the non-steel item, and you can update the cost code, unit price, and unit.
Batch update free line items
If the selected rows are free line items, the following form is displayed when you batch update.
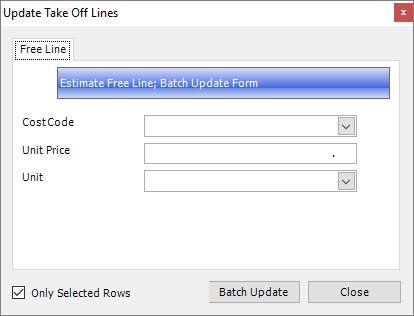
You can update the cost code, unit price and unit.
Move items to another subsection
Use the following instructions to move steel items, non-steel items and free line items from one subsection to another.
1. On the Estimate - Take Off or BOQ form (depending on the setting for the Estimate Type on the Estimate - Details form), click a subsection.
The items associated with the subsection are listed in the grid.

2. In the grid, select the items that you want to move.
3. Click Actions > Move Items.
The Move Items form is displayed.

4. Select the destination subsection and click OK.
The items are moved to the selected subsection.
Add extras
You can add extras at the following levels in an estimate:
§ Item extras
§ Subsection extras
§ Estimate extras
§ Final extras
These are shown in the following illustration:
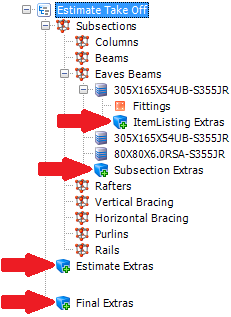
In all cases, you can add an individual extra or a predefined group of extras. In addition, for a subsection, you can copy other subsection extras, and for a steel item, you can specify item extra rates based on material costs (see Add item extra rates).
Add an individual extra
Use the following instructions to add an individual extra at any of the levels shown in the illustration above.
1. Select the Extra line.
This is the line that is preceded by the  icon.
icon.
2. Click the Add <level> Extra button.
The Extra - Extra Item form is displayed.

3. Select an extra from the drop-down list and specify the amount that you want to add. The name of the field where you specify the amount changes depending on the calculation type that is specified for the extra; in the illustration above, it is the Quantity field, but it might be a number of days or a percentage, for example. You can use item extra rates to vary the rate that is used depending on the steel item. See Use item extra rates.
The other fields on this form are populated according to the extra that you select. You can amend the information if necessary.
4. Click Save.
The extra is added to the estimate. The check box in the Additions column on the Estimate - Take Off or BOQ form is selected to show that extras have been applied to this item.

Add a predefined group of extras
Use the following instructions to add a predefined group of extras at any level.
1. Click the Extra line, then click the down arrow to the right of the Add <level> Extra button, as shown below.

2. Select Add Extra Group.
The Estimate Steel Item Fitting - Fitting Group form is displayed.
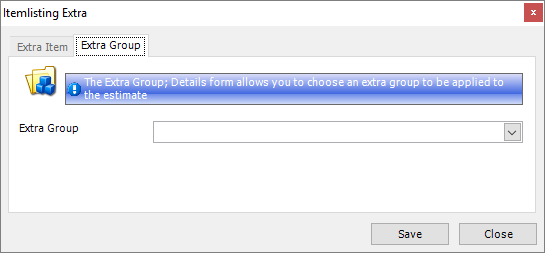
3. Select an extra group from the drop-down list.
4. Click Save.
The extras from the group are added to the estimate.
Add extras to multiple steel items
Use the following instructions to add extras to multiple steel items. You can use item extra rates to vary the rate that is used depending on the steel item. See Use item extra rates.
On the Estimate - Take Off or BOQ form:
1. Select a subsection that contains several steel items.
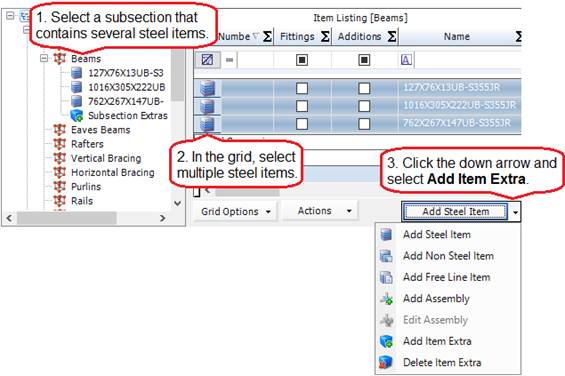
2. In the grid, select the steel items to which you want to apply the extra.
3. Click the down arrow to the right of the Add Steel Item button and select Add Item Extra.
The Extra - Extra Item form is displayed.
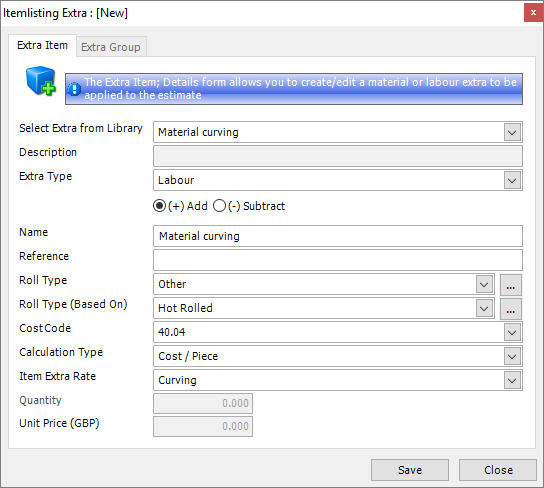
4. Select an extra from the drop-down list.
The advantage of applying extras to multiple items in this way is realised if you use item extra rates to vary the rate that is used according to the steel item, as shown in the illustration above. If you do not use item extra rates, then specify an amount (this may be a quantity, percentage and so on). The other fields on this form are populated according to the extra that you select. You can amend the information if necessary.
5. Click Save.
The extra is applied to the selected steel items and the Additions column in the Take Off or BOQ grid is selected to show that extras have been added. You can double-click a row to view and amend the rates on the Estimate Steel Item form.
Copy subsection extras
1. Click the Subsection Extras line.
2. Click the down-arrow to the right of the Add Subsection Extra button as shown below:
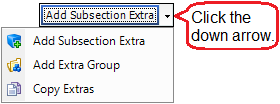
3. Select Copy Extras.
The Copy Extras form is displayed.
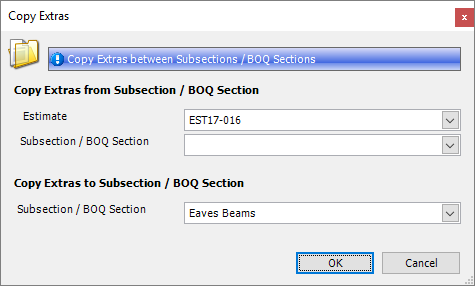
4. Select the estimate and subsection that you want to copy extras from and to.
5. Click OK.
The extras are copied.
Import an estimate
Instead of carrying out a manual take off from architect drawings into STRUMIS, you can use the Import Estimate Wizard to import a material list into an estimate record. The material list is typically generated using third party software such as StruCad, Tekla, ProSteel and so on. It can be a CAD generated report, a coma separated .csv file or a tab separated .txt file. The Import Estimate Wizard creates either a take off or BOQ estimate with the material requirements from the list.
You can access the wizard in one of the following ways:
§ Go to Enquiries & Estimating > Import Estimate
§ Create or open an estimate, then click Actions > Import Estimate
Screen 1: Import Estimate Wizard - Welcome to the Import Estimate Wizard

This is simply a welcome screen and you can click Next immediately to continue to the next screen.
Screen 2: Import Estimate Wizard - Select new estimate details

Fields
|
Field
|
Description
|
|
Estimate Name
|
Enter a unique name for the estimate. This field is auto-populated if the Auto Estimate Name option is turned on in the Enquiries & Estimating Options.
|
|
Description
|
This is a free text field. Use it to add a little more information about your estimate.
|
|
Labour Usage
|
Specify whether you want to apply labour usages.
If you select Yes, during the import process, STRUMIS attempts to automatically apply a labour usage. Each time a steel item is added to a subsection in the estimate, STRUMIS looks at the names of the labour usage records to see if there is one that exactly matches the subsection name. If there is, the labour is applied; otherwise you can select labour usage manually later in the wizard, on the Item Listing screen.
See About labour usages.
|
|
Fittings Mode
|
See About fittings.
§ The options are:Yes
Allows you to add fittings to the estimate.
See Add a fitting to a steel item.
§ No
No fittings are added to the estimate.
§ Use Percentages
You can define fittings as a percentage weight of the parent bar.
See Add a fitting to a steel item.
Fittings defined in this way are applied to every steel item in the estimate take off or BOQ.
|
|
Facility
|
Select a facility from the drop-down list.
|
|
Template Estimate
|
If you have an existing estimate that you want to use as a template, select it from the drop-down list. Subsections and extras from the template are added to the new estimate.
|
When you have specified the relevant information, click Next to continue to the next screen.
Screen 3: Import Estimate Wizard - Select File
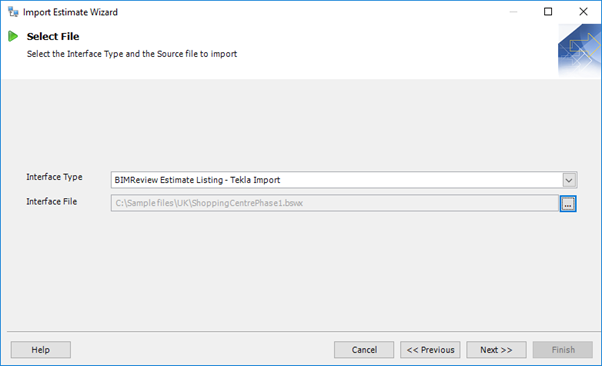
Fields
|
Field
|
Description
|
|
Interface Type
|
Select an interface type from the drop-down list. This is the type of material listing file that is produced by the third party software.
|
|
Interface File
|
Select the material listing file that you want to import.
|
When you have specified the relevant information, click Next to continue to the next screen.
Screen 4: Import Estimate Wizard - Item Listing
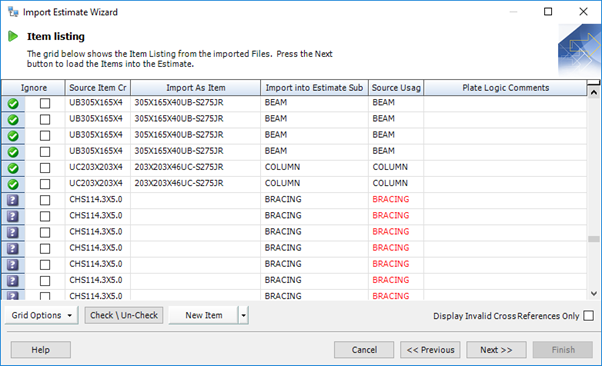
This screen lists items from the import file.
Every line is preceded by an icon to indicate the items that have a match in the item library and those that are unrecognised by STRUMIS and need further definition.
|
Icon
|
Description
|
|

|
These items are recognised by STRUMIS. This means that the system can match the item in the import file with an item in the STRUMIS Item Library.
|
|

|
These items are not recognised by STRUMIS. For full information, see Resolve unrecognised items.
|
The Source Usage column tells you whether labour usages were successfully applied for each item. If the source usage is black, labour is applied. If the source usage is red, no labour usage is applied. This is because the name of the labour usage record and the name of the subsection to which the steel item is added, do not match. You can click in the relevant cell in the grid and select a labour usage from the drop-down list.
When you have specified the relevant information, click Next to continue to the next screen.
Screen 5: Import Estimate Wizard - Create Estimate
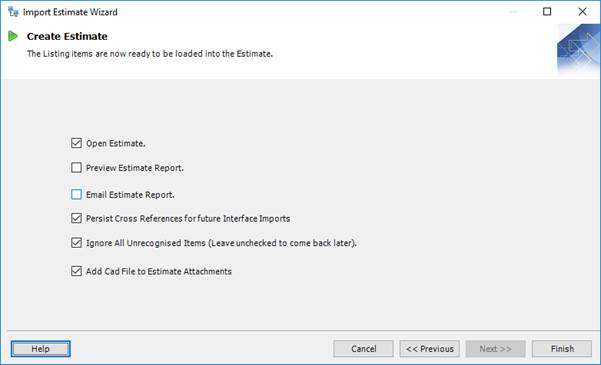
Fields
|
Field
|
Description
|
|
Open Estimate
|
Select this check box if you want to open the estimate when the wizard has finished.
|
|
Preview Estimate Report
|
Select this check box if you want to run the Estimate report when the wizard has finished.
|
|
Email Estimate Report
|
Select this check box if you want to open an email with the Estimate report attached as a .PDF file when the wizard has finished.
|
|
Persist Cross References for future Interface Imports
|
Select this check box if you want STRUMIS to remember the mappings that you put in place for unrecognised items. It does this by adding a cross reference on the Item form.
|
|
Ignore All Unrecognised Items
|
Select this check box if you want to exclude unrecognised items from the estimate.
|
|
Add CAD File to Estimate Attachments
|
Select this check box if you want to save the imported file as an attachment to the Estimate - Attachments form.
|
When you have specified the relevant information, click Finish.
The material list is imported into the estimate.
Resolve unrecognised items
The Import Estimate Wizard - Item Listing screen, lists items from the import file. Those that are not recognised by STRUMIS are preceded by a icon. This means that the system cannot match the item from the import file with an item in the STRUMIS item library. Here are some examples of when this might happen:
§ In your STRUMIS item library, there is a section called:
UB406X178X54
In the CAD import file, the same section is called:
UB406*178*54
The Import Estimate Wizard does not recognise the section name from the CAD file because a * character has been used to separate the dimensions instead of X. This is the most common reason for unrecognised items.
§ In STRUMIS, you have defined a steel grade:
S275JR
In the CAD import file, the grade is:
S_275JR
The Import Estimate Wizard does not recognise the grade from the CAD file because it contains an _ character.
There are several ways to remedy the situation; they are described in the following sections:
Map the unrecognised item manually
Use the Item Picker to manually map the unrecognised item to an item in the item library. Take a look at the illustration below:
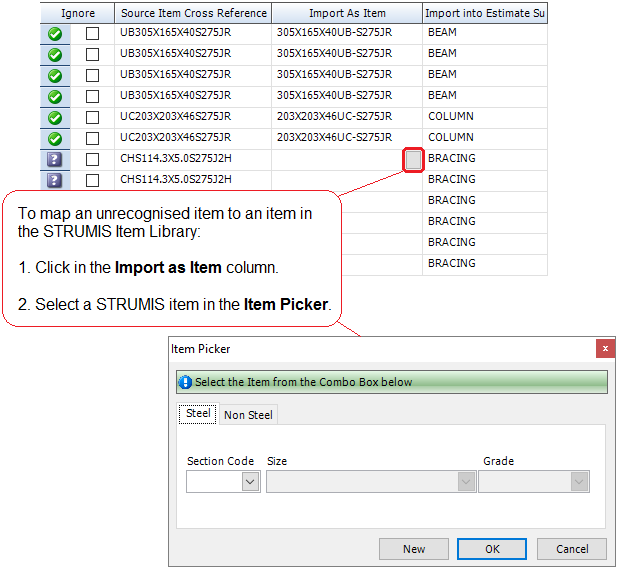
On the final wizard screen, you have an option, Persist cross references, which allows you to retain the mappings for future imports.
Ignore the unrecognised item
You can choose to ignore the unrecognised item, which means that it is not imported into the estimate. To do this, select the check box in the Ignore column. You can use the Check/Uncheck button to select or clear the check box in multiple highlighted rows as shown in the illustration below:
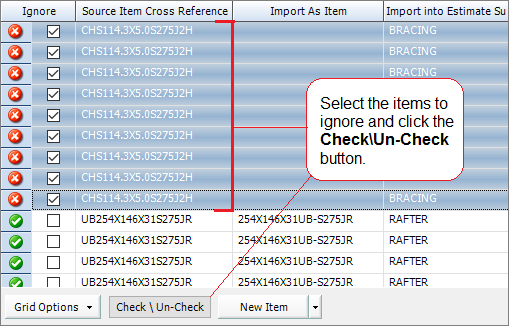
When you complete the import, go to the item library and define the steel or non-steel item. You can then re-import the CAD file.
Update the item library
To update the item library:
§ You can click the New Item button to access the item library from within the Import Estimate Wizard. Define the steel or non-steel item and close the item library. The item is now recognised by STRUMIS.
§ You can use information from the import file to create steel or non-steel items in the item library. To do this, click the down arrow to the right of the New Item button (as shown below) and select Create Unrecognised Items.

The Create Unrecognised Items form is displayed. The grid contains details about the unrecognised items from the CAD file. Click OK on this form to create the items in the item library. The item is now recognised by STRUMIS.
§ You can cancel the wizard, add the unrecognised item to the item library and re-start the wizard.
Update the STRUMIS grades
You can cancel the wizard, add the unrecognised grade to the grade table as a cross reference (see Grade Details) and re-start the wizard.
Find and edit an estimate
1. Open the Search form from the sidebar menu.
To do this, go to Enquiries & Estimating > Estimate.
2. Enter search criteria and click the Search button.
Records that match your search criteria are listed.
3. Double-click a record to edit it.
For complete information, see Find and edit an existing record.
Estimate reports
You can access reports from the sidebar menu. Go to Enquiries & Estimating > Enquiries & Estimating Reports.
See also:
Work with reports
List of reports
What's next?
When your potential customer has approved the estimate, you can continue on to create a customer record (if you have not already done so) (see About customers) and a contract for the work to be undertaken.
See About contracts.
Fields and buttons
Estimate - Details
Use this form to enter basic details for your estimate, including a link to any related quotes that you may have previously raised.
Fields
|
Field
|
Description
|
|
Status
|
The estimate can have a status of Open or Closed.
While you are working on the estimate, the status should be Open. When you have finished, set the status to Closed.
|
|
Estimate
|
This field is automatically populated if the auto-naming/numbering option is turned on in Enquiries & Estimating Options; otherwise, type in a unique name for the estimate.
|
|
Description
|
This is a free text field. Use it to give a little more information about the estimate.
|
|
Estimate Type
|
The options are:
§ Take Off
§ Bill of Quantities (BOQ)
When you save the estimate, you cannot change this setting.
|
|
Default Grade
|
Select a default grade from the drop-down list. This is used to automatically populate the Grade field when adding steel items to the estimate.
|
|
Facility
|
Select a facility from the drop-down list.
|
|
Default Price Source
|
Specify whether you want to use prices from a stockist or from a mill.
|
|
Currency
|
This field shows the currency for the facility that you selected. You cannot change it.
|
|
Apply Labour Usages
|
Specify whether you want to apply labour usages.
See About labour usages.
If you select Yes, you can elect to automatically apply a labour usage by matching the subsection name. This means that when you add a steel section on the Estimate - Take Off or BOQ form (depending on the option that you selected above for Estimate Type), the related labour usage is added if it exists and if the name of the labour usage is the same as the name of the subsection.
|
|
Apply Fittings
|
See About fittings.
§ The options are:Yes
Allows you to add fittings to the estimate.
See Add a fitting to a steel item.
§ No
No fittings are added to the estimate.
§ Use Percentages
You can define fittings as a percentage weight of the parent bar.
See Add a fitting to a steel item.
Fittings defined in this way are applied to every steel item in the estimate take off or BOQ.
|
|
Fittings Weight %
Rate Per <weight unit>
Hours Per <weight unit>
Fabrication Rate Per Hour
|
Complete these fields if you elected to use percentages to estimate times and costings for fittings in the Apply Fittings field above.
|
|
Apply Line Number
Start Number
Increment
|
If you have paper drawings, use this option to cross-reference the items on the drawing with the items that you add to the estimate. When you select one of the options below and add a steel item, non-steel item, or free-line item to the Take Off or BOQ form, an extra field, Line Number, is displayed on the Estimate Steel Item, Estimate Non-steel Item or Estimate Free Line Item form respectively. The availability of the extra field is governed by the option that you select. The options are:
§ Off
Line numbering is not used.
§ Automatic by estimate
When you select this option, you can specify a start number and an increment. If, for example, you specify a start number of 10 and an increment of 10, the line numbers start at 10 and, every time that you add an item to the estimate, the number increases to 20, 30, 40 and so on. The Line Number column on the Take Off or BOQ form is updated. Items are numbered sequentially throughout the estimate, irrespective of the subsection. You cannot back-number previously added items using this option.
§ Automatic by subsection
This is similar to Automatic by Estimate, but items are numbered sequentially throughout each subsection.
§ Manual
The extra field that is displayed on the Estimate Steel Item, Estimate Non-steel Item or Estimate Free Line Item form is not automatically populated. You must manually enter a number.
|
Grid
The grid lists enquiry records that are related to this estimate. To link an enquiry to this estimate, select the enquiry from the drop-down list in the Enquiry column. You can also create a new enquiry record by clicking the ellipsis button in the Enquiry column. When you select an enquiry, the other information is automatically populated.
Actions button
The options in the table below are available on all tabs of the Estimate form.
|
Option
|
Description
|
|
Calculate
|
Updates the value fields such as value, weight and area, within the estimate.
|
|
Reports
|
The options are:
§ Cost Code Summary Report
Prints a breakdown of the estimate into cost codes.
§ Print Estimate Report
This is a full estimate breakdown of costs for material, fittings and labour.
§ Print Enquiry Quotation Report
This is the quotation document to send to the customer.
§ Email Enquiry Quotation Report as PDF
Creates a PDF version of the report, which is attached to a blank email using your default email system.
§ Email Estimate Report as PDF
Creates a PDF version of the report, which is attached to a blank email using your default email system.
|
|
AutoCut
|
The options are:
§ Estimate
Calculates an accurate waste figure for all of the linear material in the estimate based on the library of standard lengths.
§ Subsection
Calculates an accurate waste figure for all of the linear material in the subsection based on the library of standard lengths.
§ View AutoCut Results
Displays the total length, weight, waste percentage and waste value (based on current estimate rates) for each item.
§ View Requisition Lengths
Displays a list of suggested standard lengths for buying.
§ View Cutting List
Displays a basic cutting plan for the suggested standard lengths.
§ Add Waste as Estimate Extra
Allows you to add the calculated waste value to the estimate as an extra/addition.
|
|
Import Estimate
|
Allows you to import a material list into the estimate, using the Import Estimate Wizard.
|
Estimate - Take Off or BOQ
This form is the main hub of the estimating module. It lists the steel items, non-steel items and assemblies that are included in the estimate. You can also add free line items, labour, fittings and extras.
The form is divided into an explorer and a grid. These are described in more detail in the following sections.

Explorer
The explorer lists subsections, which contain steel items, non-steel items, free line items, and any associated labour, fittings and extras. It also shows estimate extras and final extras. When you click a line in the explorer, more detailed information is displayed in the grid.
Grid
When you click a line in the explorer, details are displayed in the grid. Double-click a line in the grid to edit the item. If you select one or more steel items, non-steel items or free line items in the grid, the grid Actions button becomes available. The options are:
|
Grid Actions
|
Description
|
|
Item Status
|
Select this option to view the Item Status form.
|
|
Move Items
|
Use this option to move items from one subsection to another. See Move items to another subsection.
|
|
Batch Update
|
You can batch update lines that you have selected in the grid. See Batch update take off or BOQ lines.
|
|
View Drawing
|
Allows you to view the related CAD drawing in the following formats *.spf, *.dwg, *.dwf and *.dxf.
|
|
View CAM Using StruCNC
|
Allows you to view the related CAM drawing.
|
|
Highlight In BIMReview
|
You can highlight selected marks or use one of the pre-defined views using the BIMReview viewer.
|
The Add <item> button allows you to add subsections, steel items, non-steel items, free line items, labour, fittings and extras to the estimate. Its availability depends on the row that you have selected in the explorer and the row that you have selected in the grid.
Fields
The value, weight and area of all of the items on the estimate are displayed.
Actions button
The options available are the same as those on the Estimate - Details form. See Actions_button.
Estimate - Data
Use this form to specify where the CAD, CAM, and BIMReview files are stored for the estimate. You can type in a path or click the ellipsis button to browse for a location or file.
Estimate - Hidden Fields
The fields that are listed here are displayed on the Estimate Steel Item, Estimate Non-steel Item and Estimate Free Line Item forms. If you want to hide them, select the check boxes.
Estimate Steel Item - Steel Item
Use this form to add a steel item to an estimate. You can also use the form to edit steel items that have already been added to an estimate.
See Add a steel item to the subsection.
Fields
|
Field
|
Description
|
|
Line Number
|
The presence and usage of this field depends on the setting that you specified for the Apply Line Number field on the Estimate - Details form.
In brief, if enabled, it allows you to cross-reference items on a drawing with items that you add to the estimate.
|
|
Shortcut Code
|
|
|
Section Code
Size
Grade
|
Use these fields to specify the steel item that you want to add to the estimate.
|
|
Assembly Details
|
|
|
Assembly
Description
Quantity Per Assembly
Assembly Quantity
|
These fields are populated if both of the following statements are true:
§ You are editing a steel item that has already been added to an estimate
§ The steel item is part of an assembly that was added to the estimate
The only field that you can change here is Quantity Per Assembly. See Add an assembly to the subsection for information about changing assembly details.
|
|
Item Details
|
|
|
Reference
|
This is a free text field. You could use it to link an item on the drawings to this steel item.
|
|
Quantity
|
Specify the quantity of the steel item to add to the estimate.
|
|
Phase
|
Enter the phase for which the steel item is required.
|
|
Length
|
Specify a length or click the  button to display the Steel Item Length From Weight Calculator. This is shown below: button to display the Steel Item Length From Weight Calculator. This is shown below:

Enter a quantity and a weight for the steel item. When you tab out of the fields, the length of the steel item is calculated from information in the Item Library. Click OK to use the calculated length on the Estimate Steel Item form.
|
|
Width
|
Specify a width if necessary.
|
|
Paint Finish
|
Select a paint finish from the drop- down list.
|
|
Cost Code
|
When you select a steel item, this field is populated with information from the item library.
You can select a different cost code from the drop down list if necessary.
See About cost codes and cost centres.
|
|
Unit Price
Unit
|
When you select a steel item, this field is populated with information from the item library.
You can specify a different price and unit if necessary.
|
|
Price Source
|
When you select a steel item, this field is populated with information from the item library.
You can edit the field if necessary. The options are Stockist or Mill.
|
|
Labour Usage
|
This field may be populated, depending on the setting for the Apply Labour Usages on the Estimate - Details form.
In brief, you can elect to automatically apply a labour usage if the name of the labour usage matches that of the subsection to which you are adding a steel item.
If the field is not automatically populated, you can select a labour usage from the drop-down list.
See About labour usage.
|
Buttons
|
Button
|
Description
|
|
Calculate
|
Click this button to update the estimate with the details that you have specified for the steel item.
|
|
New Item
|
Click this button to create a new item in the item library.
See Create an item.
|
Estimate Steel Item - Labour
This form is available only when you have set the Apply Labour Usages field to Yes on the Estimate - Details form. Use it to add labour for a steel item. You can add process rows and edit the hourly rate, quantity, unit time, and setup time for the process. If you selected a labour usage on the Estimate Steel Item - Steel Item form, the processes that are associated with the labour usage are listed here.
See:
About labour usage
About processes
Add labour for a steel item
Estimate Steel Item - Fittings
Use this form to edit fittings that have been added to a steel item and to add more fittings.
You may have added fittings to the steel item in one of the following ways:
§ By adding a labour usage that includes fittings (or a fitting group) to the steel item
See Estimate Steel Item - Labour
§ By adding fittings (or a fitting group) directly to the steel item in the estimate
See Add a fitting to a steel item
In both cases, the fittings that you added are listed here.
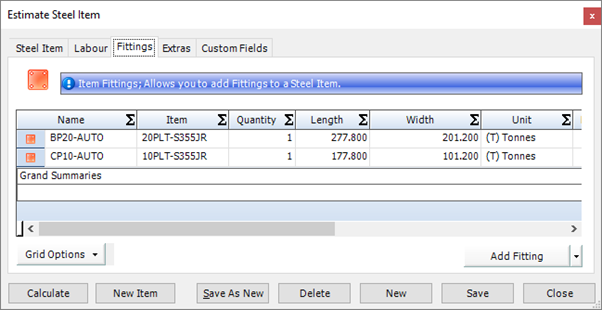
Double-click a line to edit it.
You can add a fitting or a fitting group.
To add a fitting, click the Add Fitting button.
To add a fitting group, click the down arrow to the right of the Add Fitting button and select the Fitting Group option.
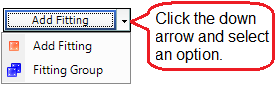
Estimate Steel Items - Fittings Percentages
Use this form to edit fitting percentages that have been defined for a steel item.
This form is displayed only if you elected to estimate costings and timings for fittings as percentages of the parent bar (meaning that you set the Apply Fittings field on the Estimate - Details form to Use Percentages). The default percentages that you specified on the Estimate - Details form are listed here. They apply to this steel item only and you can edit them if necessary.
See Add a fitting to a steel item.

Estimate Steel Item - Extras
Use this form to edit extras that have been added to a steel item and to add more extras.
The extras that you added are listed here.

Double-click a line to edit it.
You can add an extra or an extra group.
To add an extra, click the Add Extra button.
To add an extra group, click the down arrow to the right of the Add Extra button and select the Extra Group option.

Chapter 5
What's in this chapter?
About contracts, budgets and scope changes
Contracts
Contract budgets
Change orders
About contracts, budgets and scope changes
When you win an order, the first thing to do is to create a contract for the work to be undertaken. This is a mandatory step as the contract is the central point of reference for the job. You can then, optionally, create a budget for the job, which allows you to keep track of the costs that you estimated for the work compared with budgeted costs and actual costs. If the scope of the work changes, you can raise a change order and use it to update the budget.
This chapter tells you how to create and use contracts, budgets, and change orders.
Contracts
About contracts
A contract stores or provides links to information about a fabrication job that you are undertaking and progressing through the STRUMIS system. It holds details about your customer, key fabrication and delivery dates, delivery locations and any external files that are needed for the job. You can define phases for the work, record changes that are requested by your customer, and develop an invoicing schedule based on contract milestones. You can group several contracts into a project.
Access
To access contracts, click the Contract button on the Contract Ribbon. Alternatively, from the sidebar menu, go to Contracts Management > Contract.
When you create or edit a contract, you will use the Contract form.
Create a contract
The following instructions tell you how to create a contract.
|

|
Use the search facility to make sure the contract is not already in the system.
See Find and edit a contract if you need help with this.
|
1. Go to Contracts Management >Contract.
A list of contracts is displayed.
2. Click New.
The Contract form is displayed.

It has the following tabs:
§ Details
Enter general contract details, including the contract status and customer details.
See Contract - Details for a full list of the fields and buttons on this tab.
§ Dates
Enter the key contract dates.
See Contract - Dates for a full list of the fields and buttons on this tab.
§ Valuation
Add and review client change orders.
See Contract - Valuation for a full list of the fields and buttons on this tab.
§ Invoicing
Specify a schedule of invoices to be sent to the customer.
See Contract - Invoicing for a full list of the fields and buttons on this tab.
§ Phases/Zones
Break the contract down into phases if necessary.
See Contract - Phases/Zones for a full list of the fields and buttons on this tab.
§ Site Details
Specify the address at which the fabricated materials will be assembled.
See Contract - Site Details for a full list of the fields and buttons on this tab.
§ Off-site
Specify any addresses at which the fabricated materials will be assembled or partially assembled that is not the final destination. Examples are a temporary storage site, port or building yard.
See Contract - Off-site for a full list of the fields and buttons on this tab.
§ Data
Specify the locations of external files (for example, CAD files and NC files) associated with the contract.
See Contract - Data for a full list of the fields and buttons on this tab.
§ Progress Restriction
Use this tab to halt the progress of a contract at a particular point in the STRUMIS system. The tab is available only to users with system administrator privileges.
See Contract - Progress Restriction for a full list of the fields and buttons on this tab.
§ Notes
You can add free text notes or predefined notes to this record.
See Add notes to a record for a full list of the fields and buttons on this tab.
§ Contacts
Set up any internal or external contacts for the contract.
See Contract - Contacts for a full list of the fields and buttons on this tab.
§ Custom Fields
If you need to collect data that is relevant to this type of record, but there are no appropriate fields, use this form to define your own custom fields.
See Define custom fields for a record for a full list of the fields and buttons on this tab.
§ Users
Specify the users that are allowed to access the contract.
See Contract - Users for a full list of the fields and buttons on this tab.
§ Attachments
Use this form to attach external documents to a STRUMIS record.
See Attach external documents to a record for a full list of the fields and buttons on this tab.
§ Information
Use this form to view the creation date of the record, the date when it was last updated, and the users who made the changes.
See View basic information about a record for a full list of the fields and buttons on this tab.
3. Fill in the required information and click Save.
A message is displayed.

4. Click Yes if you want to set the new contract as the default on the Contract Ribbon (see Contract_ribbon); otherwise click No.
Prioritise contracts
You can assign a priority (1, 2, 3 and so on) to a contract. Assigned priorities are shown on the Contracts Search form and are for your information only.
1. Go to Contracts Management >Prioritise Contracts.
The Prioritise Contracts form is displayed.
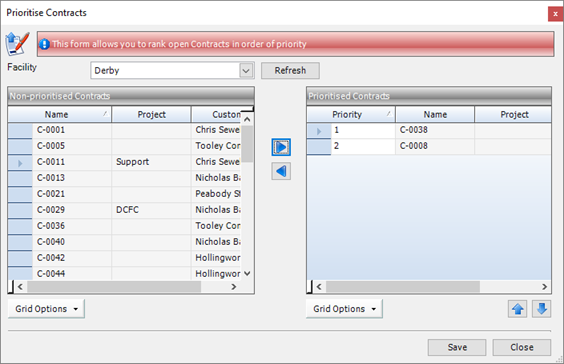
2. Select a Facility and click Refresh.
The Non-prioritised Contracts and Prioritised Contracts grids are populated.
3. Select a contract in the Non-prioritised Contracts grid and click the  button to move it into the Prioritised Contracts grid with a priority number.
(You can also de-prioritise a contract; select the contract in the Prioritised Contracts grid and click the  button to move it to the Non-prioritised Contracts grid, thus removing its priority number.
4. Use the  and
and  buttons to change the order of contracts in the Prioritised Contracts grid.
Group contracts into a project
To group contracts into a project, you must first create the project and then add one or more contracts to it.
Create a project
1. Go to Contracts Management > Project.
A list of projects is displayed.
2. Click New.
The Project form is displayed.

It has the following tabs:
§ Details
Enter a name and description for the project.
See Project - Details for a full list of the fields and buttons on this tab.
§ Custom Fields
If you need to collect data that is relevant to this type of record, but there are no appropriate fields, use this form to define your own custom fields.
See Define custom fields for a record for a full list of the fields and buttons on this tab.
§ Information
Use this form to view the creation date of the record, the date when it was last updated, and the users who made the changes.
See View basic information about a record for a full list of the fields and buttons on this tab.
3. Enter a name and description for the project and click Save.
Add a contract to the project
On the Contract - Details form, in the Project field, select the required project from the drop-down list. Click Save when you have finished working on this form.
Find and edit a contract
1. Open the Search form from the sidebar menu.
To do this, go to Contracts Management > Contract.
2. Enter search criteria and click the Search button.
Records that match your search criteria are listed.
3. Double-click a record to edit it.
For complete information, see Find and edit an existing record.
Contract reports
You can access reports from the sidebar menu. Go to Contracts Management > Contracts Management Reports.
See also:
Work with reports
List of reports
What's next?
When you are happy with the way in which the contract is set up, the next step is one of the following:
§ Create a budget for the contract
See About contract budgets
§ Create a preliminary or detailed list of the items that you are going to fabricate for the contract
See:
About preliminary listings
About detailed listings
If you have started work on a contract, and your client requests a change to the original scope of the work, you can create a change order.
See About change orders.
Fields and buttons
Project - Details
Use this form to define a project. Projects are used to group contracts together. See Group contracts into a project.
Fields
|
Field
|
Description
|
|
Name
|
Type in a name for the project.
|
|
Description
|
This is a free text field. Use it to provide a little more detail about the project.
|
Contract - Details
Use this form to enter basic details about a contract, in particular, you must select the customer to whom the contract applies, and specify whether phase/zone and lot information is to be entered manually or imported from a CAD file.
Fields
|
Field
|
Description
|
Mandatory/optional
|
|
Contract ID
|
Auto-populated
|
n/a
|
|
Name
|
This field is automatically populated if the auto-naming/numbering option is turned on in Contracts Management Options; otherwise, type in a unique name for the contract.
|
Mandatory
|
|
Description
|
This is a free text field where you can type in a description for the contract.
Whenever you have to select a contract in STRUMIS, the drop-down list shows the newest contract at the top, and the contract’s description.
|
Optional
|
|
Project
|
You can use a project to group several contracts for reporting purposes. If you want to do this, select a project from the drop-down list.
|
Optional
|
|
Phase/Zone Source
|
Select an option from the drop-down list to indicate whether the phase/zone information is loaded from a CAD file, or specified manually.
|
Mandatory
|
|
Lot Source
|
Select an option from the drop-down list to indicate whether the lot information is loaded from a CAD file, or specified manually. See About Lotting.
|
Mandatory
|
|
Unique ID Source
|
Select an option from the drop-down list to indicate whether the contract's unique ID is loaded from a CAD file, or assigned by STRUMIS.
|
Mandatory
|
|
Enquiry
|
You may have previously created an enquiry for your customer. If so, you can link the enquiry to the contract by selecting it from the drop-down list. The address and contact details are populated based on the enquiry and the Customer field becomes unavailable.
|
Optional
|
|
Customer
|
Select a customer from the drop-down list or click the ellipsis button to create a customer.
|
Mandatory
|
|
Status
|
A contract can have a status of either Open or Closed. Closed contracts do are not shown in any drop-down lists.
|
Mandatory
|
|
Type
|
Select a type from the drop-down list or click the ellipsis button to create a type.
Use this field to group contracts by type. For example, you might define three types, Domestic, Agricultural and Commercial. In the future, when you search for a contract, you can filter by type, meaning that you see a list of agricultural buildings only.
You can also use the contract type to route items through production as you can include it as a rule in the production template. For example, you could create the following types: Pressure Vessels, Tanks and Steel Structures. You can then create a production template for each contract type, thus enabling pressure vessels, for example, to have a particular route through production.
|
Optional
|
|
Facility
|
Select a facility from the drop-down list.
|
Mandatory
|
|
Execution Class
|
Specify an execution class, 1, 2, 3 or 4.
See About execution classes.
|
Optional
|
|
Customer Reference, First Name, Surname, Job Title, Telephone, Cell/Mobile, Fax, Email, Currency, Address, ZIP/Postal Code, Country
|
These fields are auto-populated when you select either an enquiry or a customer above.
|
n/a
|
Contract - Dates
Use this form to store key dates for the contract. The dates that you specify here are used in other parts of the system, for example on the Contract - Phases/Zones form.
Fields
|
Field
|
Description
|
Mandatory/optional
|
|
Fabrication Date
|
The date on which fabrication will start. Type in a date or select a date from the drop-down list.
|
Optional
|
|
Shipping Date
|
The date on which the assembled marks will be sent to site. Type in a date or select a date from the drop-down list.
|
Optional
|
|
On-site Date
|
The date on which the customer expects delivery. Type in a date or select a date from the drop-down list.
|
Optional
|
|
End Date
|
The date on which the contract will be completed. Type in a date or select a date from the drop-down list.
|
Optional
|
Contract - Valuation
Use this form to add and review client change orders. Take a look at the following topics for more information:
Change order- overview
Add a client change order to a contract
Fields
|
Field
|
Description
|
Mandatory/optional
|
|
Total Contract Value
|
This is a read-only field. It shows a sum of the Original Contract Value and the values of all client change orders.
|
n/a
|
|
Original Contract Value
|
Type in the originally agreed value of the contract.
|
n/a
|
|
Grid
|
Client change orders are added/listed here. The grid displays the client change order Name, Value, Date, Status, Date Approved and Notes. Double-click a row to edit the client change order.
You can expand a client change order to add/list the associated change orders along with their Value, Status and Description. Click the ellipsis button to open a change order.
|
n/a
|
|
Add Client CO button
|
Click this button to open the Add Client Change Order form, where you can add client change orders to the contract. They are displayed in the grid.
|
n/a
|
Contract - Invoicing
Use this form to define a schedule of expected invoices to be sent to the customer. These are known as contract milestones. You can raise sales invoices against contract milestones. See Add a free line item to the invoice, Add a mark to the invoice and Add a mark from a QS Analysis.
Sales Invoice Totals
|
Field
|
Description
|
Mandatory/optional
|
|
Expected Invoice Value
|
This is a read-only field. It is the total of the Expected Invoice Value column in the grid.
|
n/a
|
|
Actual Milestone Invoice Sent/Posted
|
This is a read-only field. It is the total of the Actual Invoice Sent/Posted column in the grid.
|
n/a
|
|
Total Invoiced for the Contract
|
This is a read-only field. It is the total value of the sales invoices that have been raised against the contract.
|
n/a
|
|
Default QS Analysis
|
This option allows you to create invoices based on QS analysis category rates.
|
Optional
|
Grid
|
Field
|
Description
|
Mandatory/optional
|
|
Details
|
Give the contract milestone a name.
|
Mandatory
|
|
Expected Invoice Date
|
Defaults to today, but you can select another date from the drop-down list.
|
Mandatory
|
|
Cost Code
|
Select a cost code from the drop-down list.
See About cost codes and cost centres.
|
Optional
|
|
Expected Invoice Value
|
Enter the value that you expect the invoice to be.
|
Optional
|
|
Actual Invoice Sent/Posted
|
This is a read-only field. It is automatically updated as you raise sales invoices against contract milestones.
|
n/a
|
|
Currency
|
This is a read-only field. It is the contract currency.
|
n/a
|
Contract - Phases/Zones
Use this form to break down a contract into phases. For example, a large retail unit may be detailed and built in three phases defined by grid line references; each phase can have different completion dates.
See About phases and lists.
Grid
|
Field
|
Description
|
Mandatory/optional
|
|
Name
|
Give your phase a name, for example Phase 1.
|
Mandatory
|
|
Description
|
Add free text to describe this phase, for example, Single storey supermarket.
|
Optional
|
|
Colour
|
Select a colour from the drop-down list. This is used in BIMReview Contract Phase View.
|
Optional
|
|
Default Phase
|
Select a check box to indicate which of the phases is the default. This is used for any items when Manual is selected for the Phase/Zone Source on the Details tab, and for any items manually added to a prelim or detailed listing.
|
Optional
|
|
Fabrication Date
|
The date on which fabrication will start. This defaults to today, but you can type in a date or select a date from the drop-down list.
|
Optional
|
|
On-site Date
|
The date on which the customer expects delivery. This defaults to today, but you can type in a date or select a date from the drop-down list.
|
Optional
|
|
End Date
|
The date on which the contract will be completed. This defaults to today, but you can type in a date or select a date from the drop-down list.
|
Optional
|
Contract - Site Details
Use this form to specify the address and contact details of the erection site where the material will be assembled.When you raise a purchase order to buy the materials needed for this contract, you can specify delivery details in the following places:
§ On the Purchase Order - Details form
Specify delivery details for the whole purchase order
§ When you add items to the Purchase Order - Lines form
Specify delivery details for individual items if they are different to those specified for the whole order
In both cases, you have the option to choose the site address that you add here on the Contract - Site Details form.
Contract - Off-site
If the contract involves the assembly of fabricated items at a location that is not the final destination, use this tab to specify that location. Examples are a temporary storage unit, a port, or a building yard where fabricated parts are assembled in a modular way before transferring them to the final destination.
When you raise a purchase order to buy the materials needed for this contract, you can specify delivery details in the following places:
§ On the Purchase Order - Details form
Specify delivery details for the whole purchase order
§ When you add items to the Purchase Order - Lines form
Specify delivery details for individual items if they are different to those specified for the whole order
In both cases, you have the option to choose the off-site address that you add here on the Contract - Off-site Details form.
Contract - Data
Use this form to specify fine details for the contract. These include locations for associated CAD/CAM files, default steel grades and paint finishes, and instructions about how to treat offcuts.
Fields
|
Field
|
Description
|
Mandatory/optional
|
|
CAD Data Path
Use Document Management?
CAM Data Path
Use Document Management?
BIMReview File
Use Document Management?
CAM Splitter NC Files Path
|
Specify where the CAD, CAM, BIMReview and CAM splitter NC files are stored. You can type in a path or click the ellipsis button to browse for a location or file.
If you elect to link the CAD, CAM or BIMReview files to document management, then all documents will be taken from the Document Control area by default. This ensures that contracts have a close relationship with their underlying documents and that proper control procedures are followed. If you select the Use Document Management check box for a BIMReview file, when you click the ellipsis button , the Document Search form is displayed instead of Open File. This allows you to select a document from document management.
|
Optional
|
|
BIMReview Attribute Mapping
|
Use this section to map the appropriate BIMReview attributes to data in STRUMIS.
|
Optional
|
|
Default Grade
|
Select a grade from the drop-down list. This is used to specify the default grade for all steel items on the contract.
|
Optional
|
|
Weight (t)
|
This is a read-only field. It shows the total weight of the items listed for the contract.
|
n/a
|
|
Area (ft2)
|
This is a read-only field. It shows the total area of the items listed for the contract.
|
n/a
|
|
Allocate Offcut To Contract
|
Use this check box to determine what happens to a usable offcut when a mark item has been cut in production.
Select the check box to allocate the offcut to the contract.
Clear the check box to return the offcut to the inventory as free stock.
|
Optional
|
|
Add Free Offcut Value To Contract
|
Use this check box to determine whether the value of a free offcut item should be added to the value of the contract. The production cut mark item has a higher unit price as a result.
The value of the offcut is distributed among marks only. The unallocated offcut has a value of 0 in inventory to keep the overall value in the system equal to what it was before.
|
Optional
|
|
Add Scrap Value To Contract
|
Use this check box to determine whether the value of a scrapped item should be added to the value of the contract. The production cut mark item has a higher unit price as a result.
|
Optional
|
|
Paint Finish
|
Select a paint finish from the drop-down list or click the ellipsis button to define a new one. The paint finish that you select here applies to all mark items on a contract, although you can change it for each mark item in the detailed listing.
|
Optional
|
|
Hours/(t)
|
Specify a default number of required processing hours per weight. This is used in long range planning, where the required hours are automatically calculated when a weight is specified.
You can edit the default hours per weight when you add a line to a long range plan.
|
Optional
|
Contract - Progress Restriction
Coming soon!
Contract - Contacts
Use this form to set up internal and external contacts for the contract.
Internal contacts grid
|
Field
|
Description
|
|
Grid
|
Lists the internal contacts.
To create and add a contact, click the ellipsis button on a row in the Name column.
To remove a contact from the list, select the row and press the Delete key on your keyboard.
|
|
Add button
|
To add contact that has already been defined, click the Add button and select one or more contacts in the Contact Search form.
|
External contacts grid
|
Field
|
Description
|
|
Grid
|
Lists the external contacts.
To create and add a contact, click the ellipsis button on a row in the Name column.
To remove a contact from the list, select the row and press the Delete key on your keyboard.
|
|
Add button
|
To add contact that has already been defined, click the Add button and select one or more contacts in the Contact Search form.
|
Contract - Users
Use this form to specify which users are allowed to access this contract. The users that are defined for the system are listed; select the Selected check box to indicate which are allowed access.
|

|
Users with contract administration rights are not listed as they cannot be restricted.
|
Contract budgets
About contract budgets
A contract budget is an itemised summary of the estimated, budgeted and actual costs (and weight, area and hours) incurred for a contract. You can break it down by week or month over a particular time period. The cost, weight, area and hour values are accrued from cost codes. Cost codes are assigned in the following places:
§ Estimated values (come from cost codes assigned to estimates)
When you create a budget for a contract, you can link it to an estimate. You can add a revision to the budget and you can also link the revision to an estimate. If a change to the contract is requested, a change order may be raised. A change order can be used to revise the budget and can be linked to an estimate. In all of these cases, items that are added to an estimate are assigned cost codes.
§ Budgeted values (come from here, in the contract budget)
To accrue cost, weight, area and hour values and view them in the budget, you add cost codes to the budget. When you add the cost code, you can also specify cost, weight, area and hour values for the contract.
§ Actual values (come from purchase orders raised for the contract)
Each time you generate costs for a contract, for example by raising a purchase order for materials, you specify a cost code for the expenditure. In this case, the cost code originates in the item library and is displayed in the purchase order, where you can change it. If you allocate inventory to the contract, the cost code from the purchase order for the inventory item is used.
As mentioned above, you create a contract budget by adding cost codes to the Contract Budget - Details form. For each cost code, cost, weight, area and hour values are aggregated from the various estimates, budgets, budget revisions, change orders, and purchase orders associated with the contract. These are displayed in the Overview tab. The Contract Budget - Details form also lists the following information:
§ Purchase orders raised for the contract
§ Sales orders raised for the contract
§ Inventory items allocated to the contract
§ Employee timesheets for the contract
§ Any other costs (which you can add to the budget manually)
You can note any changes to the original budget in the form of budget revisions or change orders.
Access
To access budgets, click the Contract Budget button on the Contract Ribbon. Alternatively, from the sidebar menu, go to Contracts Management > Contract Budget.
When you create or edit a budget, you will use the Contract Budget form.
Create a contract budget
The following instructions tell you how to create a contract budget.
|

|
Use the search facility to make sure the contract budget is not already in the system.
See Find and edit a contract budget if you need help with this.
|
1. Go to Contracts Management >Contract Budget.
A list of contract budgets is displayed.
2. Click New.
The Contract Budget Details form is displayed.
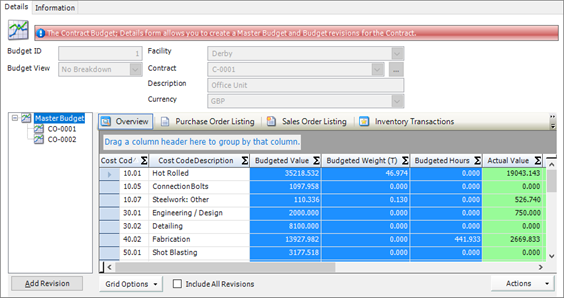
It has the following tabs:
§ Details
Shows the estimated, budgeted and actual costs, weights, areas and hours for the contract.
See Contract Budget - Details for a full list of the fields and buttons on this tab.
§ Information
See Contract Budget - Information for a full list of the fields and buttons on this tab.
3. Add cost codes to the budget and click Save.
See also:
Add or edit budget figures
4. If you want to add actual values (for costs, weights, areas or hours) that are not covered by purchase orders or inventory cost codes, you can enter them manually.
See also:
Add a manual posting
5. Add any necessary revisions to the budget and click Save.
See also:
Revise a contract budget
About change orders
Add or edit budget figures
Use the following instructions to populate the contract budget or budget revision by adding cost codes.
1. Open a contract budget.
The Contract Budget - Details form is displayed.
2. Click the Overview smart filter tab.
3. Click the Actions button, then select Add/Edit Budget Figures and Add Cost Code Budget Figures.
The Add Cost Code Budget Figures form is displayed.
Cost codes that are set up for the system are listed.

4. For the cost codes that apply to your contract budget, type budget figures directly into the columns (you can update the figures later if necessary)..
When you have entered budget figures for all of the relevant cost codes, select the rows that you want to add to the budget and click Add.
The cost codes and budget figures that you specified are added to the contract budget.
|

|
§ The following facilities are available on the Add/Edit Cost Code Budget Figures form:
§ Before you add cost codes to the contract budget, you can batch update the number of hours, value, weight and area. To do this, click Batch Update, make the necessary amendments for the selected rows (or for all rows if you clear the Only Selected Rows check box), and click OK.
§ You can add all of the cost codes to your contract budget. To do this, clear the Selected Rows Only check box.
§ You can import estimated figures from the estimate that is linked to the contract.
In the Overview smart filter tab and the Add/Edit Cost Code Budget Figures form, there are columns for estimated figures (use the Grid Options button to display these columns if necessary). You can populate these columns with figures from an estimate. To do this, select the Use Estimate Totals check box. The contract budget is linked to a contract, which is, in turn linked to an enquiry and thus to an estimate. This estimate is shown in the Estimate field. You can select another one from the drop-down box if necessary.
On the Contract Budget Details form, you may have selected Weekly or Monthly in the Budget View field, and specified a date range over which the contract budget applies. If you import estimated figures, you can spread them equally across the date range by week or by month. To do this, select Breakdown Over Period in the Cost Code Breakdown field. If you select No Breakdown, figures from the estimate are imported into the first week or month.
§ The following facilities are available on the Contract Budget Details tab > Overview smart filter:
§ To edit the figures for cost codes that you have already added to the contract budget, open a contract budget, click the Actions button, then select Add/Edit Budget Figures and Edit Cost Code Budget Figures, make your amendments and click Save.
§ You can delete cost codes from the Overview smart filter tab. Select one or more cost codes that you want to delete and press the Delete key on your keyboard.
|
Add a manual posting
Use the following instructions to manually enter actual values against cost codes for the contract.
1. Open a contract budget. Click the Manual Posting smart filter.
A list of previously added manual postings is displayed.
2. Click the Actions button and select Add Manual Posting.
The Add Manual Posting form is displayed.
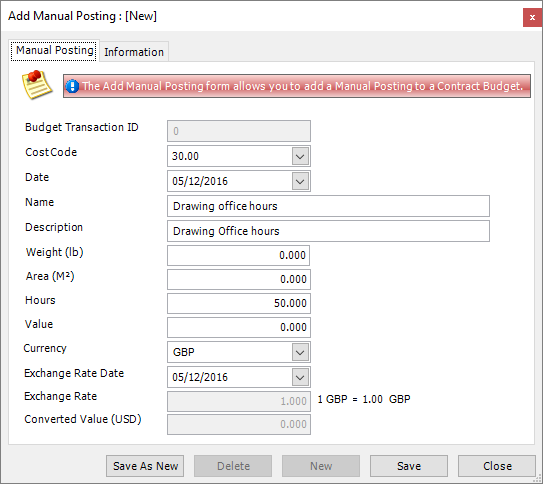
3. Complete the necessary information:
Select a cost code and a date.
Enter a name and description for your manual posting.
Enter a weight, area, number of hours or value.
Select a currency. If this is different to the system currency, you must also specify an exchange rate and the date.
4. Click Save.
The full details that you entered for the manual posting are displayed here in the Manual Posting smart filter tab and the values are summarised in the Overview smart filter tab.
|

|
If you want to post more than one manual value, use the Save As New button. Enter details for the first manual posting and click Save as described above. You can then change the details of the manual posting and click Save As New to create a second one. Continue in this way, using Save As New until you have added all of your manual postings.
|
Revise a contract budget
You can revise a contract budget in one of the following ways:
§ Add a budget revision
See below
§ Add a change order and publish it to the budget
See About change orders
Use the following instructions to add a budget revision.
1. Open a contract budget.
The Contract Budget Details form is displayed. The master budget and any revisions and change orders are displayed on the left-hand side in the Budget Tree.
2. To add a new revision, click the Add Revision button.
The Contract Budget Revision form is displayed.
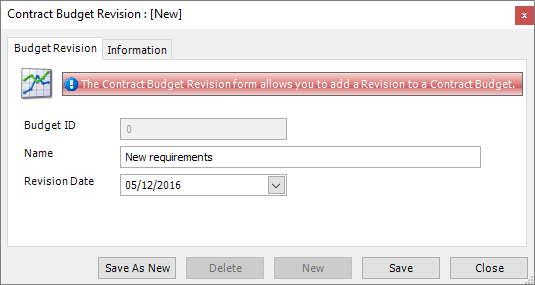
3. Give the budget revision a name and specify the date from which it is valid.
4. Click Save.
The revision is added to the Budget Tree.
When you click the revision in the Budget Tree, you can see that it looks like a master budget with the same smart filters and so on. You can develop the revision budget by adding cost codes in exactly the same way as you would develop a master budget.
|

|
§ To delete a budget revision, select it in the Budget Tree and press the Delete key on your keyboard.
§ To include figures from revisions within the master budget, select the Include All Revisions check box.
|
Move cost code values between budget revisions/change orders
You can move cost code figures (from the Purchase Order Listing, Sales Order Listing, Inventory Transactions, Employee Timesheets or Manual Postings smart filter grids) between the master budget, revision budgets and change orders. Use this facility to associate costs with the relevant budget, revision, or change order.
1. Open a contract budget.
The Contract Budget Details form is displayed.
2. Click one of following smart filters:
Purchase Order Listing
Sales Order Listing
Inventory Transactions
Employee Timesheets
Manual Postings
3. Select a row in the grid and click Actions (button) > Change Revision > name of budget, revision or change order.
The item is moved to the specified place.
Find and edit a contract budget
1. Open the Search form from the sidebar menu.
To do this, go to Contracts Management > Contract Budget.
2. Enter search criteria and click the Search button.
Records that match your search criteria are listed.
3. Double-click a record to edit it.
For complete information, see Find and edit an existing record.
Contract budget reports
You can access reports from the sidebar menu. Go to Contracts Management > Contracts Management Reports.
See also:
Work with reports
List of reports
What's next?
When you have set up a budget for the contract, you can create a list of items that you are going to fabricate for the contract. You have the option to import or create a list of items from preliminary drawings (this is called a preliminary listing), or you can import or create a list from the final drawings when they are available (this is called a detailed listing).
See:
About preliminary listings
About detailed listings
If you have started work on a contract, and your client requests a change to the original scope of the work, you can use a change order to revise the contract budget.
See About change orders.
Fields and buttons
Contract Budget - Details
The Contract Budget Details tab comprises three areas:
§ Budget details
§ Budget tree
§ Budget grid
These are shown in the illustration and described in detail below:

Budget details
|
Field
|
Description
|
Mandatory/optional
|
|
Budget ID
|
Auto-populated
|
n/a
|
|
Budget View
Start Date
End Date
|
Select one of the following options in the drop-down list:
§ Monthly
Select this option to break down the cost codes in your contract budget by month. Specify a start and end date.
§ Weekly
Select this option to break down the cost codes in your contract budget by week. Specify a start and end date.
§ No Breakdown
The cost codes that you add to the contract budget are not broken down. The totals in the Overview grid are for each cost code in the contract not for a given week or month.
In System > System Options, there is a setting to define the first day of the week, typically either Sunday or Monday; this affects the dates and week numbers that are shown when you put together a contract budget.
|
Mandatory
|
|
Facility
|
Select a facility from the drop-down list.
|
Mandatory
|
|
Contract
|
You must link the contract budget to a contract. Select the contract from the drop-down list or click the ellipsis button to create one.
|
Mandatory
|
|
Description
|
This is a read-only field. it is auto-populated from the contract.
|
n/a
|
|
Currency
|
This is a read-only field. it is auto-populated from the contract.
|
n/a
|
Budget tree
The master budget is displayed in this explorer, along with budget revisions, including change orders. Click the master budget or any sub-budget to view details in the grid.
If the scope of an existing contract changes, you can record the changes in one of the following ways:
§ Using a budget revision
Click the Add Revision button to record additional weights, hours, areas and costs associated with the scope changes. The revision is added beneath the master budget. Select the Include All Revisions check box to include the revised values in the master budget.
§ Using a change order
See Change order- overview
Change orders that have been approved by your customer and published to the contract budget are added beneath the master budget. Select the Include All Revisions check box to include the revised values in the master budget.
Budget grid
The grid has several smart filters. The information displayed in each smart filter grid is described in the following sections.
Overview
The Overview grid displays weight, area, hours and value information for cost codes that have been added into the contract budget. Information is broken down by the time period (weekly, monthly, or no breakdown) selected in the Budget View field. It is sourced and collated from the following areas:
§ Estimated values from the estimate linked to the budget or budget revision or change order
§ Budgeted values that you entered when you added cost codes
§ Actual values from the inventory, from purchase orders and from manual postings (see below)
Only cost codes added to the budget are displayed in the Overview grid. To see a list of cost codes that are not associated with the contract budget or revision, run the Cost Codes not Assigned to a Contract Budget report in Contracts Management Reports.
Purchase Order Listing
This grid displays all purchase order lines for the contract, irrespective of whether the cost codes belonging to each order line have been added into the budget. To open the purchase order to which a line belongs, right-click the line and select Open Purchase Order.
Sales Order Listing
This grid displays all sales order lines for the contract, irrespective of whether the cost codes belonging to each order line have been added into the budget. The list includes all of the sales order items and invoiced / delivered quantities for each item on a sales order. To open the sales order to which a line belongs, right-click the line and select Open Sales Order.
Inventory Transactions
This grid displays all inventory transactions for the contract. For example, materials received on purchase order receipts, material allocations to the contract, and so on. To open the transaction document associated with a particular line in the grid, right-click a line and select Open Inventory Transaction.
Employee Timesheets
This grid displays employee timesheets that have been created through production console or production barcoding. The list includes all of the processes for the contract that have progressed through production and been assigned to an employee. To open the employee timesheet associated with a particular line in the grid, right-click a line and select Open Employee Timesheet.
Manual Posting
This grid displays any actual figures (weight, area, hours or value) that have been entered against cost codes for the contract. To add lines to the grid, see Add a manual posting. For example, you might record drawing office hours.
Graph View
The Graph View displays a line chart or 3D line chart of the estimated, budgeted and actual values for the cost codes assigned to the contract. It is only available when the Budget View field is set to Weekly or Monthly.
Change orders
About change orders
Use change orders to record and track changes to the original scope of work specified in a contract.
When your customer (or any internal or external party) contacts you with a proposed change, record the details in a change order. You can enter notes about the impact of the proposed changes and attach correspondence and other supporting documentation. As the proposal moves forward, you can track its progress from preparation through to customer approval, recording key dates and the people involved along the way. Change orders are priced either manually or by importing an estimate.
Change orders can be built into a two-tier hierarchy where a parent change order is associated with one or more children. This means that you can split the proposed change into several smaller changes. You can record, price and track them individually, maybe discontinue some, and accumulate the information in the parent change order.
When your customer approves the change order, thus confirming that the work will go ahead, you can update the contract budget with the change order price and attach the change order to a contract using a client change order. A contract can contain multiple client change orders and a client change order can contain multiple change orders (excluding parent change orders). This means that you can organise approved changes and manage them within the contract.
Access
To access change orders, click the Change Order button on the Contract Ribbon. Alternatively, from the sidebar menu, go to Contracts Management > Change Order Management.
When you create or edit a change order, you will use the Change Order form.
Change order workflow
The following workflow lists the steps that you should take when you receive a request for changes to a contract.
|
Action
|
Where?
|
Show me how to...
|
|
1. You have a contract defined in STRUMIS and you receive a change request from your customer, supplier or other internal or external party.
|
Outside of the STRUMIS system.
|
|
|
2. Create or open a change order. Record the details of the proposed change, including the contract affected, notes about the areas of impact, and supporting documentation.
|
Change Order form, all tabs
|
Create a record
Find and edit an existing record
Specify the impact of the changes
Add supporting documentation to the change order
|
|
3. Notify your customer by emailing a first draft of the change order.
Optional.
Set the status of the change order to Client Notified.
|
Change Order form > Details tab > Change Order Status field
|
Change the status of a change order
|
|
4. Inform your estimating department that the change order needs pricing.
Set the status of the change order to Submitted To Estimating.
|
Change Order form > Details tab > Change Order Status field
|
Change the status of a change order
|
|
5. The estimating department prices the change.
Set the status of the change order to Pricing Completed.
|
Change Order form > Valuation tab
Change Order form > Details tab > Change Order Status field
|
Price the change order
Change the status of a change order
|
|
6. Submit the change order to your customer for approval.
Set the status of the change order to Submitted To Client.
|
Change Order form > Details tab > Change Order Status field
|
Change the status of a change order
|
|
7. When you receive approval from your customer, set the status of the change order to Approved.
|
Change Order form > Details tab > Change Order Status field
|
Change the status of a change order
|
|
8. Add approved change orders to a client change order within the contract.
|
Contract form > Valuation tab
|
Add a client change order to a contract
|
|
9. Include the price of the approved change order as a revision in the contract budget.
|
Change Order form > Valuation tab > Publish To Budgets button
|
Price the change order
|
|

|
§ If a change order is pre-approved by your customer, set the its status to Authorised. You can then price retrospectively once the work is completed.
§ Track the amendments to a change order by adding a revision note. See Track changes to the change order.
§ You can build change orders into a two-tier, parent-child hierarchy. See Change Order Links.
|
Create a change order
The following instructions tell you how to create a change order.
1. Go to Contracts Management >Change Order.
A list of change orders is displayed.
2. Click New.
The Change Order form is displayed.

It has the following tabs:
§ Details
Enter basic details about a change order, in particular, the contract that will be affected. Record revisions to the change order, and update its status along with associated dates and key people involved.
See Change Order - Details for a full list of the fields and buttons on this tab.
§ Impact
Type in notes about the areas of the contract that are affected by the proposed changes.
See Change Order - Impact for a full list of the fields and buttons on this tab.
§ Valuation
Work up a valuation for the change order and publish it to the contract budget.
See Change Order - Valuation for a full list of the fields and buttons on this tab.
§ Correspondence
Add supporting documentation for the change order.
See Change Order - Correspondence for a full list of the fields and buttons on this tab.
§ Links
Structure the change order into a two-tier, parent-child hierarchy.
See Change Order - Links for a full list of the fields and buttons on this tab.
§ Key Information
Use this tab to store general information about the change order, various certifications for the fabrication, and administration information such as tax and payment terms.
See Change Order - Key Information for a full list of the fields and buttons on this tab.
§ Custom Fields
If you need to collect data that is relevant to this type of record, but there are no appropriate fields, use this form to define your own custom fields.
See Define custom fields for a record for a full list of the fields and buttons on this tab.
§ Information
Use this form to view the creation date of the record, the date when it was last updated, and the users who made the changes.
See View basic information about a record for a full list of the fields and buttons on this tab.
3. Fill in the required information and click Save.
Batch Update
Use the following instructions to batch update the information for multiple change orders.
1. On the Change Order Search form, select the change orders that you want to update.
To do this:
§ Press Ctrl A to select all lines, or
§ Press the Ctrl key and click several non-contiguous lines, or
§ Press the Shift key then click the first and last lines in a range.
2. Click Batch Update.
The Change Order - Batch Update form is displayed.
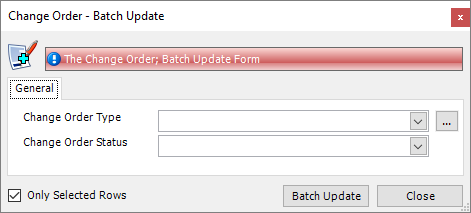
3. Enter new values for Change Order Type and Change Order Status and click Batch Update.
The selected change orders are updated.
|

|
§ If you want the value in a field to remain as it is for the selected rows, leave the field blank in the Change Order - Batch Update form.
§ Clear the Only Selected Rows check box if you want to apply the changes to all rows.
|
Tracking changes to the change order
When you revise a change order, you can track the changes that you make.
1. Open a change order. Click the Change Revision button.
The Change Order Revision form is displayed.

2. Select a new revision code, specify the person by whom the revision was made, and type in details of the revision.
|

|
§ Use the Revision History tab to view a list of revisions.
§ Change order revision codes are the same as document revision codes, which are specified in Document Management Options.
|
Change the status of a change order
1. Open a change order. Select an option in the Change Order Status field.
2. Click Save.
|

|
§ STRUMIS is supplied with the statuses listed below. You may have more statuses in your list because you can create your own library of change order statuses. For more information, see Change Order Status.
§ Preparation
The change order has been identified and is being prepared.
This is the default status of new change orders.
§ Client Notified
The customer has been notified that a change order has been identified.
The Date Notified field (mandatory) is auto-populated and Notified By is enabled.
§ Submitted to Estimating
The estimating department have been notified that the identified change order needs pricing.
The Date Submitted to Estimating field (mandatory) is auto-populated and Notified By is enabled.
§ Pricing Completed
The estimating department have priced the change order.
The Date Pricing Completed field (mandatory) is auto-populated and Pricing Completed By is enabled.
§ Submitted to Client
The change order has been submitted to the customer.
The Date Submitted to Client field (mandatory) is auto-populated and Submitted to Client By is enabled.
§ Authorised
The change order has been pre-approved by the customer, meaning that work can go ahead.
The Date Authorised field (mandatory) is auto-populated and Authorised By is enabled.
The Publish To Budgets button on the Valuation tab is enabled.
§ Approved
All costs have been approved for the change order.
The Date Approved field (mandatory) is auto-populated and Approved By is enabled.
The Publish To Budgets button on the Valuation tab is enabled.
§ Void
The change order will not proceed.
The Date Voided field (mandatory) is auto-populated and Voided By is enabled.
When you save a voided change order, it is closed and no further changes can be made.
§ Completed
The change order has been completed.
When you save a completed change order, it is closed and no further changes can be made.
§ The status of a change order may also be updated automatically when a change order is associated with a client change order. See Add a client change order to a contract.
|
Specify the impact of the changes
Use the Change Order Impact tab to indicate the areas of the contract that are affected by the proposed changes.
1. Open a change order. Click the Impact tab.
The Change Order Impact form is displayed.

2. Select the relevant check boxes and type in notes as necessary.
Price the change
1. Open a change order. Click the Valuation tab.
The Valuation form is displayed.

2. Use one of the following ways to price the change order:
§ If you have prepared an estimate, select it from the Estimate drop-down list.
You can click the ellipsis button to prepare a new estimate.
§ In the Cost Code Breakdown section, select cost codes and fill in the Weight, Value, Hours and Area.
3. Click Save.
|
|
When your customer has approved the change order, you can add it as a revision to the contract's master budget.
To do this, click the Publish To Budgets button.
|
Add supporting documentation to the change order
Use the Change Order Correspondence tab to add documents, RFI's and emails to a change order.
1. Open a change order. Click the Correspondence tab.
The Change Order Correspondence form is displayed.

To add a document:
1. Click the Documents smart filter.
2. Click the Add button as shown in the following illustration:
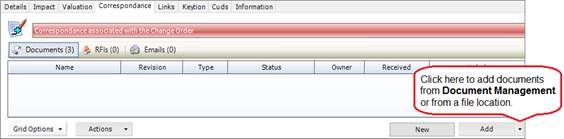
Two options are available:
§ Document Management
This option allows you to add a document from Document Management.
When you select this option, the Document Search form is displayed. Search for a document, select it, and click the Add button to add it to the change order.
§ File
This option allows you to add a document from an external file location.
When you select this option, a navigation window is displayed. Find the relevant document, select it, and click the Open button to add it to the change order.
|
|
§ Click the New button to create a document in the Document Management module and add it to the change order.
§ You can apply labels to documents so that you can filter them. See Apply a label to correspondence.
|
To add an RFI:
1. Click the RFIs smart filter.
2. Click the Add button.
The RFI Search form is displayed.
3. Search for an RFI, select it, and click the Add button to add it to the change order.
|

|
§ Click the New button to create an RFI and add it to the change order.
§ You can apply labels to documents so that you can filter them. See Apply a label to correspondence.
|
To add an email:
1. Click the Emails smart filter.
2. Drag and drop emails from your email application into the grid.
Apply a label to correspondence
On the Change Order Correspondence tab, you can apply labels to the documents, RFI's and emails that are associated with the change order. This means that you can categorise them for easy searching and management. Examples of the labels that you might want to apply to documents are Drawings, Authorisation Documents, and Scope Documents. Examples of RFI and email labels are Supplier Correspondence and Customer Correspondence.
To apply labels:
1. Select the rows to which you want to apply a label.
2. Click Actions > Apply Label.
The Apply Label form is displayed.
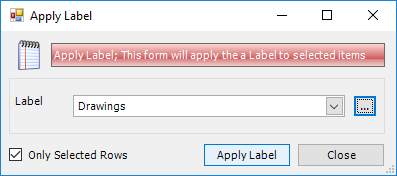
3. Select a label from the drop-down list or create labels by clicking the ellipsis button.
4. Click Apply Label.
The label is applied to the selected rows.
|

|
§ The Only Selected Rows check box is selected by default. Clear the check box if you want to apply the label to all of the rows in the list.
§ You can apply a label to an item of correspondence by selecting it in the Label column for a row as shown below:
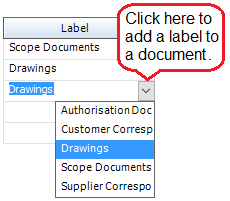
|
Set up a parent-child hierarchy
You can build change orders into a two-tier, parent-child hierarchy. This structure enables you to break a large change order into several smaller ones. The smaller (child) change orders are grouped under a parent, which represents the original large change order. The children can be individually recorded and priced. Information flows up and down the hierarchy; the parent change order accumulates prices from its children and certain amendments that you make to the parent are inherited by the children. As negotiations about the changes progress, some of the child change orders may be approved and some may be discontinued. The child change orders that are approved are added to the contract by means of a client change order. The values calculated for these approved child change orders can then be published to the contract budget. You cannot add a parent change order to a client change order.
To build a parent-child hierarchy:
1. Create or open a change order in the usual way.
2. On the Change Order Links tab, select the Is Parent Change Order check box.
3. Click the Create Child Change Order button to add children.
The child change orders are listed in the Links tab of the parent.
|

|
§ Parent change orders cannot be added to client change orders. Similarly, if a change order has been added to a client change order, it cannot be designated as a parent.
§ The Name field of a child change order is auto-populated with:
<parent change order name>-nn
where nn is a number or letter depending on settings in the Contracts Management Options.
§ A parent change order cannot have its own valuation; the Valuation tab is read-only and is an accumulation of the child change order valuations.
§ A parent change order’s valuation cannot be published to the contract budget.
§ When you update certain fields in a parent change order and click Save, you can choose whether to make the same changes to the children. This does not apply when you update a parent change order using Batch Update.
|
Add client change order from a contract
1. Open a contract. Click the Valuation tab.
The Valuation form is displayed.
2. Click Add Client CO.
The Add Client Change Order form is displayed.

3. Fill in the Name field (this must be unique for the contract) and the Date Received field.
4. Select a change order from the drop-down list as shown above.
The change orders in the drop-down list are those that have been assigned to this contract (on the Change Order Details form) and that have not yet been assigned to a client change order. Parent change orders are not available.
Enter a price for the client change order in the Value field. This can be any number until you want to set the status of the client change order to Approved; then, the amount in the Value field must be an exact sum of the change order prices in the Value column.
5. Click OK then Close.
When your customer approves the client change order, set the client change order status to Approved. The Date Approved field is populated with today's date. At this point, the change orders that are listed in the client change order should be firm and should reflect the actual changes that are to be made. If the client change order has been approved, it follows that the listed change orders should also have been approved, so remove any change orders that are not going ahead from the list. When you click OK, confirm that you want to set the status for all change orders within the client change order to Approved.
Approved change orders can now be used to revise the contract's master budget. To do this, double-click a change order row to open the Change Order form, go to the Valuation tab, and click the Publish To Budgets button.
|
|
§ Values from the Name field, Status field and Date Approved field are reflected on the Details tab of the Change Order form.
§ You can remove a change order from a client change order; select it and press the Delete key.
§ You can associate documents with a client change order; click the Add button on the Documents tab.
§ Use the Notes tab to enter additional information about the client change order. See Notes.
§ You can remove a client change order with a status of Pending from a contract; select it and press the Delete key.
|
Find and edit a change order
1. Open the Search form from the sidebar menu.
To do this, go to Contracts Management > Change Order Management.
2. Enter search criteria and click the Search button.
Records that match your search criteria are listed.
3. Double-click a record to edit it.
For complete information, see Find and edit an existing record.
Change order reports
You can access reports from the sidebar menu. Go to Contracts Management > Contracts Management Reports.
See also:
Work with reports
List of reports
What's next?
You can use a change order to revise the scope of a contract and contract budget at any time. Change orders are, therefore, stand-alone records and are not part of the sequence of events that allow you to progress work through the STRUMIS system.
Fields and buttons
Change Order - Details
Use this form to enter basic details about a change order, in particular, the contract that will be affected. Record revisions to the change order, and update its status along with associated dates and key people involved.
|
Field
|
Description
|
Mandatory/optional
|
|
ID
|
Auto-populated
|
n/a
|
|
Name
|
This field is automatically populated if the auto-naming/numbering option is turned on in Contracts Management Options; otherwise, type in a unique name for the change order.
|
Mandatory
|
|
Description
|
Add more detail about the proposed change. Free text.
|
Optional
|
|
Facility
|
Select a facility from the drop-down list.
|
Mandatory
|
|
Contract
|
Select a contract from the drop-down list. The options depend on the facility that you selected above.
|
Mandatory
|
|
Sequence
|
Select a sequence from the drop-down list. The options depend on the contract that you selected above.
|
Optional
|
|
Type
|
Select a type from the drop-down list or click the ellipsis button to create more types. what is this?
|
Optional
|
|
Revision
Change Revision button
|
This field is read-only. Click the Change Revision button to change the change order's revision code. See Tracking changes to the change order.
|
n/a
|
|
Parent Change Order
|
This is a read-only field. If this is a parent change order or a change order that is neither a parent or child, the field is empty. If this is a child change order, the field shows the name of the parent. See Change Order Links.
|
n/a
|
|
Customer Reference
|
This is a free text field. You can use it, for example, to store a reference number from your customer's change request.
|
Optional
|
|
Value
Weight
Hours
Use Valuation Totals
|
You can price the change order on the Valuation tab, or you can specify value, weight and hours here. If you want to use the price from the Valuation tab, select the Use Valuation Totals check box; the Value, Weight and Hours fields are populated (thus overriding any manual values that you entered) and you can no longer edit them.
|
Optional
|
|
Status
|
A change order can either be Open or Closed.
|
Mandatory
|
|
Change Order Status
|
Select the status of the change order. See Change the status of a change order.
|
Mandatory
|
|
Received
From
|
Fields become available when:
The change order is created.
Date:
Specify the date on which you received the change order.
From:
Select, create , or search for the person from whom you received the change order.
|
Optional
|
|
Date Created
By
|
Fields become available when:
The change order is created.
Date:
Auto-populated with the date on which the change order was created. You can select a different date.
By:
Select, create , or search for the person who created the change order.
|
Optional
|
|
Date Notified
By
|
Fields become available when:
The change order status is set to Client Notified.
Date:
Auto-populated with the date on which the change order status was set to Client Notified. You can select a different date.
By:
Select, create , or search for the person who notified the customer.
|
Optional
|
|
Date Submitted to Estimating
By
|
Fields become available when:
The change order status is set to Submitted To Estimating.
Date:
Auto-populated with the date on which the change order status was set to Submitted To Estimating. You can select a different date.
By:
Select, create , or search for the person who submitted the change order to estimating.
|
Optional
|
|
Date Pricing Completed
By
|
Fields become available when:
The change order status is set to Pricing Completed.
Date:
Auto-populated with the date on which the change order status was set to Pricing Completed. You can select a different date.
By:
Select, create , or search for the person who completed the pricing.
|
Optional
|
|
Date Submitted to Client
By
|
Fields become available when:
The change order status is set to Submitted to Client.
Date:
Auto-populated with the date on which the change order status was set to Submitted to Client. You can select a different date.
By:
Select, create , or search for the person who submitted the priced change order to the customer.
|
Optional
|
|
Date Authorised
By
|
Fields become available when:
The change order status is set to Authorised.
Date:
Auto-populated with the date on which the change order status was set to Authorised. You can select a different date.
By:
Select, create , or search for the person who authorised the change order.
|
Optional
|
|
Date Approved
By
|
Fields become available when:
The change order status is set to Approved.
Date:
Auto-populated with the date on which the change order status was set to Approved. You can select a different date.
By:
Select, create , or search for the person who approved the change order.
|
Optional
|
|
Date Voided
By
|
Fields become available when:
The change order status is set to Voided.
Date:
Auto-populated with the date on which the change order status was set to Voided. You can select a different date.
By:
Select, create , or search for the person who voided the change order.
|
Optional
|
|
Client Change Order
|
This is a read-only field. It shows the client change order with which the change order is associated.
See Add a client change order to a contract.
|
n/a
|
|
Client CO Status
Date
|
These are read only fields. They show information about the status of the client change order with which the change order is associated.
See Add a client change order to a contract.
|
n/a
|
Change Order - Impact
Use this form to indicate the areas of the contract that are affected by the proposed changes. Select the relevant check boxes and type in notes as necessary.
Change Order - Valuation
Use this form to value a change order. See Price the change order.
|
Field
|
Description
|
|
Estimate
|
Use this field to use an estimate to price the change order. Values from an imported estimate are listed in the Cost Code Breakdown grid and overwrite any manual values that you have specified.
Select an existing estimate from the drop-down list or click the ellipsis button to create a new estimate.
|
|
Description
|
This is a read-only field. It shows a description from the estimate.
|
|
Cost code breakdown
|
If you don't want to use an estimate to price the change order, you can select cost codes as shown below.
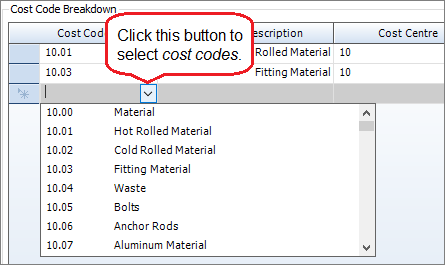
|
|
Publish To Budgets
|
When the change order has a status of Approved, click this button to publish the price to the contract budget. A new revision budget is added to the master budget.
If you make changes to the pricing here on the Valuation form, click this button to re-publish (meaning overwrite) the prices to the contract budget. You are prompted to confirm or cancel this action.
|
|
Change Order Value
Change Order Weight
Change Order Hours
|
These are read-only fields. When the change order is saved, they show the totals of the columns in the Cost Code Breakdown grid.
|
|

|
You can combine the valuation methods above; import values from an estimate and then append cost codes in the Cost Code Breakdown grid.
|
Change Order - Correspondence
Use this form to associate supporting documentation with the change order. See Add supporting documentation to the change order.
Smart filters
The following smart filters are available:
|
Smart filter
|
Description
|
|
Documents
|
Use this form to add documents from STRUMIS Document Management or from an external file location to the change order.
|
|
RFIs
|
Use this form to add STRUMIS RFIs to the change order.
|
|
Emails
|
Use this form to add emails to the change order.
|
When you click a smart filter, the buttons change according to the option you choose.
Documents
|
Field
|
Description
|
|
Grid
|
Lists documents that have been added to the change order.
To delete a row, select it and press the Delete key.
|
|
New button
|
Click New to open the New Document form. You can then create a document in the Document Management module and add it to the change order.
|
|
Add button
|
Add documents from Document Management or files from an external location. See Add supporting documentation to the change order.
|
|
Actions button
|
Click Actions > Apply Label to assign labels to the selected documents. See Add supporting documentation to the change order.
|
RFIs
|
Field
|
Description
|
|
Grid
|
Lists STRUMIS RFI's that have been added to the change order.
To delete a row, select it and press the Delete key.
|
|
New button
|
Click New to launch the RFI Wizard, where you can create an RFI to add to the change order.
|
|
Add button
|
Click Add to open the RFI Search form, where you can select an existing RFI to add to the change order.
|
|
Actions button
|
Click Actions > Apply Label to assign labels to the selected RFI's. See Label correspondence.
|
Emails
|
Field
|
Description
|
|
Grid
|
Lists emails that have been added to the change order.
Drag and drop emails from your email application into the grid.
To delete a row, select it and press the Delete key.
|
|
Actions button
|
Click Actions > Apply Label to assign labels to the selected emails. See Label correspondence.
|
Change Order - Links
You can build change orders into a two-tier, parent-child hierarchy. See Set up a parent-child hierarchy.
|
Field
|
Description
|
|
Is Parent Change Order
|
Select this check box to specify that the current change order is a parent. Clear the check box if you do not want to use a parent-child hierarchy. The check box is not available for child change orders.
|
|
Grid
|
Lists any child change orders.
|
|
Create Child Change Order
|
This button becomes available when you select the Is Parent Change Order check box. Click it to create the children of the current parent change order. They will be listed in the grid.
|
Change Order - Key Information
The fields on this tab are for information only. They store key information about the general parameters of the change order, various certifications for the fabrication, and administration information such as tax and payment terms.
Chapter 6
Working with preliminary lists and preliminary nesting and ordering
What's in this chapter?
Preliminary listing
About preliminary lists
Preliminary list terminology
Import prelim marks from a CAD file
Unrecognised and invalid prelim marks
Manually create a prelim listing
Add a prelim mark manually
Import prelim marks from an estimate
Find and edit a preliminary list
Preliminary list reports
What's next?
Fields and buttons
Preliminary nesting and ordering
About preliminary nesting and ordering
What's next?
Preliminary listing
About preliminary lists
A preliminary list is a provisional list of the items that you are going to fabricate for a contract. Developing a preliminary list is an optional step that typically happens before detailed fabrication drawings are completed. You can import a list of items from an estimate or a CAD model, or you can develop the preliminary list manually. Importing a list from a CAD file is the most popular method and STRUMIS uses a wizard to guide you through the process. In all cases, you can:
§ Specify numeric or alphabetic identifiers for items in the preliminary list
§ Assign items in the list to a phase or zone
§ Put items into a batch to specify which ones are to be processed together in the future
Access
To access preliminary lists, click the Prelim Listing button on the Contract Ribbon. Alternatively, from the sidebar menu, go to Contracts Management > Contract Prelim Listing.
When you create or edit a preliminary list, you will use the Contract Prelim Listing form.
Preliminary list terminology
Items that you import from a CAD file are referred to as prelim marks throughout the preliminary listing and preliminary nesting and ordering processes. They are the steel and non-steel components that are needed for the contract.
Import prelim marks from a CAD file
This topic tells you how to create a preliminary list and populate the grid on the Contract Prelim Listing - Details form by importing prelim marks from a CAD generated report, a coma separated values (.csv) file, or a tab separated text (.txt) file. STRUMIS has a wizard that automatically creates a Contract Prelim Listing form (the basic, unpopulated list) and leads you through the import process. Launch the Import Prelim Wizard in one of the following ways:
§ Go to Contracts Management > Import Preliminary Listing.
§ If you have already created a Contract Prelim Listing form, open it (see Find and edit a prelim listing).
Click Actions (button) > CAD Interface.
The wizard is described below.
Screen 1: Import Prelim Wizard - Welcome
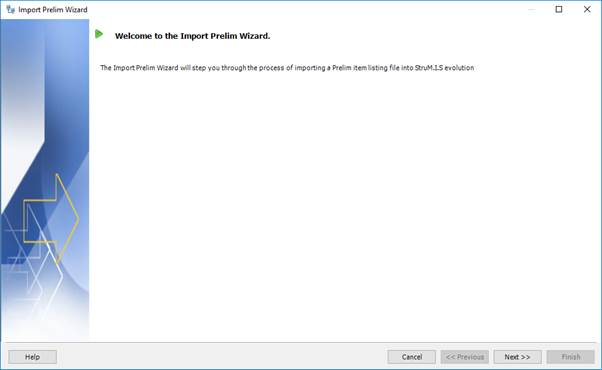
This is simply a welcome screen and you can click Next immediately to continue to the next screen.
Screen 2: Import Prelim Wizard - Select/Create a Contract
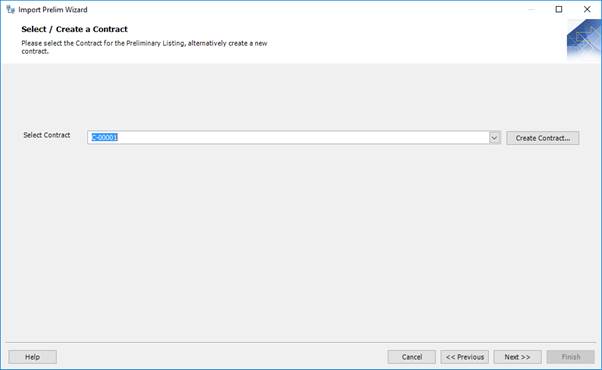
This screen is displayed only when you launch the wizard from Contracts Management > Import Preliminary Listing.
Select the contract for which you are importing a prelim listing. You can create a contract if you do not have one set up already. To do this, click the ellipsis button. See Create a contract.
Click Next to continue to the next screen.
Screen 3: Import Prelim Wizard - Select File
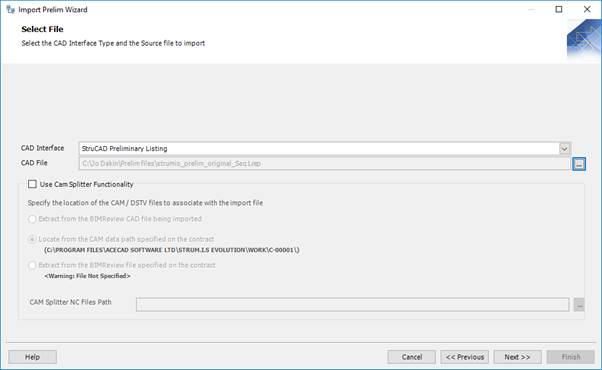
Use this screen to specify the CAD file from which you are going to import information. You must first select a CAD interface from the drop-down list. This is the type of file to be imported and depends on the software that was used to produce the CAD file. Examples are Tekla and ProSteel. You can then browse for the CAD file to be imported.
Click Next to continue to the next screen.
Screen 4: Import Prelim Wizard - Item Listing
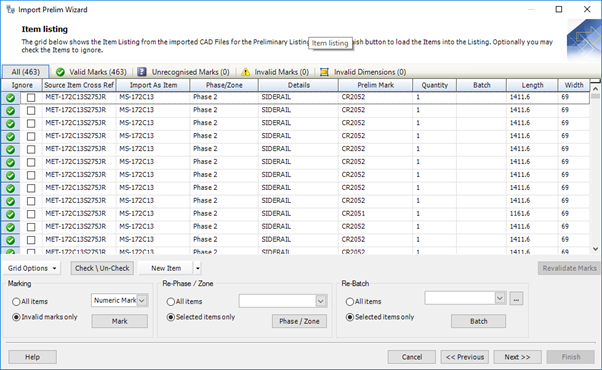
This screen lists the prelim marks in the CAD file. They are divided into tabs to show the prelim marks that have a match in the item library and those that are unrecognised by STRUMIS and need further definition.
You can also assign numeric or alphabetic identifiers to the prelim marks, allocate them to phases, and batch them for nesting and ordering.
For full details, see Import Prelim Wizard - Item Listing.
Click Next to continue to the next screen.
Screen 5: Import Prelim Wizard - Revisions

This screen allows you to review any amendments that you made.
For full details, see Import Prelim Listing - Revisions.
Click Next to continue to the next screen.
Screen 6: Import Prelim Wizard - Create Prelim List
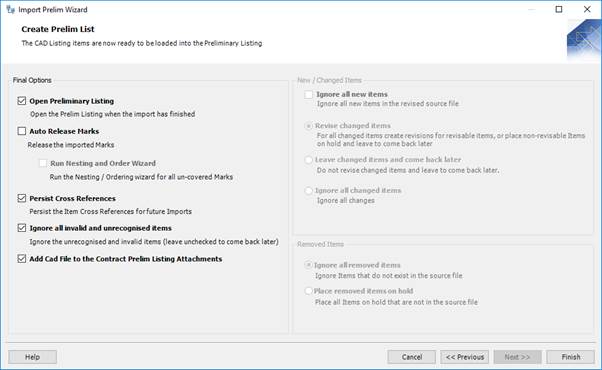
This screen allows you to make some final decisions about the prelim listing before it is loaded and saved. These include the option to continue immediately to nesting and ordering, and instructions about how to deal with changes in the CAD file if you re-import it.
When you have selected the relevant options, click Finish to load the prelim marks into the Contract Prelim Listing - Details form.
For full details, see:
Import Prelim Wizard - Create Prelim List.
Contract Prelim Listing - Details
Unrecognised and invalid prelim marks
The Import Prelim Wizard - Item Listing screen shows any unrecognised or invalid prelim marks. If you want to use these in your preliminary list, you need to address the reasons for the unrecognised or invalid status.
Unrecognised prelim marks
These are prelim marks in the import file that are not recognised by STRUMIS. This means that the system cannot match the item in the import file with an item in the STRUMIS Item Library. There are several ways to remedy this:
§ Use the Item Picker to manually map the unrecognised prelim mark to an item in the item library. Take a look at the illustration below:

Click the Revalidate Marks button when you have mapped the unrecognised prelim marks. The newly mapped prelim marks are now listed in the Valid Marks column.
§ You can choose to ignore the unrecognised prelim mark, which means that it is not imported. To do this, select the check box in the Ignore column. You can use the Check/Uncheck button to select or clear the check box in multiple highlighted rows as shown in the illustration below:
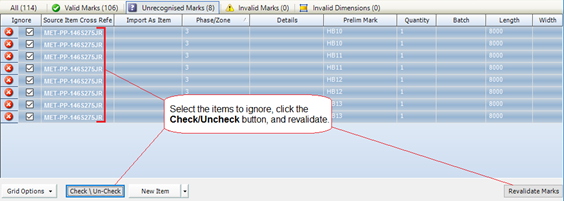
When you complete the import, go to the item library and define the steel or non-steel item. You can then re-import the CAD file.
§ You can click the New Item button to access the item library from within the Import Prelim Wizard. Define the steel or non-steel item, close the item library and revalidate the prelim marks.
§ You can use information from the import file to create steel or non-steel items in the item library. To do this, click the down arrow to the right of the New Item button (as shown below) and select Create Unrecognised Items.
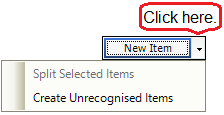
The Create Unrecognised Items form is displayed. The grid contains details about the unrecognised items from the CAD file. Click OK on this form to create the items in the item library. You can now revalidate the prelim marks.
§ You can cancel the wizard, add the unrecognised item to the item library and re-start the wizard.
Invalid prelim marks
An invalid prelim mark is most likely caused by part of the assembly being an Unrecognised Item. If there are no Unrecognised Items then it can be triggered if the prelim mark is not unique.
Prelim marks with invalid dimensions
This status signifies that the dimensions of one of the prelim marks do not match. You can either re-size the offending dimension or remark it. If you change the dimensions of a mark you can check that they are valid by clicking the Revalidate Marks button.
If all of your marks appear as invalid dimensions it most likely because they are not prelim marked. Use the Marking facility to assign identifiers.
Manually create a prelim listing
The following instructions tell you how to create the basic prelim listing record.
|

|
Use the search facility to make sure the prelim list is not already in the system.
See Find and edit a prelim listing if you need help with this.
|
You can populate the list in one of the following ways:
§ Manually
§ By importing prelim marks from an estimate
§ By importing prelim marks from a CAD file
If you import prelim marks from a CAD file, you do not need to create the basic record as described below as it is done automatically as part of the import wizard.
1. Go to Contracts Management >Contract Prelim Listing.
A list of records is displayed.
2. Click New.
The Contract Prelim Listing Details form is displayed.
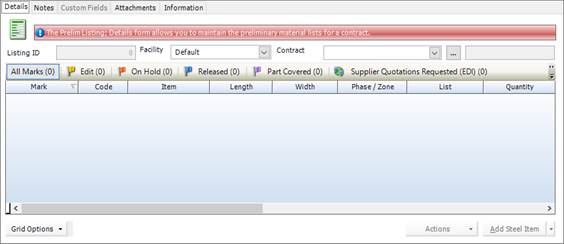
3. Select a facility and a contract and click Save.
Irrespective of how you populate this form, it is the central hub of prelim listing. Click the following link to find out more about the fields on the form and about working with a prelim listing:
Contract Prelim Listing - Details
4. You can now populate the grid using the following methods (you can use all of the methods to populate the same grid if necessary):
§ Add prelim marks manually
§ Add prelim marks from an estimate
§ Add prelim marks by importing a CAD file
Add a prelim mark manually
This topic tells you how to manually add steel and non-steel prelim marks to a prelim listing.
1. Open a prelim listing.
The Contract Prelim Listing form is displayed.
2. Click the Details tab.
The Details tab lists the prelim marks that make up the prelim listing.
3. Click the buttons shown in the graphic below to add new prelim marks.
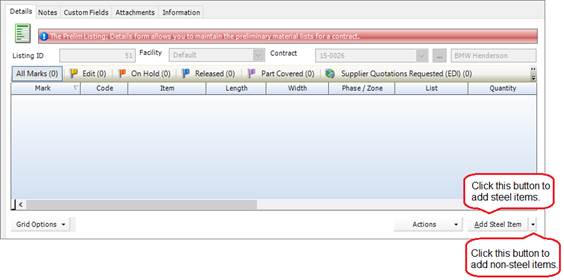
The options are:
§ Add Steel Item
Choose this option to select a steel item from the Item Library, specify a length, width and quantity and add it as a prelim mark to the prelim listing. The process is described in more detail below.
§ Add Non Steel Item
Choose this option to select a non-steel item from the Item Library, specify a quantity and add it as a prelim mark to the prelim listing. The process is described in more detail below.
To add a steel item:
When you select the option to add a steel item, the Prelim Listing Steel Item form is displayed:

1. Specify the attributes of the prelim mark that you want to add to the prelim listing.
Select a Section Code, Size and Grade and specify the required length and width (if applicable).
2. Enter the quantity that you want to add to the prelim listing. When you click outside of the Quantity field, the prelim mark is displayed in the grid at the bottom of the form, allowing you to specify how the its quantity is distributed across phases and lists. Add rows to the grid by typing into the blank last row. You can use the Edit Phases and Edit Lists buttons to create phases and lists.
For each row, specify the list, phase and quantity. Take a look at the illustration below. You can see that there is a total quantity of 5. This is split between phases 1 and 3. In phase 1, the quantity is further split between Lists 1 and 2. The total quantity and the distributed quantities must tally before you attempt to save the prelim mark.
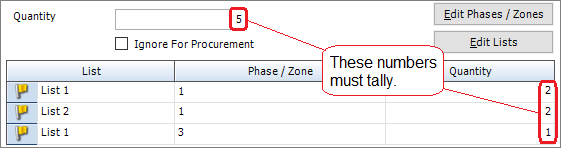
3. If you have a mechanism outside of STRUMIS for purchasing this item, select the Ignore For Procurement check box. During the nesting and ordering process, any prelim marks to be fabricated from this item will have a status of Covered, meaning that no materials need to be purchased.
4. You can optionally add a reference and a description (in the Details field). These are displayed in columns on the Contract Prelim Listing form, and can, therefore, be used to filter information.
5. Click Save.
The prelim mark is added to the Contract Prelim Listing form.
To add a non-steel item:
The process is similar to adding a steel item. See above.
|

|
On the Contract Prelim Listing form:
§ Double-click a line to edit the prelim mark details.
§ Select one or more lines and press the Delete key on your keyboard to remove the prelim marks from the prelim listing.
§ You can import prelim marks from an estimate (see Import prelim marks from an estimate) or from a CAD file (see Import prelim marks from a CAD file).
|
Import prelim marks from an estimate
You can use items from an estimate take off as prelim marks in a prelim listing. This topic tells you how to populate the grid on the Contract Prelim Listing Details form by importing items from an estimate.
1. Open a prelim listing.
The Contract Prelim Listing form is displayed.
2. Click Actions (button) > Import Estimate Listing.
The Estimate Import form is displayed.
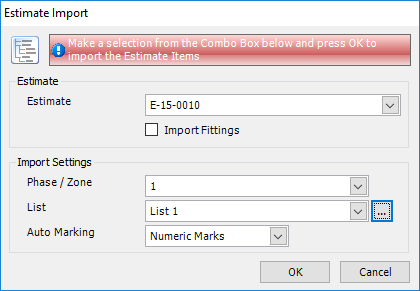
3. Select an estimate from the drop-down list and use the Import Fittings check box to specify whether you want to include the fittings in the import.
4. Select a phase and a list with which to associate the imported prelim marks.
5. Finally, use the Auto Marking field to specify how you want to identify the prelim marks; by assigning characters or by assigning numbers.
6. Click OK.
Items from the estimate are used to populate the grid on the Contract Prelim Listing form.
Find and edit a preliminary list
1. Open the Search form from the sidebar menu.
To do this, go to Contracts Management > Contract Prelim Listing.
2. Enter search criteria and click the Search button.
Records that match your search criteria are listed.
3. Double-click a record to edit it.
For complete information, see Find and edit an existing record.
Preliminary list reports
You can access reports from the sidebar menu. Go to Contracts Management > Contracts Management Reports.
See also:
Work with reports
List of reports
What's next?
When you are happy with the preliminary list, you can continue on to preliminary nesting and ordering. This is a process that enables you to get a head start on acquiring materials that you need for the contract either by reserving materials from inventory or by raising purchase orders for materials that you do not have in stock.
See About preliminary nesting and ordering.
Preliminary listing and preliminary nesting and ordering are optional steps. If you want to skip them, the next mandatory step is to develop a detailed list of the items to be fabricated.
See About detailed listings.
Fields and buttons
Contract Prelim Listing - Details
Use this form to maintain the prelim listing for the specified contract. The grid lists the prelim marks that make up the prelim listing. Use the smart filters at the top of the grid to filter according to the status of the prelim marks. The following sections give more detailed information about the fields, grid and buttons on the form.
Fields
|
Field
|
Description
|
Mandatory/optional
|
|
Listing ID
|
Auto-generated
|
n/a
|
|
Facility
|
Select a facility or use the Default setting.
|
Mandatory
|
|
Contract
|
Select the contract to which the prelim listing relates. The contract description is displayed.
|
Mandatory
|
Grid
The grid has several smart filters, most of which list prelim marks with a particular status (the Supplier Quotations Requested smart filter and the Saved Nests smart filter are exceptions). In the grids that list prelim marks with a particular status, each row in the grid specifies the quantity of a particular prelim mark in a specific phase and list. Prelim marks can be split across multiple phases and lists, which means that there may be more than one row for the same prelim mark. For example, a contract may need two of prelim mark C3063 in phase 1 and three of prelim mark C3063 in phase 2, so prelim mark C3063 has two rows in the grid.
The status of each prelim mark is represented by the following icons:
§  Edit
Edit
You can edit the prelim mark but you cannot nest it.
§  On Hold
You cannot edit or nest the prelim mark. Use this status to put the prelim mark on hold in the event of an imminent change to the design, for example.
§  Released
Release the prelim mark if you are happy with the details and want to nest it. Only released prelim marks can be nested.
§  Part Covered
You cannot manually change the status of a prelim mark to Part Covered; this is done automatically by the nesting and ordering process. For example, suppose that you require a quantity of five prelim marks. When you carry out the nesting process, you may have enough material to fabricate three of the required five. This is a part covered mark and it is displayed in this smart filter to show that you need to source more material to complete the full quantity.
§  Covered
This status means that the prelim mark has been covered by a nest and all material needed for the prelim mark (on the phase and list) is allocated or on order. You cannot manually change the status of a prelim mark to Covered; this is done automatically by the nesting and ordering process.
To change the status of a prelim mark, select a line in the grid, select Actions (button) > Item Status, and specify the required status.
The information displayed in each smart filter is described in the following sections.
All Marks
Displays all prelim marks in the prelim listing.
Edit
Displays the prelim marks in the prelim listing that have a status of Edit.
On Hold
Displays the prelim marks in the prelim listing that have a status of On Hold.
Released
Displays the prelim marks in the prelim listing that have a status of Released.
Part Covered
Displays the prelim marks in the prelim listing that have a status of Part Covered.
Supplier Quotations Requested
During the preliminary nesting and ordering process, you can raise an RFQ (Request For Quotation) to send out to a supplier to check on material costs and availability. If you have raised RFQs, they are listed here.
Saved Nests
During the preliminary nesting and ordering process, you can save the nest that you have developed so that you can return to it later, typically when you have received quotations from your suppliers regarding material costs and availability. Saved nests are listed here. Double-click a nest to open it and continue with the nesting and ordering process.
Covered
Displays the prelim marks in the prelim listing that have a status of Covered.
Buttons
Add Steel Item/Add Non Steel Item
These options allow you to add prelim marks to the listing.
See Add a prelim mark manually.
Actions
The following options are available:
|
Option
|
Description
|
|
View Mark Status
|
Select this option to view the Mark Status form.
|
|
View Item Status
|
Select this option to view the Item Status form.
|
|
View Cutting Plan
|
Available only for nested items.
Opens the Cutting Plan Viewer form, where you can view the selected mark item's nested cutting plan along with the supplier details and purchase order number.
See Cutting Plan Viewer.
|
|
Item Status
|
You can change the status of the item to Edit, Hold, or Release for Nesting/Ordering. See above for information about the item status.
|
|
Nesting and Ordering
|
When you have released prelim marks, use these options to begin the process of nesting and ordering. See About preliminary nesting and ordering.
|
|
Calculate
|
Recalculates the mark gross weight, based on the Weight parameter on the Item - Details form.
|
|
Reports
|
The available reports are:
§ Prelim Coverage Report
§ Marks Cut By Bars Report
|
|
Refresh
|
Use this option to refresh the form after you have made updates.
|
|
Import Estimate Listing
|
See Import prelim marks from an estimate.
|
|
CAD Interface
|
See Import prelim marks from a CAD file.
|
|
Batch Update
|
Displays the Contract Prelim Mark Batch Update form, where you can update the nesting batches for multiple prelim marks.
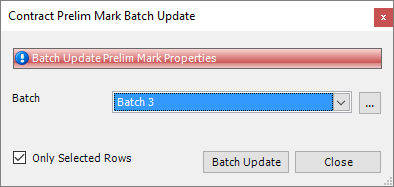
1. Select one or more prelim marks in the grid.
2. Select the required batch or click the Ellipsis button to create new ones.
3. Specify whether you want to assign all of the prelim marks to the batch or only the selected ones.
4. Click the Batch Update button.
The Batch column is updated.
|
|
View Lists
|
Displays the List Edit form, where you can view and edit list information.
|
|
View Phases
|
Displays the Contract Phases/Zones form.
|
|
View Batch Listing
|
Displays the Prelim Batch Listing form, which lists the prelim marks in each batch.
|
|
Resend Existing Supplier Quotation/Order Request (EDI)
|
Allows you to resend an EDI file to your supplier.
|
|
Cancel Existing Supplier Quotation/Order Request (EDI)
|
Use this option if you have sent an EDI file to a supplier and decide to withdraw the request for a quotation or cancel an order.
|
|
Export Supplier Quotation/Order Request (EDI)
|
Allows you to export your EDI File request to a file.
|
Mark Status
Use this form to view information about a mark. You can see the phase/zone quantities, the lot allocation and the component marks that are associated with the mark. If the component marks have purchase orders and inventory allocations, these are shown as well.

The following options are available from the Actions button:
§ Email Mark Status Report
Allows you to generate an e-mail with the Mark Status report attached.
§ Print Mark Status Report
Allows you to generate the Mark Status report.
Import Prelim Wizard - Item Listing
This screen lists prelim marks from the CAD file. They are divided into tabs to show the prelim marks that have a match in the item library and those that are unrecognised by STRUMIS and need further definition.
You can also assign numeric or alphabetic identifiers to the prelim marks, allocate them to phases, and batch them for nesting and ordering.
Grid
The grid lists the prelim marks from the CAD import file. They are separated into the following smart filters:
Mark
During the import process, you can assign numeric or character identifiers to the prelim marks.
Use the following instructions:
1. Select Character Marks or Numeric Marks.
2. Specify whether you want to assign identifiers to all of the prelim marks or only invalid prelim marks.
3. Click the Mark button.
The identifiers in the Prelim Mark column are updated.
Re-phase
During the import process, you can assign prelim marks to a phase. Use the following instructions:
1. Select one or more prelim marks in the grid.
2. Select the required phase.
3. Specify whether you want to assign all of the prelim marks to the phase or only the selected ones.
4. Click the Phase button.
The Phase/Zone column is updated.
Re-batch
During the import process, you can assign prelim marks to a batch. This is a batch for nesting purposes. It helps you to group like items for future processing. Use the following instructions:
1. Select one or more prelim marks in the grid.
2. Select the required batch or click the Ellipsis button to create new ones.
3. Specify whether you want to assign all of the prelim marks to the batch or only the selected ones.
4. Click the Batch button.
The Batch column is updated.
Import Prelim Wizard - Revisions
This screen is displayed only in the following circumstances:
§ When you update and revalidate prelim marks in Screen 4
§ When you are importing a CAD file to revise an existing prelim listing
It looks like this:
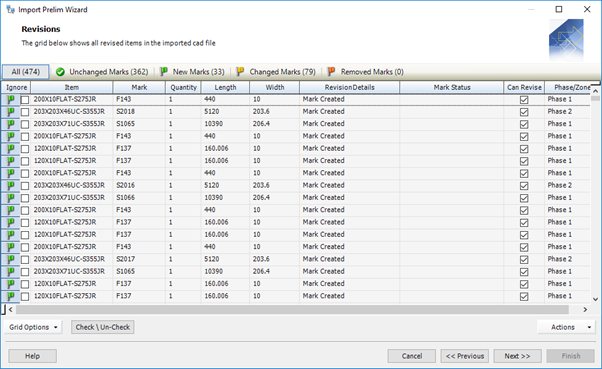
The prelim marks from the source file are listed and separated into smart filters. The only option you have on this screen is to exclude prelim marks from the import. To do this, select the check box in the Ignore column for the prelim marks to be excluded.
Import Prelim Wizard - Create Prelim List
This screen allows you to make some final decisions about the prelim listing before it is loaded and saved.
The screen looks like this:

Final Options
|
Field
|
Description
|
|
Open Preliminary Listing
|
Select this check box to open the Contract Prelim Listing Details form when the import process has finished. The default setting for the check box is controlled in Contract Management Options.
|
|
Auto Release Marks
|
Select this check box to set the status of the imported prelim marks to Released. This means that they are available for nesting. You can launch the Nesting And Order Wizard as soon as the import is finished. To do this, select the Run Nesting And Order Wizard check box.
|
|
Persist Cross Reference
|
Select this check box if you want STRUMIS to remember the mappings that you put in place for unrecognised items in Screen 4. It does this by adding a cross reference in the Item form. The availability of this check box depends on the setting Only Allow Admin Users to Persist Cross References in Contracts Management Options.
|
|
Ignore All Invalid And Unrecognised Items
|
Select this check box if you want to exclude invalid and unrecognised items from the import.
|
|
Add CAD File To The Contract Prelim Listing Attachments
|
Select this check box to save the original import file as an attachment in the Contract Prelim Listing form.
|
New/Changed Items
When you import revisions to an existing prelim listing, you can decide how to treat new and changed items.
§ New items
If you select the Ignore all new items check box, new items are not added to the prelim listing.
§ Changed items
You have the following options:
Revise changed items updates the existing prelim listing with the newly imported changes.
Leave changed items and come back later
Ignore all changed items does not update the existing prelim listing with changes.
Removed Items
If you re-import a CAD file, and some of the prelim marks that appeared in the original file are no longer present, you can decide how to treat those remove items in the existing prelim listing. You have the following options:
Ignore all removed items does not remove items from the existing prelim listing, even if they no longer appear in the import file.
Place removed items on hold assigns a status of On Hold to items in the existing prelim listing if they no longer appear in the import file.
Preliminary nesting and ordering
About preliminary nesting and ordering
Preliminary nesting is an optional process that enables you to get a head start on sourcing materials that you need for a contract. It involves reviewing the items that you are going to fabricate, reviewing the material that you have available for the fabrication, and calculating a cutting plan that minimises material costs and wastage.
Before you make a start, then, you must have a preliminary list of the items that you need for the contract. Take a look at About preliminary listings for more information. The preliminary listing is a provisional list of the items that you are going to fabricate. This means that it is unlikely to give final accurate measurements and typically does not include fixings. More precise information is available when you receive a detailed listing from your client; at this point, you can repeat the nesting process with the final measurements and requirements.
You can source material from your inventory, suppliers, steel mills, outstanding purchase orders and theoretical offcuts (meaning the leftovers from other nesting processes). You can manually amend the cutting plan if necessary; when you are happy with it, you can reserve material for the contract, raise purchase orders for extra material that you need, or raise RFQs (Requests For Information) to send to suppliers to check cost prices and availability.
STRUMIS uses a wizard to guide you through the nesting and ordering process (see The Nesting Wizard). You can also nest manually (see Manual Nesting). Both methods draw on information from the item library and the supplier setup forms.
What's next?
Preliminary nesting and ordering is an optional step. If your company uses this STRUMIS facility, you should now have one or more of the following:
§ Saved nest
When you receive the required information, you can open and complete any saved nests.
§ Purchase order
If you are sure that you need to order material, you can send purchase orders.
§ Request for information
If you have generated requests for information, you can send them out to your suppliers.
The next step is to create a detailed list of the items that you are going to fabricate.
See About detailed listings.
Chapter 7
Working with detailed lists
What's in this chapter?
About detailed lists
Detailed list terminology
Create a detailed list
Import a detailed listing from a CAD file
Resolve unrecognised mark items
Resolve invalid marks
Resolve invalid dimensions
Create a detailed listing
Add a drawing
Add a mark
Add a mark item
Import marks from a prelim listing
Batch update marks
Batch update mark items
Use a black flag to indicate removed items
Import CAM/DSTV files
About revising a detailed list
Revision options
Phase and lot changes
Item (section size) changes
Mark item length changes (linear items)
Mark item quantity increase or new mark item added
Mark item quantity decrease
Mark item removed
Find and edit a detailed list
Detailed list reports
What's next?
Fields and buttons
About detailed lists
A detailed list is a list of the items that you are going to fabricate and assemble for a contract. It is based on final, detailed drawings but you can revise it if the drawings change. You can import a list of items from a CAD model, or you can develop the detailed list manually. Importing a list from a CAD file is the most popular method and STRUMIS uses a wizard to guide you through the process.
At the same time as developing a detailed list, you can specify phases/zones for the contract and you can put marks into lots. It's a good idea to do the phasing at this point as the source information is up-to-date. You must assign marks to lots (and release the lots) prior to nesting; you can do that while importing marks from a CAD file, or by using the STRUMIS lotting facility (see About Lotting).
Access
To access detailed lists, click the Detailed Listing button on the Contract Ribbon. Alternatively, from the sidebar menu, go to Contracts Management > Contract Detailed Listing.
When you create or edit a detailed list, you will use the Contract Detailed Listing form.
Detailed list terminology
The following table shows the terminology that is used in STRUMIS to refer to the various components of a drawing:
|
Field
|
Description
|
|
Assembly mark
|
This is a group of marks (see below), for example, a truss. Because an assembly mark contains other marks, it is sometimes called a parent mark. The marks that it contains are called child marks.
There are two types of assembly mark:
§ A site assembly, where marks are bolted together on-site
§ A shop assembly, where marks are welded/bolted together in the workshop, prior to dispatch
When you import or develop a detailed list, you can put marks into lots. Marks in the same lot are delivered to site together. For this reason, the child marks of a site assembly can be lotted, whereas shop assemblies are lotted at the parent mark level.
An assembly mark has the following additional properties:
§ It is used only to contain other marks. You cannot add mark items to an assembly mark.
§ You cannot assign a phase/zone to an assembly mark
§ You can define a quantity for an assembly mark
If you specify a quantity for an assembly mark, total material quantities are affected. For example, you may have an assembly mark (A) that contains two child marks (B and C). If you specify the following quantities:
Assembly mark A: quantity = 5
Child mark (B): quantity = 2
Child mark (C): quantity = 6
the total number of marks that are fabricated is:
Child mark (B): total quantity = 10 (5 x 2)
Child mark (C): total quantity = 30 (5 x 6)
|
|
Mark
|
This is the lowest level assembly, for example, a beam. It can be made up of one or more mark items (see below).
When a mark is part of a larger assembly, it is called a child mark.
|
|
Mark item
|
A mark item is a steel or non-steel component. One or more mark items make up a mark.
|
Create a detailed list
You can create a detailed list in one of the following ways:
§ By importing information from a CAD file
This is the most common way of constructing a detailed list.
Outside of the STRUMIS system, a detailer uses CAD software to prepare drawings that contain the exact requirements for each item that you are going to fabricate. If you have access to the files from the CAD package, you can use the Import Detail Wizard and the Contract CAM/DSTV Import Wizard to import the list and fabrication requirements. The wizard automatically creates a Contract Detailed Listing record and stores the imported information within.
See Import detailed list from a CAD file.
§ Manually on the Contract Detailed Listing form
See Manually create a detailed list.
You can then populate the detailed list in one or more of the following ways:
§ Manually
To do this, see:
Add a drawing
Add a mark
Add a mark item
§ By importing marks from a preliminary list
If you took the optional step of preparing a preliminary list, you can use it as the basis for a detailed list
See Import marks from a prelim list
§ By importing marks from a CAD file
See Import detailed list from a CAD file
Import a detailed listing from a CAD file
This topic tells you how to populate the grid on the Contract Detail Listing - Details form by importing mark items from a CAD generated report, a coma separated values (.csv) file, or a tab separated text (.txt) file. STRUMIS has a wizard that leads you through the import process. Launch the Import Detail Wizard in one of the following ways:
§ Go to Contracts Management > Import Detailed Listing.
This is the most common way of creating a detailed listing for your contract.
§ Open a Contract Detailed Listing form.
Click Actions (button) > CAD Interface.
The wizard is described below.
Screen 1: Import Detail Wizard - Welcome
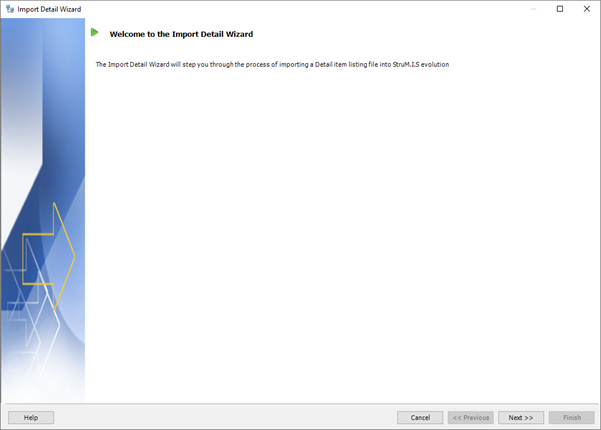
This is simply a welcome screen and you can click Next immediately to continue to the next screen.
Screen 2: Import Detail Wizard - Select/Create a Contract
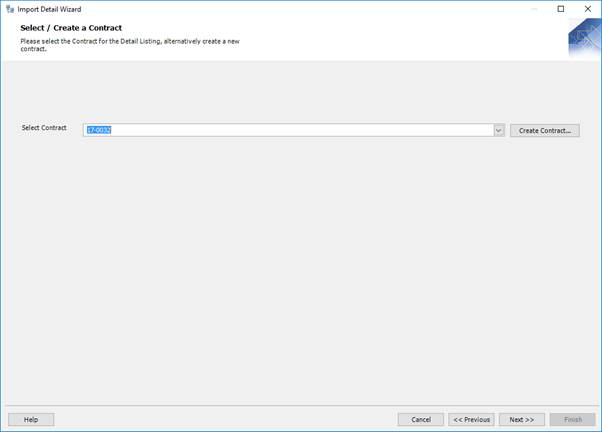
This screen is displayed only when you launch the wizard from Contracts Management > Import Detailed Listing.
Select the contract for which you are importing a detailed listing. You can create a contract if you do not have one set up already. To do this, click the ellipsis button. See Create a contract.
Click Next to continue to the next screen.
Screen 3: Import Detail Wizard - Select File
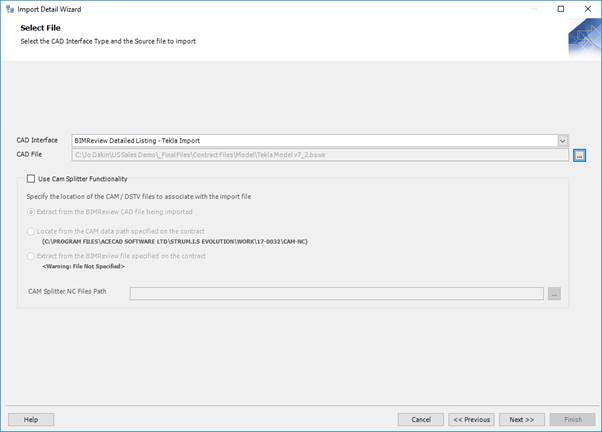
Use this screen to specify the CAD file from which you are going to import information. You must first select a CAD interface from the drop-down list. This is the type of file to be imported and depends on the software that was used to produce the CAD file. Examples are Tekla and ProSteel. You can then browse for the CAD file to be imported.
Click Next to continue to the next screen.
Screen 4: Import Detail Wizard - Item Listing

This screen lists the marks in the CAD file. They are divided into tabs to show the marks that have a match in the item library and those that are unrecognised by STRUMIS and need further definition.
For each mark, you can also specify a paint finish, phase, and lot.
For full details, see Import Detail Wizard - Item Listing.
Click Next to continue to the next screen.
Screen 5: Import Detail Wizard - Revisions

This screen is only available when you import a file to revise a detailed listing. It allows you to review differences between the current detailed listing and the new CAD file that you are importing.
For full details, see:
About revisions
Import Detail Wizard - Revisions
Click Next to continue to the next screen.
Screen 6: Import Detail Wizard - Revisions Un-nesting Rollback Options

This screen is only available when you import a file to revise a detailed listing and when there are marks and mark items that cannot be automatically revised.
Items that cannot be revised until they are unissued and un-nested are listed. You can select the items that you want to unissue and un-nest, thus allowing the revision of these items to go ahead.
For full details, see:
About revisions
Import Detail Wizard - Revisions Unnesting Rollback Options.
Click Next to continue to the next screen.
Screen 7: Import Detail Wizard - Revisions Un-Issue Rollback Options

This screen is only available when you import a file to revise a detailed listing and when there are marks and mark items that cannot be automatically revised.
Items that cannot be revised until they are unissued from production, but that do not need to be un-nested, are listed. You can select items and unissue them, thus allowing the revision of these items to go ahead.
For full details, see:
About revisions
Import Detail Wizard - Revisions Unissue Rollback Options
Click Next to continue to the next screen.
Screen 8: Import Detail Wizard - Create Detailed List

This screen allows you to make some final decisions about the detail listing before it is loaded and saved. These include the option to continue immediately to nesting and ordering, and instructions about how to deal with revisions if necessary.
When you have selected the relevant options, click Finish to load the marks into the Contract Detail Listing - Details form.
For full details, see:
Import Detail Wizard - Create Detailed List
Contract Detailed Listing - Details
Resolve unrecognised mark items
The Unrecognised Mark Items tab, on the Import Detail Wizard - Item Listing screen, lists mark items from the import file that are not recognised by STRUMIS. This means that the system cannot match the item from the import file with an item in the STRUMIS item library. Here are some examples of when this might happen:
§ In your STRUMIS item library, there is a section called:
UB406X178X54
In the CAD import file, the same section is called:
UB406*178*54
The Import Detail Wizard does not recognise the section name from the CAD file because a * character has been used to separate the dimensions instead of X. This is the most common reason for unrecognised mark items.
§ In STRUMIS, you have defined a steel grade:
S275JR
In the CAD import file, the grade is:
S_275JR
The Import Detail Wizard does not recognise the grade from the CAD file because it contains an _ character.
There are several ways to remedy the situation; they are described in the following sections:
Map the unrecognised item manually
Use the Item Picker to manually map the unrecognised mark item to an item in the item library. Take a look at the illustration below:
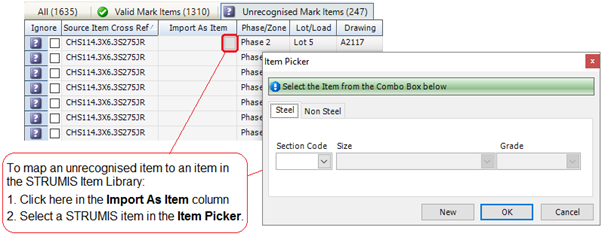
Click the Revalidate Marks button when you have mapped the unrecognised mark items. The newly mapped mark items are now listed in the Valid Mark Items tab.
On the final wizard screen, you have an option, Persist cross references, which allows you to retain the mappings for future imports.
Ignore the unrecognised item
You can choose to ignore the unrecognised mark item, which means that it is not imported. To do this, select the check box in the Ignore column. You can use the Check/Uncheck button to select or clear the check box in multiple highlighted rows as shown in the illustration below:
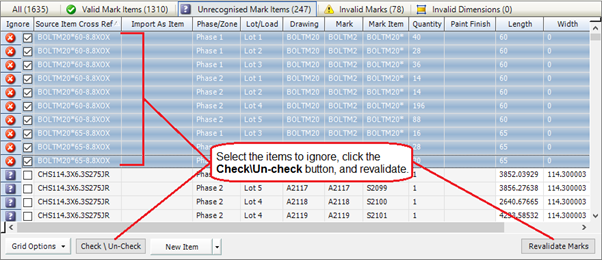
When you complete the import, go to the item library and define the steel or non-steel item. You can then re-import the CAD file.
Update the item library
To update the item library:
§ You can click the New Item button to access the item library from within the Import Detail Wizard. Define the steel or non-steel item, close the item library and revalidate the marks.
§ You can use information from the import file to create steel or non-steel items in the item library. To do this, click the down arrow to the right of the New Item button (as shown below) and select Create Unrecognised Items.
The Create Unrecognised Items form is displayed. The grid contains details about the unrecognised items from the CAD file. Click OK on this form to create the items in the item library. You can now revalidate the mark items.
§ You can cancel the wizard, add the unrecognised item to the item library and re-start the wizard.
Update the STRUMIS grades
You can cancel the wizard, add the unrecognised grade to the grade table as a cross reference (see Grade Details) and re-start the wizard.
Resolve invalid marks
Invalid marks of all types are listed on the Invalid Marks tab on the Import Detail Wizard - Item Listing screen.
Unrecognised mark items are also listed on a dedicated tab. To resolve them, see Unrecognised mark items.
Mark items with invalid dimensions are also listed on a dedicated tab. To resolve them, see Invalid dimensions.
When you have resolved any unrecognised mark items and invalid dimensions, invalid marks caused by other reasons are left. The most common of these are described below.
Mark items with the same name have different properties
You can use the grid options to organise the grid so that you can easily pick out mark items that have the same name but different properties. Take a look at the examples below.
Example 1: same name, different item
Group the items in the grid firstly by the Mark Item column, and then by the Import As Item column. For guidance about how to do this, see Work with grids. Scroll down the list to find any mark items that are listed with 2 Items.
In the following example, the mark item PLT1 has been incorrectly specified as a 120x10FLAT in one instance but in all other cases is specified as a 450x25FLAT.

In this case, you can either edit the source file or liaise with the draughtsman who could re-mark the 120x10FLAT or change it to match all other PLT1 mark items. When you have resolved the problem, import the re-issued CAD file. The mark items should then be valid.
Example 2: same name different cut type
Group the items in the grid firstly by the Mark Item column, and then by the Cut Type column. For guidance about how to do this, see Work with grids. Scroll down the list to find any mark items that are listed with 2 Items.
To resolve this problem, do one of the following:
§ Have the draughtsman correct the problem and re-issue the file. You can then re-import the CAD file.
§ Turn off the option for Cut Type within the CAD Interface so that it imports all items as Straight Cut.
This is the quick option, but it means that all items are imported as Straight Cut for all marks.
Invalid lot or phase
In the contract for which you are importing the detailed listing, you can set two parameters on the Contract - Details form. They are:
§ Phase/Zone Source
If you set this to CAD, phase information is imported from the CAD file. This means that the mark items that make up a mark must share the same phase information, otherwise the mark is invalid.
§ Lot/Load Source
If you set this to CAD, lot information is imported from the CAD file. This means that the mark items that make up a mark must share the same lot information, otherwise the mark is invalid.
In the example below, the mark items that make up mark 5 are in lot 3 apart from mark item PLT3, which is in lot 2. Mark 5 is, therefore, rendered invalid.
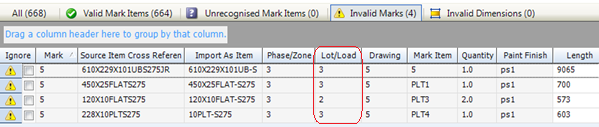
Use the re-phase and re-lot facilities on the Import Detail Wizard Item Listing screen to rectify this type of issue.
Quantity set to 0
If the value in the Quantity column for any mark item is 0, then it is rendered invalid. The best course of action is to have the draughtsman correct the problem and re-issue the file. You can then re-import the CAD file.
No main member specified
If you have considered all of the sections above but still have invalid marks, it may be that the invalid mark does not have a main member specified. This occurs when mark items are created from a dummy member within the CAD package and the dummy member is set to be the main member in error by the draughtsman.
To find this type of invalid mark, first use the grid options to show the SourceMainMember column. For guidance about how to do this, see Work with grids.
The mark item that is the main member has a SourceMainMember value of 1. If none of the mark items for the mark are flagged as the main member, the only solution is to have the draughtsman correct the problem and re-issue the file. You can then re-import the CAD file.
Resolve invalid dimensions
Mark items of the same name must have the same dimensions. If this is not the case, the mark items are listed on the Invalid Dimensions tab, on the Import Detail Wizard - Item Listing screen. The illustration below shows mark items with different lengths:
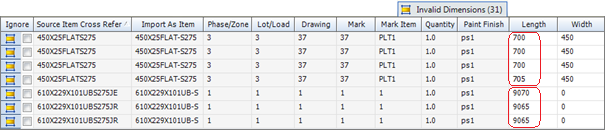
Mark item 1 has two instances of a length of 9065mm and one instance of a length of 9070mm.
Mark item PLT1 has 27 instances of a length of 700mm and one instance of a length of 705mm
This is typically caused by tolerance settings in the CAD package. In our example, a tolerance has been set to allow components that vary by up to and including 5mm to be marked the same.
To remedy this situation:
1. Edit the spurious length directly in the grid, then tab out of the field.
All instances of the mark item are updated.
2. Click the Revalidate Marks button.
The updated mark items are now listed in the Valid Mark Items tab.
|

|
In the Contracts Management Options, you can use the following parameters to set a tolerance.
§ CAD Interface Dimensions tolerance (mm)
Specify the number of millimetres by which mark item dimensions can differ. If the dimensions fall within the tolerance, the mark item is valid; if they fall outside of the tolerance, the mark item is listed in the Invalid Dimensions tab.
§ CAD Interface Dimensions tolerance Rounding
Specify whether you want to round up or down.
|
Create a detailed listing
The following instructions tell you how to create the basic detailed listing record. You can then populate it in one of the following ways:
§ Manually
§ By importing marks from a prelim listing
§ By importing marks from a CAD file
If you import prelim marks from a CAD file, you do not need to create the basic record as described below as it is done automatically as part of the import wizard.
1. Go to Contracts Management >Contract Detailed Listing.
A list of records is displayed.
2. Click New.
The Contract Detailed Listing - Details form is displayed.

Irrespective of how you populate this form, it is the central hub of detailed listing. Click the following links to find out more about the fields on the form and about working with a detailed listing:
Contract Detailed Listing - Details
Contract Detailed Listing - Mark Item View
3. Select a facility and a contract and click Save.
You can now populate the grid using the following methods (you can use all of the methods to populate the same grid if necessary):
§ Manually
To do this, see:
Add a drawing
Add a mark
Add a mark item
§ By importing marks from a prelim listing
See Import marks from a prelim listing
§ By importing marks from a CAD file
See Import detailed listing from a CAD file
Add a drawing
Use these instructions to manually add a drawing to a detailed listing. You can then add marks and mark items for the drawing.
On the Contract Detailed Listing - Details form:
1. Click Actions (button) > Add Drawing.
The Detailed Listing Drawing form is displayed.
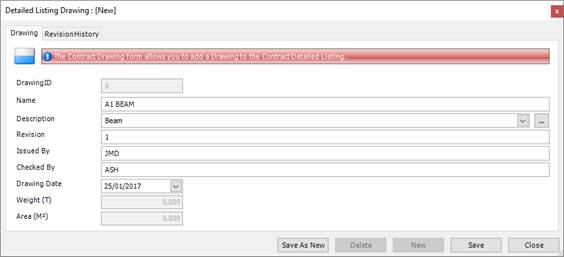
2. Complete the fields on the form using the following information:
Drawing tab
|
Field
|
Description
|
|
DrawingID
|
Automatically populated.
|
|
Name
|
Type in a name for the drawing.
|
|
Description
|
Select a description from the drop-down list or click the ellipsis button to create a new one.
|
|
Revision
|
Type in the revision number for the drawing.
|
|
Issued By
|
Type in the name or initials of the person who issued the drawing.
|
|
Checked By
|
Type in the name or initials of the person who checked the drawing.
|
|
Drawing Date
|
Specify the date on which the drawing was created.
|
|
Weight
Area
|
These fields show the weight and area of any items that you add to the drawing
|
Revision History tab
This tab details any changes made to the drawings's marks and mark items after it has been lotted.
3. Click Save.
The drawing is added to the list of drawings on the Contract Detailed Listing - Details form.
|

|
You can add drawings by copying them from another detailed listing. To do this:
1. Click Actions > Copy Drawings.
The Copy Drawing form is displayed:

2. Select the contract from which you want to copy and click Search.
The drawings associated with the contract are listed.
3. Select the lines that you want to copy and click OK.
The selected information is copied to the list of drawings on the Contract Detailed Listing - Details form.
|
Add a mark
Use these instructions to add a mark to a drawing.
On the Contract Detailed Listing - Details form:
1. Select the drawing to which you want to add a mark.
2. Click the Add Mark button.
The Detailed Listing Mark form is displayed:
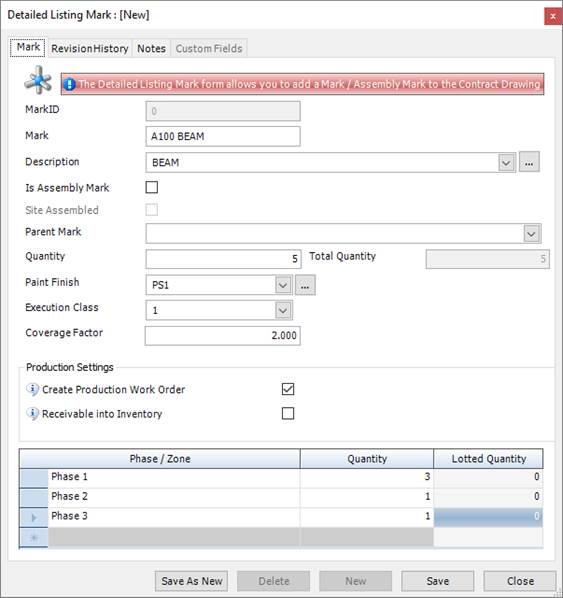
3. Complete the fields on the form using the following information:
Mark tab fields
|
Field
|
Description
|
|
MarkID
|
Automatically populated.
|
|
Mark
|
Type in a name for the mark.
|
|
Description
|
Type in a description for the mark.
|
|
Is Assembly Mark
|
Select this check box if this is an assembled mark. The Site Assembled check box becomes available. The Parent Mark field becomes unavailable.
If this mark is not an assembled mark, the Parent Mark field is available and you can select a parent.
|
|
Site Assembled
|
Select this check box if the mark is an assembly mark and is to be assembled on site.
|
|
Parent Mark
|
If this mark is a child mark, select a parent from the drop-down list.
|
|
Quantity
Total Quantity
|
Specify the quantity of the mark that is required. If the mark is a child mark, the quantity is multiplied by the quantity of the parent to give a total quantity.
|
|
Paint Finish
|
Select a paint finish from the drop-down list or click the ellipsis button to create a new one.
|
|
Execution Class
|
Select an execution class: 1, 2, 3 or 4.
See About execution classes.
|
|
Coverage Factor
|
If this mark requires a paint finish, specify a coverage factor here. This is a multiple of the actual amount of paint that is required. It is used to account for wastage.
|
|
Create Production Work Order
|
Select this check box to automatically create a work order when you use the Generate Contract Work Orders Wizard.
|
|
Receivable into Inventory
|
Use this flag if the mark is to be fabricated and then stored in your inventory for future use. When you set the flag, an extra field is displayed, where you must specify the code, size and grade for the section that you want to receive into inventory.
When you finish creating the detailed listing, you will go on to create a work order for the mark. The work order is progressed through production and the fabrication of the mark is completed. At this point, you can receive the completed mark into your inventory using a Receive From Work Order transaction. See About Receive From Work Order. The new inventory item has the same length and width as the mark's main member. You might use this functionality, for example, to fabricate a plate girder and receive it into the inventory as a single item.
|
Mark tab grid
If you have specified a quantity of more than one mark, you can split the mark across several phases. When you return to the Contract Detailed Listing - Details form, in the list of marks, you can view the phases for each mark. To do this, select the Display Mark Phases/Zones check box.
Revision History tab
This tab shows details of any changes made to this mark or its mark items after it has been lotted.
Notes tab
Use this tab to add notes for the mark.
4. Click Save.
The mark is added to the list for the selected drawing.
Add a mark item
Use these instructions to add a mark item to a mark. You can add a steel item or a non-steel item.
To add a steel item
On the Contract Detailed Listing - Details form:
1. Select a drawing, then select the mark to which you want to add a mark item.
2. Click the Add Steel Item button.
The Component Mark Steel Item form is displayed:

3. Complete the fields on the form using the following information:
|
Field
|
Description
|
|
Mark Item
|
Enter a unique name for the mark item. A mark item name is unique throughout a contract. To use a mark item on more than one mark, select it from the Name drop-down list.
|
|
Is Main Member
|
Select this check box if the mark item is a main member.
|
|
Section Code
Size
Grade
|
Specify a section code, size and grade for the mark item.
|
|
Type
|
Select Shaft, Fitting or Other from the drop-down list.
|
|
Length
Width
|
Enter a length for linear sections and a width for non linear sections.
|
|
Quantity
|
Specify the required quantity of the mark item.
|
|
Prelim Mark
|
If you use the preliminary listing and preliminary nesting and ordering facilities in STRUMIS, you may have a prelim mark that matches this mark item. During the prelim nesting and ordering process, you may have already sourced the material from which you are going to fabricate this mark item. If this is the case, enter the related prelim mark here. This information will be used later during the detailed nesting process.
|
|
Reference
|
This is a free text field. You could use it to store a drawing reference, for example.
|
|
Paint Finish
|
This field is initially set to the paint finish that you specified for the mark, but you can override it if necessary. Select a paint finish from the drop-down list or click the ellipsis button to create a new one.
|
|
Ignore For Procurement
|
If you have a mechanism outside of STRUMIS for purchasing the material needed for this mark item, select this check box. During the nesting and ordering process, the mark item will have a status of Covered, meaning that no materials need to be purchased for its fabrication.
|
|
Create Production Work Order
|
Select this check box to automatically create a work order when you use the Generate Contract Work Orders Wizard.
|
|
Automatically Issue Inventory To Production (Backflush)
|
Select this check box to specify that the mark item's parent bar will be removed from the inventory when the mark item is cut in Production Control.
|
|
Cut Type
Top Flange
Web
Bottom Flange
|
Select a cut type from the drop-down list or click the ellipsis button to create a new one.
If the cut type is anything other than Straight Cut, enter start and end angles for the top flange, web and bottom flange as necessary.
|
Revision History tab
This tab shows details of any changes made to this mark item after it has been lotted.
Notes tab
Use this tab to add notes for the mark item.
4. Click Save.
The steel item is added to the list for the selected mark.
To add a non-steel item
On the Contract Detailed Listing - Details form:
1. Select a drawing, then select the mark to which you want to add a mark item.
2. Click the Add Non Steel Item button.
The Component Mark Non Steel Item form is displayed:

3. Complete the fields on the form using the following information:
|
Field
|
Description
|
|
Mark Item
|
Enter a unique name for the mark item. A mark item name is unique throughout a contract. To use a mark item on more than one mark, select it from the Name drop-down list.
|
|
Item
|
Select a non-steel item from the drop-down list.
|
|
Quantity
|
Specify the required quantity of the mark item.
|
|
Type
|
Select Shaft, Fitting or Other from the drop-down list.
|
|
Prelim Mark
|
If you use the preliminary listing and preliminary nesting and ordering facilities in STRUMIS, you may have a prelim mark that matches this mark item. During the prelim nesting and ordering process, you may have already sourced the material from which you are going to fabricate this mark item. If this is the case, enter the related prelim mark here. This information will be used later during the detailed nesting process.
|
|
Reference
|
This is a free text field.
|
|
Ignore For Procurement
|
If you have a mechanism outside of STRUMIS for purchasing the material needed for this mark item, select this check box. During the nesting and ordering process, the mark item will have a status of Covered, meaning that no materials need to be purchased for its fabrication.
|
|
Create Production Work Order
|
Select this check box to automatically create a work order when you use the Generate Contract Work Orders Wizard.
|
|
Automatically Issue Inventory To Production (Backflush)
|
Select this check box to specify that the mark item's parent bar will be removed from the inventory when the mark item is cut in Production Control.
|
Revision History tab
This tab shows details of any changes made to this mark item after it has been lotted.
Notes tab
Use this tab to add notes for the mark item.
4. Click Save.
The non-steel item is added to the list for the selected mark.
Import marks from a prelim listing
If you have a preliminary listing for this contract, you can import prelim marks from the prelim listing into a detailed listing. The prelim marks are listed as drawings on the Contract Detailed Listing - Details form. Please note that preliminary listing is an optional feature in STRUMIS and your company may not use it.
Use these instructions to import marks from a prelim listing.
On the Contract Detailed Listing - Details form:
1. Click Actions (button) > Import Prelim Listing.
The Import Prelim Listing form is displayed.
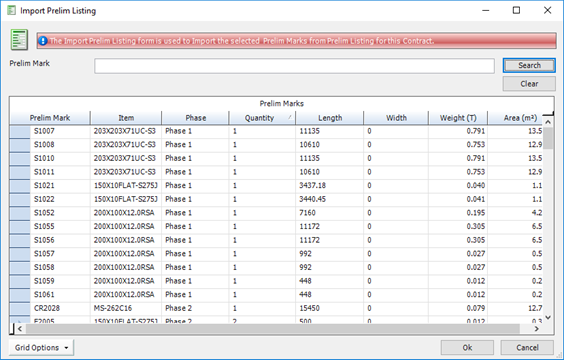
2. Select the prelim marks that you want to add to the detailed listing.
To do this:
§ Press Ctrl A to select all lines, or
§ Press the Ctrl key and click several non-contiguous lines, or
§ Press the Shift key then click the first and last lines in a range.
3. Click OK.
The prelim marks are added to the Contract Detailed Listing - Details form.
Batch update marks
Use these instructions to batch update multiple mark items on a detailed listing, when generating work orders, or from production control.
§ On the Contract Detailed Listing - Details form:
Select a drawing.
Select the marks that you want to update.
§ On the Generate Contract Work Orders - Details form:
Select the marks that you want to update.
§ On the Production Control form:
Select the marks that you want to update.
In all cases, use the following instructions:
1. Click Actions (button) > Batch Update Contract Marks.
The Contract Mark Batch Update form is displayed.

2. Complete the fields on this form using the following information:
|
Field
|
Description
|
|
Create Production Work Order
|
Select this check box to automatically create a work order in the Generate Contract Work Orders Wizard.
|
|
Apply to child mark(s)/mark item(s)
|
Select this check box to apply the setting for Create Production Work Order to any child marks or mark items associated with the mark.
|
|
Paint Finish
|
Select a paint finish from the drop-down list.
|
|
Execution Class
|
Select an execution class from the drop-down list.
|
|
Production Bundle
|
This field is available only when you access this form from production. It is used to group marks that are going through the production process together. A production bundle (unlike a batch) can be used to group items across different contracts.
|
|
Mark Notes
|
Type in a note. This is included on the Detailed Listing Mark - Notes form.
|
|
Append Notes
|
Select this check box to append the note to any others on the Detailed Listing Mark - Notes form. If the check box is cleared, the note is used to replace any that are present on the Detailed Listing Mark - Notes form.
|
|
Only Selected Rows
|
Select this check box to update only the selected marks. If the check box is cleared, all of the marks for the selected drawing are updated.
|
3. Click Batch Update.
Information is updated for the selected marks.
Batch update mark items
Use these instructions to batch update multiple mark items on a detailed listing, from production nesting and ordering, when generating work orders, or from production control.
§ On the Contract Detailed Listing - Details form:
Select a drawing.
Select a mark.
Select the mark items that you want to update.
§ On the Production Nesting and Ordering - Items to Nest form:
Select the mark items that you want to update.
§ On the Generate Contract Work Orders - Details form:
Select the mark items that you want to update.
§ On the Production Control form:
Select the mark items that you want to update.
In all cases, use the following instructions:
1. Click Actions (button) > Batch Update Contract Mark Items.
The Mark Item - Batch Update form is displayed.
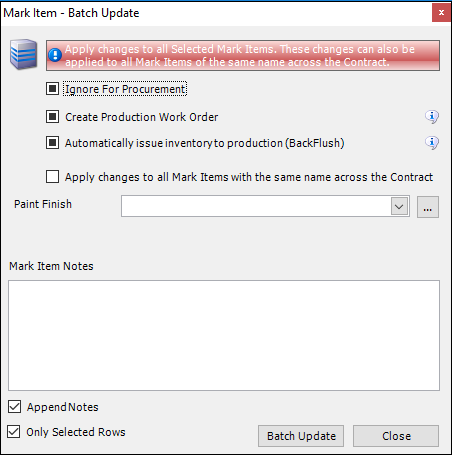
2. Complete the fields on this form using the following information:
|
Field
|
Description
|
|
Ignore For Procurement
|
If you have a mechanism outside of STRUMIS for purchasing the material needed for this mark item, select this check box. During the nesting and ordering process, the mark item will have a status of Covered, meaning that no materials need to be purchased for its fabrication.
|
|
Create Production Work Order
|
Select this check box to allow the Generate Contract Work Orders Wizard to create a work order for the mark item when it is run.
|
|
Automatically Issue Inventory To Production (Backflush)
|
Select this check box to specify that the mark item's parent bar will be removed from the inventory when the mark item is cut in Production Control.
|
|
Apply changes to all Mark Items with the same name across the Contract
|
This batch update procedure updates multiple mark items that are associated with the selected mark. Select this check box if you want to expand the update to include mark items of the same name throughout the contract.
|
|
Paint Finish
|
Select a paint finish from the drop-down list.
|
|
Production Bundle
|
This field is available only when you access this form from production. It is used to group mark items that are going through the production process together. A production bundle (unlike a batch) can be used to group items across different contracts.
|
|
Mark Item Notes
|
Type in a note. This is included on the Component Mark Steel Item - Notes form.
|
|
Append Notes
|
Select this check box to append the note to any others on the Component Mark Steel Item - Notes form. If the check box is cleared, the note is used to replace any that are present on the Component Mark Steel Item - Notes form.
|
|
Only Selected Rows
|
Select this check box to update only the selected mark items. If the check box is cleared, all of the mark items for the selected mark are updated.
|
3. Click Batch Update.
Information is updated for the selected mark items.
Use a black flag to indicate removed items
You can use a black flag to indicate that an instance of a mark or mark item has been removed.
On the Contract Detailed Listing - Details form:
1. Select the Display individual mark and mark item instances check box.
If a mark or mark item has a quantity of more than one, you can display it in the grid as one line or several lines. For example, if a mark has a quantity of 6, and you select the Display individual mark and mark item instances check box, 6 lines (meaning instances of the mark) are shown, each with a quantity of 1. You must select the check box to show all instances of the mark or mark item before you can assign a black flag.
2. Select the Display black flag mark and mark item instances check box.
To assign a black flag to a mark:
1. In the mark list, select the marks to which you want to assign a black flag.
To do this:
§ Press Ctrl A to select all lines, or
§ Press the Ctrl key and click several non-contiguous lines, or
§ Press the Shift key then click the first and last lines in a range.
2. Click Actions (button) > Black Flag Mark.
A black flag  is assigned to the mark.
The selected marks remain in the list so that you have a record of them, but they take no further part in the production process.
To assign a black flag to a mark item:
1. In the mark item list, select the mark items to which you want to assign a black flag.
To do this:
§ Press Ctrl A to select all lines, or
§ Press the Ctrl key and click several non-contiguous lines, or
§ Press the Shift key then click the first and last lines in a range.
2. Click Actions (button) > Black Flag Mark Item.
A black flag is assigned to the mark item.
The selected mark items remain in the list so that you have a record of them, but they take no further part in the production process.
Import CAM/DSTV files
You can use the Contract CAM/DSTV Import Wizard to import CAM files for each mark item. The CAM files are used by:
§ The Nesting Wizard for angle and plate nesting
§ The Generate Contract Work Orders Wizard to retrieve templates and processes
The wizard is described below.
Screen 1: Contract CAM/DSTV Import Wizard - Welcome
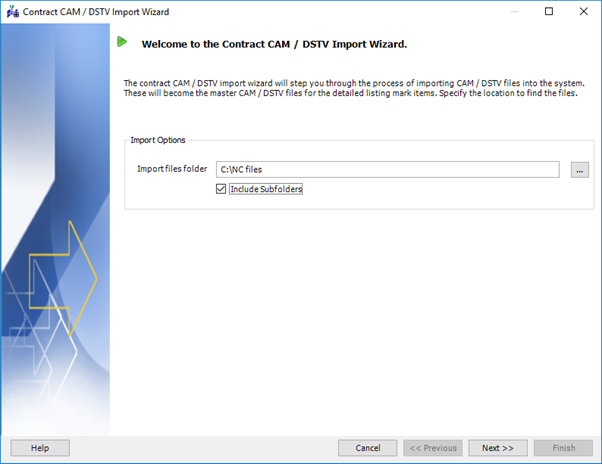
This is the welcome screen and the place in which you specify the location of the CAM files that you want to import.
If you have specified a path to the CAM files associated with this contract on the Contract - Data form, the Import files folder field is populated automatically. Otherwise, type in the path and folder or click the ellipsis button to browse for it. STRUMIS also looks for CAM files in the subfolders if you select the Include Subfolders check box.
Click Next to continue to the next screen.
Screen 2: Contract CAM/DSTV Import Wizard - CAM/DSTV Results
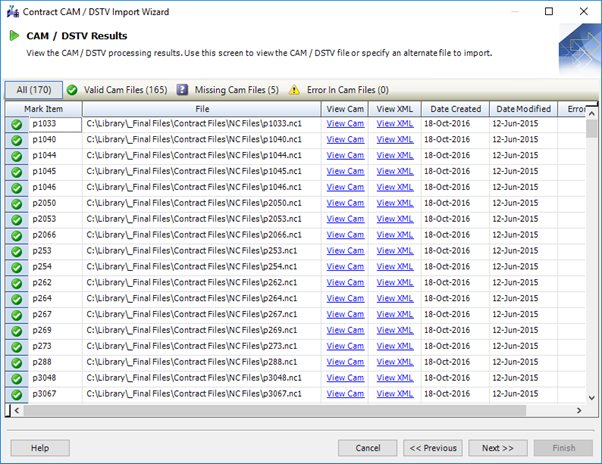
This screen lists the mark items and their associated CAM files. It is divided into smart tabs that tell you whether the mark item has a valid CAM file, no CAM file, or a CAM file with errors.
You can use view the CAM information using StruCNC (click View CAM) or the XML script (click View XML).
Click Next to continue to the next screen.
Screen 3: Contract CAM/DSTV Import Wizard - Contract CAM Import Complete

This is the final screen of the wizard.
Click Finish to load the CAM files into STRUMIS.
About revising a detailed list
An important requirement of detailed listing is to track any changes or revisions that are made to drawings during the processes of procurement, production and delivery, and to notify the various parties or departments of the changes.
The consequences of a revision can range from a minor specification change to a major design change such as the complete removal of a mark. These changes may have an impact on the material that you need to order (for example, you may need to raise a new purchase order or amend an existing one), or on the material as it is being processed through the production stages (for example, you may need to use a different manufacturing process or re-work an existing item).
The most common way to revise a detailed list is to use the Import Detail Wizard to import a revised CAD file into the same contract. STRUMIS notifies you of changes between the previously imported CAD file and the revised one. These are displayed on an extra screen, the Import Detail Listing - Revisions screen, during the wizard.
Items from the previously imported CAD file may already have been lotted, released, nested and issued to production when the new revised CAD file is issued. If any of these items need to be revised, they first have to be unissued and un-nested (if they are associated with a cutting plan). Whether this is done automatically or manually depends on a set of constraints called Revision options.
Information about the nature of the revision and whether it can be done automatically or not is given in the Revision Details and Can Revise columns on the Import Detail Listing - Revisions screen. For items where the Can Revise check box is selected, revisions can automatically go ahead (meaning that STRUMIS automatically unissues and un-nests the items where necessary). For items where the Can Revise check box is not selected, the following screens are available in the wizard when necessary:
§ Import Detail Wizard Revisions Unnesting Rollback Options
This screen allows you to unissue and un-nest items that are to be revised. You can also specify what happens to any material that has already been cut.
§ Import Detail Wizard Revisions Unissue Rollback Options
This screen allows you to unissue items that are to be revised. The items listed are not associated with a cutting plan and do not, therefore, need to be un-nested.
On the final screen of the wizard (the Import Detail Listing - Create Detailed List screen), you can then decide whether to update the revised items, ignore them, or put them on hold for future consideration.
Revision options
The following table lists the system options that control the way in which revisions to a detailed listing are handled.
If an item that needs to be revised complies with the rules given in the table, it can be automatically rolled back and revised by the Import Detail Wizard without your intervention.
If an item that needs to be revised does not comply with the rules given in the table, you may need to un-nest the item and unissue it from production. These actions take place during the Import Detail Wizard.
See About revisions.
To access the options, go to Contracts Management > Contracts Management Options. We recommend that you use the default settings given in the table.
|
Type of revision
|
When to revise
|
Comments
|
|
Always apply production length revision changes
|
Selected check box (default setting)
Cleared check box
|
When you select the check box, length revisions are always applied to linear items even when the mark item is allocated to a cutting plan. Revisions are applied only if:
§ The piece has been released into production
§ There is sufficient remnant
§ The piece has not been cut
§ The mark item has not failed one of the other revision rules
|
|
Mark Description
|
Allow Revision if Listed
Allow Revision if Lotted
Allow Revision if Released
Allow Revision if Nested / Ordered
Allow Revision if Production Cut
Allow Revision if Assembled (Mark)
Allow Revision if Assembled (Assembly Mark)
Allow All Revisions (default setting)
|
|
|
Mark Quantity Decrease
(for CAD imports only)
|
Allow Revision if Listed
Allow Revision if Lotted
Allow Revision if Released (default setting)
Allow Revision if Nested / Ordered
Allow Revision if Production Cut
Allow Revision if Assembled (Mark)
Allow Revision if Assembled (Assembly Mark)
Allow All Revisions
|
This option applies to CAD Interface imports only. It does not include child marks of a shop assembly. The quantity does not decrease if the mark has been issued to production or nested; this scenario forces a revision rollback.
|
|
Mark Quantity Increase
(for CAD imports only)
|
Allow Revision if Listed
Allow Revision if Lotted
Allow Revision if Released
Allow Revision if Nested / Ordered
Allow Revision if Production Cut
Allow Revision if Assembled (Mark)
Allow Revision if Assembled (Assembly Mark)
Allow All Revisions (default setting)
|
This option applies to CAD Interface imports only. It does not include child marks of an assembly mark.
|
|
Mark Remove
|
Allow Revision if Listed
Allow Revision if Lotted (default setting)
|
This option does not include child marks of a shop assembly mark.
|
|
Material Changes
|
Allow Revision if Listed
Allow Revision if Lotted
Allow Revision if Released (default setting)
Allow Revision if Nested / Ordered
Allow Revision if Production Cut
Allow Revision if Assembled (Mark)
Allow Revision if Assembled (Assembly Mark)
Allow All Revisions
|
Material changes include the following:
§ Quantity
§ Length
§ Width
§ Item
§ Cut Type
§ Mark Item Created
§ Mark Item Removed
|
|
Non-material Changes
|
Allow Revision if Listed
Allow Revision if Lotted
Allow Revision if Released
Allow Revision if Nested / Ordered
Allow Revision if Production Cut
Allow Revision if Assembled (Mark)
Allow Revision if Assembled (Assembly Mark)
Allow All Revisions (default setting)
|
§ Non-Material changes include the following:Main Member
§ Item Type
§ Prelim Mark
§ Reference
§ Supply Source
§ Paint Finish
§ Angle Information
|
Phase and lot changes
The following examples are based on the Revision Setting for Non-Material Changes set to Allow All Revisions.
Example 1
1. The material list for mark 9 has been imported into the detailed listing:
Mark 9 – Qty = 3 off, all in Phase 1 Lot 1.
2. Mark 9 has been released, nested and both mark item and mark work orders have been generated.
See the snapshot of the Production Lotting form with the Phase and Lot columns highlighted.
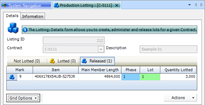
3. Import the revised material list for mark 9 into the detailed listing:
Mark 9 – Qty = 3 off, all moved to Phase 2 Lot 2.
4. On the Import Detail Wizard Revision screen:
All instances of mark 9 have been changed, therefore this is a phase/zone change and a lot/load change. The Can Revise checkbox is ticked, which means that the revision will take place automatically.
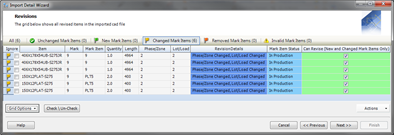
5. Click the Next button.
The Import Detail Wizard Create Detail List screen is displayed.
6. Click the Finish button, the revision will now take place automatically and the mark items will be updated to Phase 2 and Lot 2.
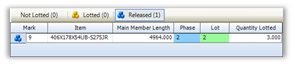
Example 2
1. The material list for mark 9 has been imported into the detailed listing:
Mark 9 – Qty = 3 off, all in Phase 1 Lot 1
2. Mark 9 has been released, nested and both mark item and mark work orders have been generated.
3. Import the revised material list for mark 9 into the detailed listing:
Mark 9 – Qty = two off in Phase 1 Lot 1 and 1 off moved to Phase 1 Lot 2.
4. On the Import Detail Wizard Revision screen:
All instances of mark 9 have not been changed, therefore this is both a mark lot/load quantity decrease and a mark lot/load quantity increase and the Can Revise checkbox is un-ticked. This means that the changed mark items will not be updated automatically.

5. When you click the Next button, the Revisions Un-nesting Rollback Options form is displayed.

6. For the revision to take place, un-nest all instances of mark 9 (this automatically un-issues the mark item work orders).
7. Click the Next button.
The Revisions Un-Issue Rollback Options form is displayed.
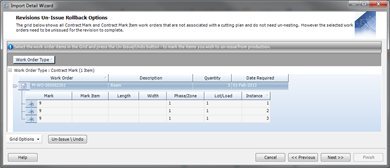
8. Select the work order then click the Un-Issue \ Undo button.
The icons for the mark work order will change to confirm that they will be rolled back.
9. Click the Next button.
The Create Detail List screen will now be displayed.
10. Click the Finish button.
The revision will now take place automatically and mark 9 will be rolled back to lotted (not released).

It is at this point that you should consider what happens to the purchase order and the associated material when a revision occurs and mark items are un-nested. The following scenarios are based on the status of the purchase order when the revision takes place.
§ When the purchase order has a status of Requisition:
§ The original nested material is removed from the Lines tab.
§ The purchase order number may be used for the new nested mark items.

§ When the purchase order has a status of Released but the material has not been received into the inventory:
§ The original material remains on the Lines tab, however, the material is only allocated to the contract and the mark item allocation is removed.
§ The material on the purchase order may be used for the new nested mark items.

§ When the purchase order has a status of Released and the material is received into the inventory:
§ The original material is only allocated to the contract and the mark item allocation is removed.
§ The material in the inventory may be used for the new nested mark items.
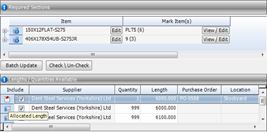
Item (section size) changes
The following examples are based on the Revision Setting for Material Changes set to Allow Revisions if Released.
Example 1
1. The material list for mark item C7 has been imported into the detailed listing:
Mark item C7– section size W12 x 40 x 18’ 8 – 7/8”, grade A36.
2. Mark item C7 has been released but has not been nested or issued to production.
3. Import the revised material list for mark item C7into the detailed listing:
Mark item C7– section size increased to W12 x 50 x 18’ 8 – 7/8”, grade A992gr50.
The Import Detail Wizard Item Listing screen will highlight under the Listed In System As column that the mark item was originally imported as a W12 x 40-A36.

4. On the Import Detail Wizard Revisions screen:
All instances of mark item C7 have been changed, therefore this is a mark item section revision and the Can Revise checkbox is ticked. This means that the changed mark items will be updated automatically.

5. Click the Next button.
The Create Detail List screen will now be displayed.
6. Click the Finish button and the revision will now take place automatically and the mark items will be updated to the new section size.
Example 2
1. The material list for mark C7 Beam component parts has been imported into the detailed listing:
Mark item C7 = W12 x 40 x 18’ 8 – 7/8”, grade A36
Mark item CLT1 = 2 x Clip Angles L4”x4”x5/16” x 8-1/2”, grade A36
2. Mark item C7and Mark item CLT1 have been released, nested and issued to production.
3. Import the revised material list for mark C7 Beam component parts into the detailed listing:
Mark item C7 = W12 x 50 x 18’ 8 – 7/8”, grade A992gr50
Mark Item CLT1 remains unchanged
The Import Detail Wizard Item Listing screen will highlight under the Listed In System As column that the mark item was originally imported as a W12 x 40-A36.
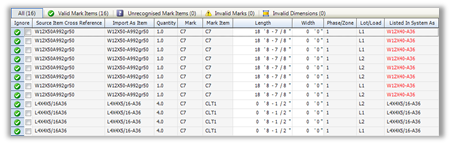
4. On the Import Detail Wizard Revisions screen:
As all instances of mark C7 Beam have not been changed, this is a mark item section revision and the Can Revise checkbox is un-ticked. This means that the changed mark items will not be updated automatically.
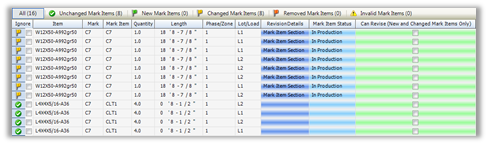
5. Click the Next button.
The Revisions Un-nesting Rollback Options form will be displayed.
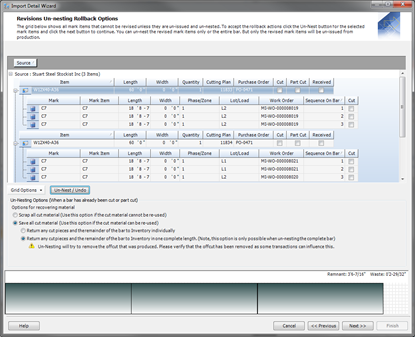
6. For the revision to take place, un-nest all instances of mark item C7.
This automatically un-issues the mark item work orders.
7. Click the Next button.
The Create Detail List screen will now be displayed.
8. Click the Finish button.
The revision will now take place and mark item C7 will be rolled back to Not Covered on the Production Nesting and Ordering form.

The work orders for mark item C7 will also be rolled back to Mark Items Not Issued on the Generate Contract Work Orders form.
9. Mark item CLT1 will remain unchanged as nested and issued to production.

|

|
In the above example, if the Revision Setting for Material Changes was set to Allow All Revisions, then the revision would take place without opening the Revisions Un-nesting Rollback Options form. The mark items would be updated to show the revised section size but the material would not be un-nested. The cutting plans would therefore still show mark item C7 as nested to the original (different section size) bar.
|
Mark item length changes (linear items)
If the length of a mark item has been changed then STRUMIS will interrogate the cutting plans to determine whether the nested bar is long enough to accept the revised lengths. If this is the case then the cutting plans are updated automatically when the Import Detail Wizard is complete.
The following examples are based on the Revision Setting for Material Changes set to Allow If Released and with the Always apply production length revision changes checkbox ticked.
Example 1
1. The material list for mark item 10 has been imported into the detailed listing:
Mark item 10 – 3 off, 5000mm long. Nested to 2 bars 5500mm and 1 bar 6000mm.
2. Mark item 10 has been released and nested but has not been issued to production.
3. Import the revised material list for mark item 10 into the detailed listing:
Mark item 10 – 3 off, now increased to 5600mm long.
4. On the Import Detail Wizard Revision screen:
As none of the original nested bars are long enough to accept the revised length, then none of the cutting plans will be updated automatically.

5. Click the Next button.
The Revisions Un-nesting Rollback Options form will be displayed.
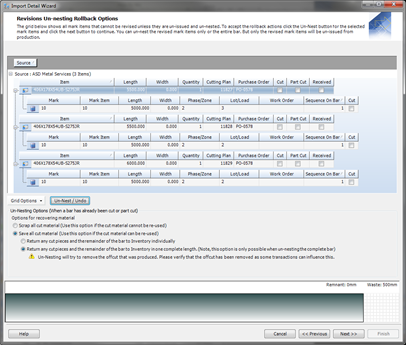
6. For the revision to take place, un-nest all instances of mark item 10.
7. Click the Next button.
The Create Detail List screen will now be displayed.
8. Click the Finish button.
The revision will now take place and mark item 10 will be rolled back to Not Covered in the Production Nesting and Ordering form.

Example 2
1. The material list for mark item 10 has been imported into the detailed listing:
Mark item 10 – 3 off, 5000mm long. Nested to 3 bars 6000mm.
2. Mark item 10 has been released and nested but has not been issued to production.
The following illustration shows the Detailed Nesting Cutting List Report with the Cuts To Make column and cutting plan numbers highlighted.

3. Import the revised material list for mark item 10 into the detailed listing:
Mark item 10 – 3 off, now increased to 5600mm long.
4. On the Import Detail Wizard Revision screen:
As all of the original nested bars are long enough to accept the revised length, then the revision will take place and the cutting plans will be updated automatically.

5. Click the Next button.
The Create Detail List screen will now be displayed.
6. Click the Finish button.
The revision will now take place automatically and the mark items will be updated to the new lengths.
The following illustration shows the Detailed Nesting Cutting List Report with the Cuts To Make column and cutting plan numbers highlighted.

The Cuts To Make values have been updated automatically while the cutting plan numbers have remained the same.
Mark item quantity increase or new mark item added
If a mark item's quantity has been changed or a new mark item has been created, then STRUMIS will make these changes automatically when the Import Detail Wizard is complete.
The following example is based on the Revision Setting for Non-Material Changes set to Allow All Revisions.
Example
1. The material list for mark C4M has been imported into the detailed listing:
Mark C4M – consisting of C4M Main Member 1 off, PLT1 Base Plate 1 off and PLT3 Rectangular Stiffeners 2 off.
2. Mark C4M has been released, nested and both mark item and mark work orders have been generated.
3. Import the revised material list for mark C4M into the detailed listing:
Mark C4M – consisting of C4M Main Member 1 off, PLT1 Base Plate 1 off, PLT3 Rectangular Stiffeners increased to 8 off and an additional PLT4 Rectangular Stiffener 1 off.
4. On the Import Detail Wizard Revision screen:
PLT3 has been changed; therefore this is a mark item quantity increased.
PLT4 is a new item; therefore this is a mark item created.
The Can Revise checkbox is ticked which means that the revision will take place automatically.

5. Click the Next button.
The Create Detail List screen will now be displayed.
6. Click the Finish button.
The revision will now take place automatically and the additional mark item PLT3 and the new mark item PLT4 will appear on the Production Nesting and Ordering form as Not Covered.
PLT3 is now displayed on separate lines. This is because the original mark items have been issued to production and assigned to a workstation.
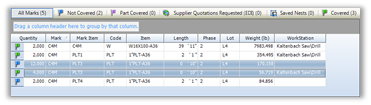
7. If mark C4M was released and nested but the mark items were not issued to production then the additional mark item PLT3 would appear on the Production Nesting and Ordering form as Part Covered.
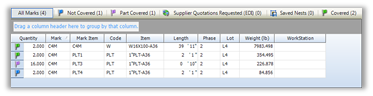
8. Mark item PLT4 will appear on the Production Nesting and Ordering form as Not Covered in both cases.
9. The additional plates PLT3 and the new plate PLT4 will also appear on the Generate Contract Work Orders form as Mark Items Not Issued.

Mark item quantity decrease
If the quantity of a mark has been decreased then STRUMIS will interrogate the Mark Item Status and detect whether the mark quantity being reduced is lower than the lotted quantity of the mark.
The following example is based on the Revision Setting for Non-Material Changes set to Allow All Revisions and for Mark Quantity Decrease set to Allow Revision if Released.
Example 1
1. The material list for mark B12 has been imported into the detailed listing:
Mark B12 – Qty = 3 off, all in Phase 1 Lot 1.
2. Mark B12 has been released but has not been nested or issued to production.
See the snapshot of the Production Lotting form with the Phase and Lot columns highlighted.

3. Import the revised material list for mark B12 into the detailed listing:
Mark B12 – Qty = 2 off, all in Phase 1 Lot 1.
4. On the Import Detail Wizard Revision screen:
All instances of mark B12 have been changed; therefore this is a mark phase/zone quantity decreased, a mark lot/load quantity decreased and a mark quantity decreased. The Can Revise checkbox is ticked which means that the revision will take place automatically.

5. Click the Next button.
The Create Detail List screen will now be displayed.
6. Click the Finish button.
The revision will now take place automatically and mark B12 will be rolled back to Lotted (not released).

Example 2
1. The material list for mark B25 has been imported into the detailed listing:
Mark B25 – Qty = 3 off, all in Phase 1 Lot 1.
2. Mark B25 has been released, nested and both mark item and mark work orders have been generated.
3. Import the revised material list for mark B25 into the detailed listing:
Mark B25 – Qty = 2 off, all in Phase 1 Lot 1.
4. On the Import Detail Wizard Revision screen:
All instances of mark B12 have been changed; therefore this is a mark phase/zone quantity decreased, a mark lot/load quantity decreased and a mark quantity decreased. The Can Revise checkbox is un-ticked. This means that the changed mark items will not be updated automatically

5. Click the Next button.
The Revisions Un-nesting Rollback Options form will be displayed.

6. For the revision to take place, un-nest all instances of mark B25 (this automatically un-issues the mark item work orders).
7. Click the Next button.
The Revisions Un-Issue Rollback Options form will now be displayed.

8. Select the work order(s) then click the Un-Issue \ Undo button.
The icons for the mark work order will change to confirm that they will be rolled back.

9. Click the Next button.
The Create Detail List screen will now be displayed.
10. Click the Finish button.
The revision will now take place and mark B25 will be rolled back to Lotted (not released).
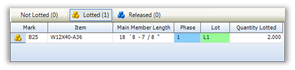
Mark item removed
If a mark item has been removed from the mark then STRUMIS has the following options on the Create Detail List screen of the Import Detail Wizard:
§ Ignore all removed Items
This will ignore items that are marked for removal.
§ Place removed items on hold
This will place items marked for removal on hold.
§ Hold all mark items on a removed mark
This will put all mark items of a mark on hold when a mark is marked for removal.
The following example is based on the Revision Setting for Non-Material Changes set to Allow All Revisions and for Material Changes set to Allow Revision if Released.
Example
1. The material list for mark 8 has been imported into the detailed listing:
Mark 8 – consisting of mark items 8, PLT1, PLT3 and PLT4.
2. Mark 8 has been released, nested and both mark item and mark work orders have been generated.
3. Import the revised material list for mark 8 into the detailed listing:
Mark 8 – consisting of mark items 8, PLT1, PLT3 but mark item PLT4 has been removed and a new mark item PLT14 added.
4. On the Import Detail Wizard Revision screen:
PLT4 is displayed under the Removed Mark Items smart filter and the Can Revise checkbox is un-ticked, which means that PLT4 will be placed on hold. PLT14 is a new item, therefore this is a mark item created. The Can Revise checkbox is ticked which means that the revision will take place automatically.

5. Click the Next button.
The Create Detail List screen will now be displayed.
6. Tick the Place removed items on hold button.
This will place mark 8 on hold and only the removed mark item PLT4 on hold. These are denoted by the red flag.
7. Click the Finish button.
The Contract Detailed Listing form will now display mark item PLT4 on hold and the new mark item PLT14 added to the Component Mark Items window.
If the Hold all mark items on a removed mark checkbox is also ticked, then the mark will be placed on hold along with all of the associated mark items.
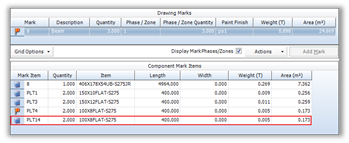
8. All other mark items will remain released, nested and issued to production.
In the snapshot of the Production Nesting Ordering form you can see PLT4 marked as on hold with the red flag and the new PLT14 appears as Not Covered.

Find and edit a detailed list
1. Open the Search form from the sidebar menu.
To do this, go to Contracts Management > Contract Detailed Listing.
2. Enter search criteria and click the Search button.
Records that match your search criteria are listed.
3. Double-click a record to edit it.
For complete information, see Find and edit an existing record.
Detailed list reports
You can access reports from the sidebar menu. Go to Contracts Management > Contracts Management Reports.
See also:
Work with reports
List of reports
What's next?
If you imported your detailed list from a CAD file, you may have already assigned all of the marks in the list to lots and released them. In this case, you are ready to begin nesting and ordering. This is another wizard-driven process where you source the material that you need to fabricate the items in the list either from inventory or by ordering it from your suppliers.
See About production nesting and ordering
If the marks in your detailed list are not yet lotted, this is your next step.
See About Lotting.
Fields and buttons
Contract Detailed Listing - Details
Use this form to add drawings to a detailed listing, add marks to a drawing and add mark items to a mark.
See also:
Add a drawing
Add a mark
Add a mark item
The form is divided into three grids as shown in the illustration below:

The fields and grids are described in more detail in the sections below.
Fields
|
Field
|
Description
|
|
Facility
|
Select a facility from the drop-down list.
|
|
Contract
|
Select the contract for which you are creating or amending a detailed listing. You can click the ellipsis button to create a new contract if necessary.
|
|
Display individual mark and mark item instances
|
If a mark or mark item has a quantity of more than one, you can display it in the grid as one line or several lines. For example, if a mark has a quantity of 6:
Select the Display individual mark and mark item instances check box to display one line with a quantity of 6
Clear the Display individual mark and mark item instances check box to display six lines, each with a quantity of 1
|
|
Display black flag mark and mark item instances
|
You can use a black flag to indicate that an instance of a mark or mark item has been removed.
Select the Display black flag mark and mark item instances check box to show black flag items
Clear the Display black flag mark and mark item instances check box to hide black flag items
See Use a black flag to indicate removed items.
|
Drawings grid
This is a list of detailed drawings for the contract.
The Actions button gives the following options:
|
Field
|
Description
|
|
Copy Drawings
|
Allows you to populate this grid with drawings from another detailed listing.
See Add a drawing.
|
|
CAD Interface
|
Allows you to import drawings from a CAD file using a wizard.
See Import detailed listing from a CAD file.
|
|
Import Prelim Listing
|
Allows you to import prelim marks from a preliminary listing.
See Import marks from a prelim listing.
|
|
Import CAM/DSTV files
|
Allows you to import CAM files that are associated with this contract.
See Import CAM DSTV files.
|
|
Create CAM for Entire Listing
|
|
|
Reports
|
Allows you to generate a Buying Listing, Mark Status or Paint Finish List report.
|
Marks grid
This is a list of marks that are associated with the selected drawing. You can add a mark and, if the mark is split across several phases, you can display the phases/zones. See Add a mark.
The Actions button gives the following options:
|
Option
|
Description
|
|
View Mark Status
|
Select this option to view the Mark Status form.
|
|
Re Phase/Zone
|
This option is available only when you select the Display Mark Phases/Zones check box.
Select this option to open the Re-phase/Zone Marks form. This allows you to move marks into another phase.

1. Select the marks that you want to re-phase.
2. Select the destination phase from the drop-down list.
3. Click OK.
|
|
View Phase/Zone
|
This option is available only when you select the Display Mark Phases/Zones check box.
Select this option to view and create phases/zones on the Contract Phases/Zones form.
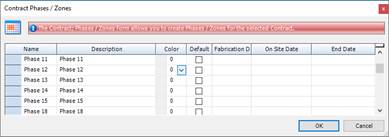
|
|
Batch Update Contract Marks
|
Opens the Batch Update Marks form to allow you to change the details of one or more marks.
See Batch update marks.
|
|
Hold Mark
Un Hold Mark
|
You can place a mark on hold to stop it progressing through lotting, nesting and ordering or production. When you select the Hold Mark option, you can give a reason for holding the mark:

When you hover over the mark's line in the Contract Detailed Listing - Details grid, the reason is displayed.
|
|
Black Flag Mark
|
You can use a black flag to indicate that an instance of a mark has been removed.
See Use a black flag to indicate removed items.
|
|
View Drawing
|
Allows you to view the related CAD drawing in the following formats *.spf, *.dwg, *.dwf and *.dxf.
|
|
BIMReview
|
You can highlight selected marks or use one of the pre-defined views using the BIMReview viewer.
|
Mark items grid
This is a list of mark items that are associated with the selected mark. You can add a steel item or a non-steel item to the list. See Add a mark item.
The Actions button gives the following options:
|
Option
|
Description
|
|
Hold Mark Item
Un Hold Mark Item
|
You can place a mark item on hold to stop it progressing through lotting, nesting and ordering or production. When you select the Hold Mark Item option, you can give a reason for holding the mark item:
When you hover over the mark item's line in the Contract Detailed Listing - Details grid, the reason is displayed.
When a mark item is put on hold, its corresponding mark is also put on hold.
|
|
Black Flag Mark Item
|
You can use a black flag to indicate that an instance of a or mark item has been removed.
See Use a black flag to indicate removed items.
|
|
Batch Update Contract Mark Items
|
Opens the Batch Update Mark Items form to allow you to change the details of one or more mark items.
See Batch update mark items.
|
|
BIMReview
|
You can highlight selected marks or use one of the pre-defined views using the BIMReview viewer.
|
|
View Drawing
|
Allows you to view the related CAD drawing in the following formats *.spf, *.dwg, *.dwf and *.dxf.
|
|
View CAM using StruCNC
|
Allows you to view the related CAM drawing.
|
|
StruCNC
|
Allows you to manage the related CAM information.
|
|
View Item Status
|
Select this option to view the Item Status form.
|
|
View Cutting Plan
|
Available only for nested items.
Opens the Cutting Plan Viewer form, where you can view the selected mark item's nested cutting plan along with the supplier details and purchase order number.
See Cutting Plan Viewer.
|
Contract Detailed Listing - Mark Item View
Use this form to view a list of the mark items for the contract. You can break down the full list by the following criteria:
§ Whether the item is a steel item (specify the section code, size and grade) or non-steel item
§ The phase/zone to which the mark item is assigned
§ The lot/load to which the mark item is assigned
When you have specified the criteria, click the Retrieve button to populate the grid.
The Actions button gives the following options:
|
Option
|
Description
|
|
Split to Plate
|
Coming soon.
|
|
Combine Mark Items
|
Coming soon.
|
|
View Drawing
|
Allows you to view the related CAD drawing in the following formats *.spf, *.dwg, *.dwf and *.dxf.
|
|
StruCNC
|
Allows you to manage the related CAM information.
|
Import Detail Wizard - Item Listing
This screen lists mark items from the CAD file. They are divided into tabs to show the mark items that have a match in the item library and those that are unrecognised by STRUMIS and need further definition.
For each mark item, you can specify a paint finish, phase and lot.
Grid
The grid lists the mark items from the CAD import file. They are separated into the following smart filters:
|
Smart filter
|
Description
|
|
All
|
Lists all mark items in the import file.
|
|
Valid Marks
|
Lists mark items in the import file that are recognised by STRUMIS. This means that the system can match the item in the import file with an item in the STRUMIS Item Library.
|
|
Unrecognised Marks
|
Lists mark items from the import file that are not recognised by STRUMIS.
For full information, see Unrecognised mark items.
|
|
 Invalid Marks Invalid Marks
|
There are several common reasons for which a mark may be flagged as invalid.
For full information, see Invalid marks
|
|
 Invalid Dimensions Invalid Dimensions
|
This status signifies that the dimensions of one of the mark items is incorrect and you should redefine the dimensions.
For full information, see Invalid dimensions.
|
Paint finish
A paint finish is defined for the whole contract on the Contract - Data form. You can override that setting on a per mark basis. Use the following instructions:
1. Select one or more mark items in the grid.
2. Select a paint finish from the drop-down list.
3. Specify whether you want to assign all of the mark items to the phase or only the selected ones.
4. Click the Update Paint Finish button.
The Paint Finish column is updated.
If you select a mark item that is part of an assembly, the paint finish for the whole assembly is updated.
Re-phase
During the import process, you can assign mark items to a phase. Use the following instructions:
1. Select one or more mark items in the grid.
2. Select the required phase from the drop-down list.
3. Specify whether you want to assign all of the mark items to the phase or only the selected ones.
4. Click the Update Phase button.
The Phase/Zone column is updated.
Re-lot
During the import process, you can assign mark items to a lot. See About Lotting. Use the following instructions:
1. Select one or more mark items in the grid.
2. Select the required lot from the drop-down list.Specify whether you want to assign all of the mark items to the lot or only the selected ones.
3. Click the Update Lot button.
The Lot column is updated.
Import Detail Wizard - Revisions
§ Use this screen to review revalidated mark items. It is displayed only in the following circumstances:When you are importing a CAD file to revise an existing detailed listing
§ When you update and revalidate mark items in Screen 4
The screen looks like this:

Grid
The grid lists all of the items from the revised CAD import file. They are separated into smart filters.
While most of the columns are self-explanatory, it is worth noting the following:
|
Column header
|
Description
|
|
Revision Details
|
This column gives important details about the revisions that will be made to the item.
|
|
Mark Item Status
|
This column shows you how far the item has progressed through the STRUMIS system.
|
|
Can Revise
|
You cannot change the setting of the check box. It tells you whether the item has fallen with in the contstr
If the check box is selected, the item falls within the constraints set by the Revision options, and will be automatically revised.
If the check box is not selected, the item falls outside of the constraints set by the Revision options, and you must manually intervene to un-nest and unissue the item prior to revision Un-nesting and unissuing takes place on the next wizard screens:
Import Detail Wizard Revisions Unnesting Rollback Options
Import Detail Wizard Revisions Unissue Rollback Options
|
The smart filters are described below:
|
Smart filter
|
Description
|
|
All
|
Lists all mark items in the revised CAD file.
|
|
Unchanged Mark Items
|
These are the items that have not altered between the revised CAD file and the previous detailed listing.
|
|
New Mark Items
|
These are items that are in the revised CAD file that were not in the previous detailed listing. You can decide how to handle the items on the Import Detail Wizard - Create Detailed List screen.
|
|
Changed Mark Items
|
These are items that have changed between the previous detailed listing and the revised CAD file. You can decide how to handle the items on the Import Detail Wizard - Create Detailed List screen.
|
|
Removed Mark Items
|
These are items that existed in the previous detailed listing but no longer exist in the revised CAD file. You can decide how to handle the items on the Import Detail Wizard - Create Detailed List screen.
|
|
Invalid Mark Items
|
These are items that are part of a mark or assembly mark that is invalid because the mark or mark item is new but has a component mark item with a revision change that cannot be revised. You can decide how to handle the items on the Import Detail Wizard - Create Detailed List screen.
|
Buttons
Check\Un-check
You can choose to ignore a mark item, which means that it is not revised or imported. To do this, select the check box in the Ignore column for the mark items to be excluded. You can use the Check/Uncheck button to select or clear the check box in multiple highlighted rows.
Actions
|
Button
|
Description
|
|
View Mark Status
|
Select this option to view the Mark Status form.
|
|
View Item Status
|
Select this option to view the Item Status form.
|
|
Revision Report
Email Revision Report
|
Print the revision report to the screen or attach it to an email. The report lists the new, changed and removed items.
|
|
BIMReview
|
You can highlight selected marks using the BIMReview viewer.
|
Import Detail Wizard - Revisions Un-nesting Rollback Options
This screen is only available when you revise the detailed listing for a contract by importing a new CAD file for the same contract.
Mark items from a current detailed listing may be processed (lotted, released, nested, issued to production, and processed through production) and then revised (or removed) when a re-issued CAD file is imported. Before the mark item can be revised, it has to be rolled back so that it is lotted only. This means that it has to be unissued from production and un-nested. The roll-back can be automatic or you may have to manually intervene, depending on the Revision option settings. Here are the rules:
§ If the settings are such that the mark item can be automatically revised, the check box in the Can Revise column of the Import Detail Wizard - Revisions screen is selected and this screen (Import Detail Wizard - Revisions Un-nesting Rollback Options) is not displayed.
§ If the settings are such that you have to unissue and un-nest manually, the check box in the Can Revise column of the Import Detail Wizard - Revisions screen is not selected and the Import Detail Wizard - Revisions Un-nesting Rollback Options screen is displayed. It shows the mark items that you have to unissue and un-nest. You can unissue and un-nest mark items or the entire bar. If you elect to unissue and un-nest the entire bar, only the revised mark items are unissued from production.
Select the items and click the Un-nest/Undo button.
When you unissue an item from production, it may already have been cut or part cut. In this case, you can specify how the cut pieces are handled. You can scrap all of the cut material or you can save it and return it to your inventory as individual pieces or as a single length.
Import Detail Wizard - Revisions Un-Issue Rollback Options
This screen is only available when you revise the detailed listing for a contract by importing a new CAD file for the same contract.
Marks and mark items from a current detailed listing may be processed (lotted, released, nested, issued to production, and processed through production) and then revised (or removed) when a re-issued CAD file is imported. Before the mark or mark item can be revised, it has to be rolled back so that it is lotted only. In cases where the mark or mark item is not associated with a cutting plan (meaning that it is not nested), this means that it has to be unissued from production. The roll-back can be automatic or you may have to manually intervene, depending on the Revision option settings. Here are the rules:
§ If the settings are such that the mark item can be automatically revised, the check box in the Can Revise column of the Import Detail Wizard - Revisions screen is selected and this screen (Import Detail Wizard - Revisions Un-issue Rollback Options) is not displayed.
§ If the settings are such that you have to unissue manually, the check box in the Can Revise column of the Import Detail Wizard - Revisions screen is not selected and the Import Detail Wizard - Revisions Un-issue Rollback Options screen is displayed. It shows the marks and mark items that you have to unissue.
Select the items and click the Un-issue/Undo button.
Import Detail Wizard - Create Detail List
This screen allows you to make some final decisions about the detailed listing before it is loaded and saved.
The screen looks like this:
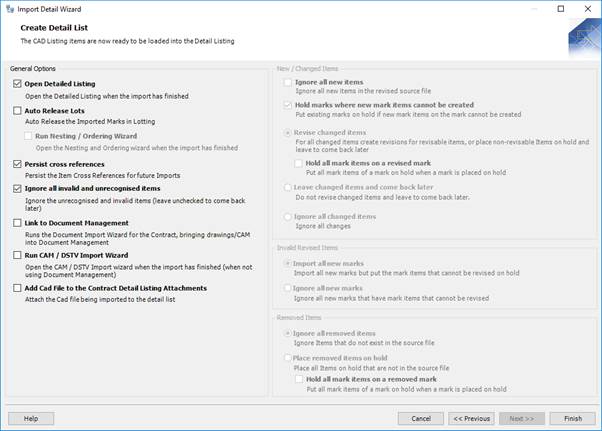
General Options
|
Field
|
Description
|
|
Open Detailed Listing
|
Select this check box to open the Contract Detailed Listing - Details form when the import process has finished. The default setting for the check box is controlled in Contract Management Options.
|
|
Auto Release Lots
|
Select this check box release lotted mark items for nesting. If you auto-release lots, you can launch the Nesting And Order Wizard as soon as the import is finished. To do this, select the Run Nesting And Order Wizard check box.
|
|
Persist Cross Reference
|
Select this check box if you want STRUMIS to remember the mappings that you put in place for unrecognised items. It does this by adding a cross reference on the Item form. The availability of this check box depends on the setting Only Allow Admin Users to Persist Cross References in Contracts Management Options.
|
|
Ignore All Invalid And Unrecognised Items
|
Select this check box if you want to exclude invalid and unrecognised items from the import.
|
|
Link to Document Management
|
Select this option if you want to run the Document Management Wizard, which leads you through the process of bringing documents related to this contract into document management.
|
|
Run CAM/DSTV Import Wizard
|
Select this option to run import CAM and DSTV files. These file types are used in plate or angle nesting to efficiently deal with bevels.
This option is not available if you select the Link to Document Management option above.
|
|
Add CAD File To The Contract Prelim Listing Attachments
|
Select this check box to save the original import file as an attachment in the Contract Detailed Listing form.
|
New/Changed Items
When you import a revised CAD file into an existing detailed listing, you can decide how to treat new and changed items.
|
Field
|
Description
|
|
Ignore all new items
|
If you select this check box, new items from the revised CAD file are not added to the detailed list.
|
|
Hold marks where new mark items cannot be created
|
This check box is relevant if you import a revised CAD file where new mark items have been added to a mark.
If you select the check box, the mark is put on hold if the mark items cannot be created.
If you clear the check box, mark items that cannot be created are put on hold but the mark remains valid.
|
|
Revise changed items
|
Where possible (depending on the Revision options), this option updates the existing detailed listing with the newly imported changes.
If a mark is revised, you can elect to Hold all mark items on a revised mark.
|
|
Leave changed items and come back later
|
If you select this option, no revisions are made to the existing detailed listing and changed marks are put on hold.
|
|
Ignore all changed items
|
This option does not update the existing detailed listing with changes.
|
Invalid Revised Items
When you import a revised CAD file into an existing detailed listing, you can decide how to treat invalid items.
|
Field
|
Description
|
|
Import all new marks
|
Import all new marks, but put the mark items that cannot be revised on hold.
|
|
Ignore all new marks
|
Ignore new marks if they have mark items that cannot be revised.
|
Removed Items
If you import a revised CAD file, and some of the marks that appeared in the original file are no longer present, you can decide how to treat those removed items in the existing detailed listing. You have the following options:
|
Field
|
Description
|
|
Ignore all removed items
|
If you select this option, items that have been removed from the CAD file are not removed from the existing detailed listing.
|
|
Place removed items on hold
|
Select this option to assign a status of On Hold to items in the existing detailed listing if they no longer appear in the import file. If a mark is removed, you can elect to Hold all mark items on a removed mark.
|
Chapter 8
What's in this chapter?
About Lotting
Open lotting information for a contract
Define lots for a contract
Assign marks to a lot
Release marks for nesting and ordering
Batch update marks
Lotting reports
What's next?
Fields and buttons
About Lotting
A lot is a group of marks that are sent to site together, usually on the same truck. You can define lots on an ad hoc basis. Each one has several associated dates where you can note deadlines for certain events, for example, you can specify the dates on which a lot (meaning a group of marks) is due for fabrication, paint and dispatch.
You can put marks into lots in one of the following ways:
§ Automatically
Marks are typically imported into STRUMIS from a CAD interface file using the Import Detailed Listing facility. You can import lot information along with the marks. You can also release lots automatically as part of the import process. See About detailed lists.
§ Manually
You can manually assign or reassign marks to a lot. To do this, use the Production Lotting form. If you use this method to assign lots, you must already have a detailed list containing the marks to be supplied for the contract (see About detailed lists). You can manually release lots from the Production Lotting form.
Select the method in the Lot/Load Source field on the Contract - Details tab. If you select the CAD interface file method, you can still manually reassign a mark to a different lot if necessary. If you select the manual method and then import a detailed listing, the lot information is not included in the import and you have to use the Production Lotting form (or re-import the detailed listing).
When you have assigned marks to lots, you must then release the lots when you are ready to move on to either production nesting and ordering, or to generate work orders. See What's next?
Access
To access lotting information, click the Production Lotting button on the Contract Ribbon. Alternatively, from the sidebar menu, go to Production > Lotting.
When you work with lotting information, you will use the Production Lotting form.
Open lotting information for a contract
Marks are assigned to lots on a per contract basis. If you have set a default contract on the Contract Ribbon, simply click the Production Lotting button on the Contract Ribbon to open the associated record. This is the most common way to access lotting information for a contract. See Contract_ribbon.
Alternatively, use the following set of instructions. You can also use the grid options to locate the contract. For more information about the grid options, see Work with grids. When you have opened the Production Lotting form, you can continue on to define lots and to put marks into those lots.
1. Go to Production > Lotting.
A list of contracts is displayed. Only contracts with a detailed listing are shown.
2. Type your search criteria into the fields at the top of the page.
You can search for contracts by ID or Name. For example, the following search returns a list of contracts with a name that begins with 17.
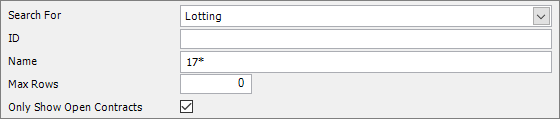
3. Click Search.
Contracts (with a detailed listing) that match your search criteria are listed.
4. Double-click a contract in the list to access the associated lot information.
The Production Lotting - Details form is displayed.
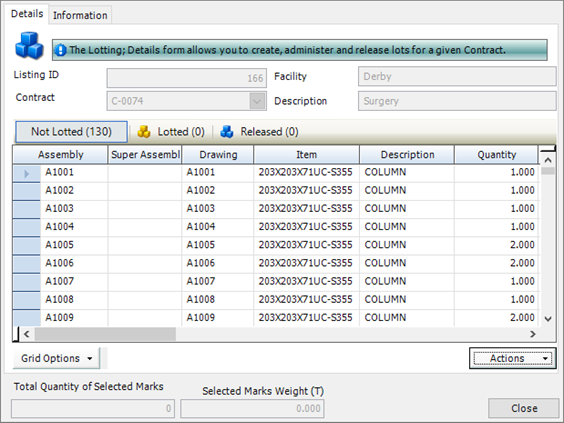
5. Use the Actions button menu options to continue with the lotting process.
See also:
Define lots for a contract
Assign marks to a lot
Release marks for nesting and ordering
Production Lotting Details
Define lots for a contract
Lots are defined on a per contract basis. Each lot has a set of target dates, for example the date on which fabrication starts and the date on which all marks must be complete. Some dates are drawn from the contract and some feed into long range and detailed planning. You can define your own target dates and you can batch update standard and user-defined dates for all of the lots. Use the following instructions to define lots and dates.
Define lots
1. Open lotting information for a contract.
See Open lotting information for a contract.
2. On the Production Lotting form, click Actions (button) > View Lots.
The Contract Lots form is displayed.
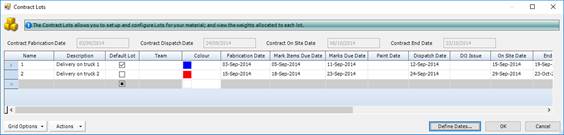
Complete the fields.
|
Column
|
Description
|
|
Name
|
Type in a name for this lot.
|
|
Description
|
Type in a description for this lot.
|
|
Default Lot
|
Select this check box to make this lot the default. Any new marks added to the contract are put into this lot.
|
|
Team
|
Type in the name of the manufacturing or erection team.
|
|
Colour
|
Select a colour for use in the 3D model.
|
|
Fabrication Date
|
The date on which fabrication starts. If you specified a fabrication date in the Contract - Dates form, it is used here; otherwise, type in a date or select one from the drop-down list. If you leave the Mark Items Due Date and Marks Due Date fields blank, the fabrication date is used as the Start Date in detailed production planning.
|
|
Mark Items Due Date
|
The date on which all of the mark items in this lot are to be completed. This date is used in detailed production planning when you select the Show Load Planning Dates check box.
|
|
Marks Due Date
|
The date on which all of the marks in this lot are to be completed. This date is used in detailed production planning when you select the Show Load Planning Dates check box.
|
|
Paint Date
|
The date on which painting starts.
|
|
Dispatch Date
|
The date on which the assembled marks are sent to site. If you specified a dispatch date in the Contract - Dates form, it is used here; otherwise, type in a date or select one from the drop-down list.
|
|
On Site Date
|
The date on which your customer expects to receive the lot. If you specified an on-site date in the Contract - Dates form, it is used here; otherwise, type in a date or select one from the drop-down list.
|
|
End Date
|
The date on which the contract is completed. If you specified a fabrication date in the Contract - Dates form, it is used here; otherwise, type in a date or select one from the drop-down list. This date is used in detailed production planning when you select the Show Load Planning Dates check box.
|
|
Weight
|
The total weight of the marks in this lot. This field is not available for editing. It is auto-populated from the weights in the detailed list.
|
|
Created By/On
|
The user that created the lot and the date on which it was created.
|
|
Execution Class
|
Specify an execution class as per the European Union regulations.
|
|
Long Range Schedule Date
|
|
|
Long Range Description
|
|
|

|
If the schedule needs adjusting, you can move all of the associated dates for the lot and any subsequent lots. Select the lot(s) for which you want to move dates, then click Actions. Select one of the following options:
§ Put Back Days
Use this option to make the dates later by the number of days that you specify.
§ Bring Forward Days
Use this option to make the dates earlier by the number of days that you specify.
|
Define non-standard dates
Your company might use target dates that are not on the Contract Lots form. In this case, you can define extra date columns that are specific to your company. These can be used in production planning.
1. On the Contract Lots form, click the Define Dates button.
The Load Planning Dates form is displayed.
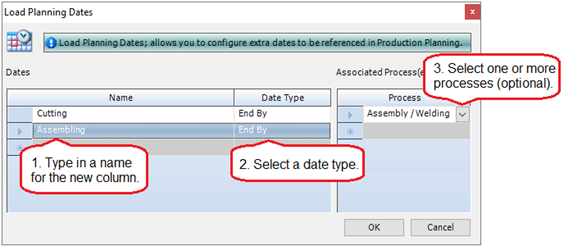
2. Complete the fields.
|
Column
|
Description
|
|
Name
|
Give your date a name. This will be the column header on the Contract Lots form.
|
|
Date Type
|
Select the type of date from the drop-down list. The options are:
§ End By
One column is added to the Contract Lots form. It will contain the date by which the action should be finished. This type of date is shown on the Detailed Planning form with a red diamond.
§ Range
Two columns are added to the Contract Lots form: a Start Date and an End Date for the action. This type of date is shown on the Detailed Planning form with a bar.
§ Start After
One column is added to the Contract Lots form. It will contain the date after which the action can be started. This type of date is shown on the Detailed Planning form with a green diamond.
|
|
Process
|
You can link the action to one or more production processes. Select a process from the drop-down list. Use the different lines in the Process column if you want to select more than one process.
|
3. Click OK.
The Load Planning Dates form is closed and the dates that you defined are shown as columns on the Contract Lots form.
|

|
On the Load Planning Dates form, you can define many planning dates.
|
Batch update lots
The following instructions tell you how to use the Update Contract Lots form to make changes to multiple lots.
1. On the Contract Lots form, select the lots that you want to update.
To do this:
§ Press Ctrl A to select all lines, or
§ Press the Ctrl key and click several non-contiguous lines, or
§ Press the Shift key then click the first and last lines in a range.
2. Click Actions > Batch Update.
The Update Contract Lots form is displayed.
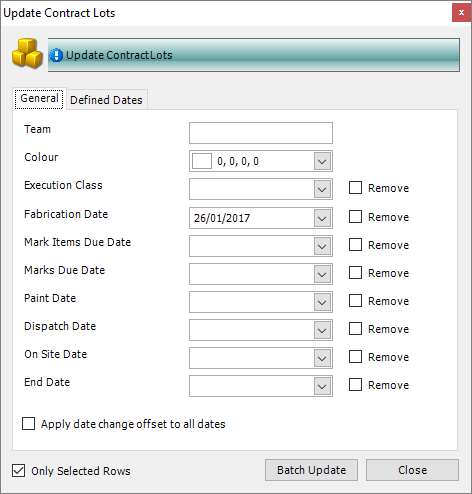
It has the following tabs:
§ General
Allows you to batch update standard information for the selected lots.
§ Defined Dates
Allows you to update user-defined information for the selected lots.
3. Update the fields on either of the tabs.
The Apply date change offset to all dates check box applies only when you have selected one lot. If ,for example, you increase the Fabrication Date field by 10 days, and select this check box, the other dates for the lot are also increased by 10 days when you click Batch Update.
Select Only Selected Rows to update only the lots that you highlighted. If you do not select this check box, all lots in the grid will be updated.
If you do not want to update some of the fields, leave them blank.
4. Click Batch Update to update the selected lots.
Assign marks to a lot
The following instructions tell you how to manually assign marks to a lot.
1. Open lotting information for a contract.
See Open lotting information for a contract.
2. On the Production Lotting - Details form, select one or more marks in the Not Lotted tab and click Actions > Lot.

The Production Lotting - Move form is displayed.

3. Select a lot in the Move to Lot drop-down list and click OK.
The marks are put into the specified lot and the Production Lotting - Move form closes.
4. On the Production Lotting- Details form, the newly lotted marks are displayed in the Lotted tab.
|

|
On the Production Lotting - Details form:
§ You can un-lot marks. To do this, select marks in the Lotted tab and click Actions (button) > Un Lot.
§ You can un-release marks. To do this, select marks in the Released tab and click Actions (button) > Un Release.
On the Production Lotting - Move form:
§ You do not have to put the total quantity of each mark into the same lot. Use the Quantity To Lot column to specify the quantity of the mark to put into the lot. In the grid, you can view the quantity and weight of each item. This is useful information if you have to adhere to a maximum weight per lot.
§ You can specify an execution class for a mark.
§ You can automatically release marks for nesting and ordering when you put them into a lot. To do this, select the Auto Release check box. When you click OK to return to the Production Lotting form, the marks are listed in the Released tab.
§ In the Move to Lot drop-down list, you can show only lots that contain no marks. To do this, select the Only Show Empty Lots check box.
§ You can edit the lot definitions. To do this, click the Edit Lots button. See Define lots for a contract.
|
Release marks for nesting and ordering
When you have assigned marks to a lot (see Assign marks to a lot), you can release them for nesting and ordering. The following instructions tell you how to do this.
1. Open lotting information for a contract.
See Open lotting information for a contract.
2. On the Production Lotting - Details form, select one or more marks in the Lotted tab and click Actions > Release.
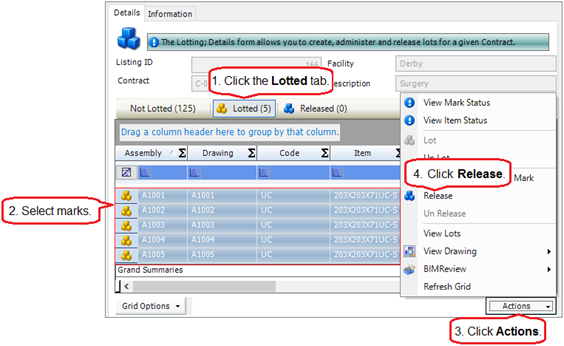
The selected marks are released and displayed in the Released tab. They can now be accessed by nesting and ordering.
|

|
You can un-release marks. To do this, select marks in the Released tab and click Actions (button) > Un Release.
|
Batch update marks
The following instructions tell you how to use the Contract Mark Batch Update form to make changes to the properties of multiple marks on a detailed listing. You can create work orders, specify the paint finish, specify the execution class, and add notes for a batch of marks.
1. Open lotting information for a contract.
(See Open lotting information for a contract.)
2. Select the marks that you want to update.
To do this:
§ Press Ctrl A to select all lines, or
§ Press the Ctrl key and click several non-contiguous lines, or
§ Press the Shift key then click the first and last lines in a range.
3. Click Actions (button) > Batch Update Contract Mark.
The Contract Mark Batch Update form is displayed.
4. Update the fields as required.
If you do not want to update some of the fields, leave them blank.
|
Field
|
Description
|
|
Create Production Work Order
|
Select this check box if you want to automatically create a work order for the mark.
|
|
Apply to child mark(s)/mark items
|
Select this check box to create work orders for any child marks or mark items associated with the mark.
|
|
Paint Finish
|
Select a paint finish from the drop-down list. If necessary, create a new paint finish. To do this, click the ellipsis button and specify the details on the resulting look-up form.
|
|
Execution Class
|
Select an execution class from the drop-down list.
|
|
Mark Notes
|
This is a free text field where you can type in a note to add to the mark(s).
|
|
Append Notes
|
Select this check box to add any new notes to existing notes for the mark(s).
|
|
Only Selected Rows
|
Select Only Selected Rows to update only the lines that you highlighted. If you do not select this check box, all marks in the grid will be updated.
|
5. Click Batch Update to update the selected purchase order items.
Lotting reports
You can access reports from the sidebar menu. Go to Production > Production Reports.
See also:
Work with reports
List of reports
What's next?
When you have assigned marks to lots, you must then release the lots so that they become available in the production module. The next step in the workflow is either nesting and ordering, or generating work orders. The order in which you carry out these operations is described in the scenarios below:
§ Nest the mark items, then generate work orders:
In this case, all of the mark items in the released lots are available for nesting. This scenario minimises material wastage.
§ Generate work orders, then nest the mark items:
In this case, work orders are generated for mark items from the released lots. This means that when you carry out nesting and ordering, the mark items that are available are limited to those for a particular workstation. This order maximises the efficiency with which material flows through your workshop.
See also:
About production nesting and ordering
About work orders
Fields and buttons
Production Lotting - Details
This form shows the marks in the contract detailed listing. It allows you to define lots, assign marks to the lots and release lotted marks for nesting and ordering. You can also "un-release" and "un-lot" marks.
Fields
|
Field
|
Description
|
|
Contract
|
Not available to edit.
Shows the name of the contract with which you are working.
|
|
Facility
|
Not available to edit.
Shows the name of the facility.
|
|
Description
|
Not available to edit.
Shows the contract description.
|
Grid
The grid shows the marks that are in the detailed listing for the contract named above. Use the Actions button options to define lots, assign marks to lots and release marks for nesting and ordering.
See also:
Define lots for a contract
Assign marks to a lot
Release marks for nesting and ordering
|
|
You can update multiple the properties of multiple marks using Actions (button) > Batch Update.
See Batch update marks.
|
Actions button
The Actions button gives you the following menu options:
|
Menu option
|
Description
|
|
View Mark Status
|
Select this option to view the Mark Status form.
|
|
View Item Status
|
Select this option to view the Item Status form.
|
|
Lot
|
Opens the Production Lotting – Move form, where you can define lots and assign marks to the lots.
See also:
Define lots for a contract
Assign marks to a lot
|
|
Un Lot
|
Removes the selected marks (on the Lotted tab) from lots. Marks are returned to the Not Lotted tab.
|
|
Batch Update Contract Mark
|
Opens the Batch Update Marks form to allow you to change the properties of one or more marks.
See Batch update marks.
|
|
Release
|
Releases the selected marks (on the Lotted grid) for nesting and ordering.
See Release marks for nesting and ordering.
|
|
Un Release
|
Moves the selected marks from the Released tab to the Lotted tab. These marks are no longer available for nesting and ordering.
|
|
View Lots
|
Opens the Contract Lots form to allow you to view or edit the lots for this contract.
|
|
View Drawing
|
You can display the related CAD drawing or the document management status.
|
|
BIM Review
|
You can highlight selected marks or use one of the pre-defined views using the BIMReview viewer.
|
|
Refresh Grid
|
Refreshes the grid on the selected tab to display the latest position of all the marks for this contract.
|
Chapter 9
Production nesting and ordering
What's in this chapter?
About production nesting and ordering
Select mark items to nest
The Nesting Wizard
Manual Nesting
Batch update required sections
Weld selected lengths together
Batch update nesting results
Open a saved nest
Nesting reports
What's next?
Fields and buttons
About production nesting and ordering
Production nesting and ordering is the process by which you source the materials that you need for a contract. It involves reviewing the items that you are going to fabricate, reviewing the material that you have available for the fabrication, and calculating a cutting plan that minimises material costs and wastage.
Before you make a start, then, you must have the following things in place:
§ A detailed list of the items that you are going to fabricate for the contract. Take a look at About detailed listings for more information.
§ Marks must be lotted and released before they can be nested. Take a look at Release marks for nesting and ordering for more information.
You can source material from your inventory, suppliers, steel mills, outstanding purchase orders and theoretical offcuts (meaning the leftovers from other nesting processes). You can manually amend the cutting plan if necessary; when you are happy with it, you can reserve material for the contract, raise purchase orders for extra material that you need, or raise RFQs (Requests For Information) to send to suppliers to check cost prices and availability.
STRUMIS uses a wizard to guide you through the nesting and ordering process. To begin with, however, you must select the mark items that you want to nest. See Select mark items to nest.
Access
To access production nesting and ordering, click the Nesting and Ordering button on the Contract Ribbon. Alternatively, from the sidebar menu, go to Production > Nesting & Ordering.
When you view nesting information or launch the Nesting Wizard, you will use the Production Nesting and Ordering form.
Select mark items to nest
You can nest any mark item from any contract together in the same batch. Use the following instructions to select mark items from one or more contracts. Before you can begin the nesting and ordering process, you must have a detailed listing in place for the contracts that you are going to use (see About detailed listings.)
1. Go to Production > Nesting and Ordering.
Contracts that have a detailed listing are shown.
2. If necessary, you can filter the list so that it shows only the contracts that contain the mark items to be nested.
To do this, type your search criteria into the fields at the top of the page.
You can search for a contract by Name. For example, the following search returns a list of records with a name that begins with 15.
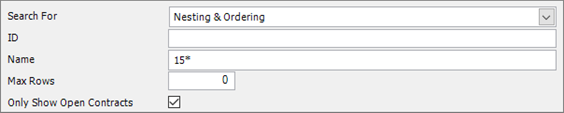
3. Click Search.
Contracts that have a detailed listing and that match your search criteria are listed.
4. To view (and ultimately select) mark items from a single contract, double click a line.
To view (and ultimately select) mark items from multiple contracts, select multiple relevant lines and click Actions (button) > Nest all selected contracts.
In both cases, the Production Nesting and Ordering form is displayed.
The form has the following tabs:
Click the following links to find out more about the fields on this form:
Production Nesting and Ordering - Contracts
Production Nesting and Ordering - Items to Nest
5. On the Production Nesting and Ordering - Contracts form:
The Available Contract Phases/Lots grid is a list of contracts, broken down by phase and lot, that have mark items that are available for nesting. Select the phases/lots that contain the mark items that you want to nest. To do this:
a. Select one or more lines in the grid and click the button.
The contract phase/lot moves to the Contract Phases/Lots Selected for Nesting grid.
b. You can now view the mark items that are available in the phases or lots that you have selected.
To do this, click the Items to Nest tab.
6. On the Production Nesting and Ordering - Items to Nest form:
a. Select the mark items that you want to nest.
b. Click Actions (button) > Nesting & Ordering > AutoCut > Selection.
The Nesting Wizard is launched.
See The Nesting Wizard for information about continuing the nesting and ordering process.
The Nesting Wizard
The nesting wizard takes the items that you need to fabricate from a preliminary list or a detailed list and suggests an optimal way to cut them from the material that you have available in your inventory or from suppliers.
Launch the Nesting Wizard in one of the following ways:
§ Open a Contract Prelim Listing form (see Find and edit a prelim listing).
Click Actions (button) > Nesting and Ordering >AutoCut.
§ Open a Production Nesting and Ordering form (see Select mark items to nest).
Click the Items to Nest tab.
In the list, select the items that you want to nest.
Click Actions (button) > Nesting and Ordering >AutoCut.
The wizard is described below.
Screen 1: Nesting Wizard - Setup Options

Use this screen to specify the sources that you want to use to provide the material needed for the contract. These include the inventory, suppliers, steel mills, and any material that is on order but has not yet been received.
For full details, see Nesting Wizard - Setup Options.
Click Next to continue to the next screen.
Screen 2: Nesting Wizard - Select Suppliers and Inventory Lengths
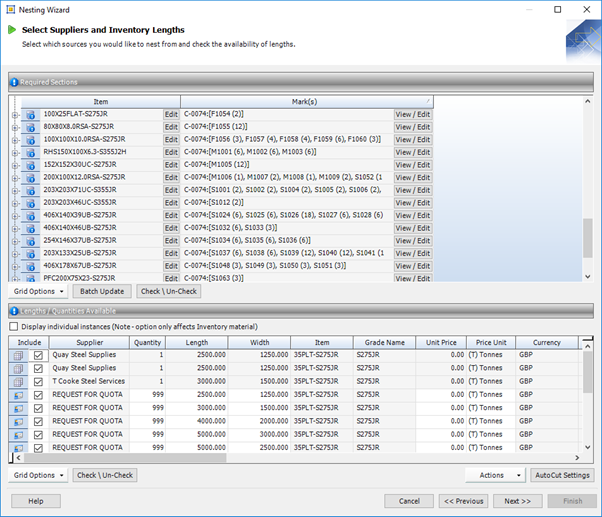
This screen lists the material that you need for the contract and the possible suppliers. You can exclude materials from the list and specify which suppliers you want to use.
There are buttons on the screen that allow you to weld lengths of steel together and also to access settings that are used to:
§ Specify lengths for steel mill suppliers
§ Optimise the nesting process
§ Nest theoretical offcuts
§ Specify the order in which material in the inventory is used
For full details, see Nesting Wizard - Select Suppliers and Inventory Lengths.
Click Next to continue to the next screen.
Screen 3: Nesting Wizard - Nesting Results/Manual Nest

This screen shows the cuts that are suggested by the nesting engine. You can manually amend them if necessary (see Manual Nesting).
For full details, see Nesting Wizard - Nesting Results.
Click Next to continue to the next screen.
Screen 4: Nesting Wizard - Inventory/Suppliers and RFQ
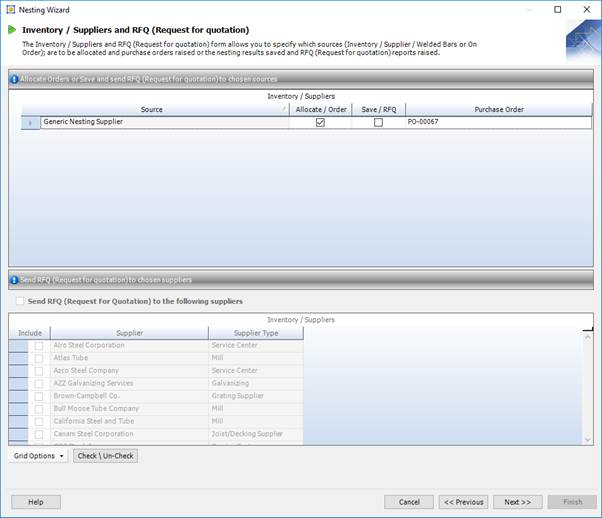
For each source that you selected in the previous screens, you can do one of the following:
§ Allocate the material to the contract and raise a purchase order with your supplier
§ Save the nest and raise RFQs (Requests For Information) for your supplier so that you can check on cost prices and availability
For full details, see Nesting Wizard - Inventory, Suppliers and RFQ.
Click Next to continue to the next screen.
Screen 5: Nesting Wizard - Complete

This is the final screen of the wizard.
If you elected to raise purchase orders in the previous screen, you can specify that they should be automatically released and displayed when the wizard finishes.
If you elected to save the nest, you can specify a name and description.
For full details, see Nesting Wizard - Complete.
When you have selected/completed the relevant options, click Finish to create purchase orders and RFQs, and to save the nest.If you are running the wizard in prelim mode, saved nests are listed on the Contract Prelim Listing - Details form, under the Saved Nests tab. Double-click the line to open the nest.
If you are running the wizard in production mode, saved nests are listed on the Production Nesting and Ordering - Items to Nest form, under the Saved Nests tab. Double-click the line to open the nest.
Manual Nesting
Use the Manual Nesting form to manually allocate prelim marks (prelim nesting only) or mark items (production nesting only) to available lengths of steel. You can access the Manual Nesting form from the Nesting Results/Manual Nest screen of the Nesting Wizard.
The form has four grids:
§ Available Lengths
Suppliers and the lengths of steel that they can supply are listed here.
§ Unfulfilled Marks
Mark items that have not been nested are listed here.
§ Cutting Plans
Lengths of steel that are to be used for nesting are listed here.
§ Covered Marks
Nested mark items are listed here.
The following buttons are available:
|
Button
|
Description
|
|

|
Move one instance of each selected bar from the Available Lengths grid to the Cutting Plans grid.
|
|

|
Move the selected bars from the Cutting Plans grid to the Available Lengths grid, thus un-nesting the bars.
|
|

|
Move a single instance of the selected marks from the Unfulfilled Marks grid to the Covered Marks grid.
The selected marks are nested according to the optimal cutting plan determined by the nesting engine.
|
|

|
Move all instances of the selected marks from the Unfulfilled Marks grid to the Covered Marks grid.
The selected marks are nested according to the optimal cutting plan determined by the nesting engine.
|
|

|
Move the selected marks from the Covered Marks grid to the Unfulfilled Marks grid, thus un-nesting the marks.
|
|

|
Move a single instance of the selected mark from the Unfulfilled Marks grid to the Covered Marks grid.
Use this button if you want to by-pass the cutting order determined by the nesting engine and place un-nested marks on the bar manually. You place marks one-by-one, meaning that you can select only one un-nested mark at a time.
|
|

|
Move all instances of the selected marks from the Unfulfilled Marks grid to the Covered Marks grid.
Use this button if you want to by-pass the cutting order determined by the nesting engine and place un-nested marks on the bar manually. You place marks one-by-one, meaning that you can select only one un-nested mark at a time. If an un-nested mark has a quantity of more than 1, you can use this button to allocate all of the instances to the bar in one move.
|
|

|
Move the selected marks from the Covered Marks grid to the Unfulfilled Marks grid, thus un-nesting the marks.
|
To manually nest a mark item:
Take a look at the following illustration. Points 1, 2 and 3 are described in more detail below.

1. Make steel lengths available for nesting.
a. In the Available Lengths grid, select one or more steel lengths that you want to use.
b. Click the button to move one of each selected lengths to the Cutting Plan grid. These lengths can now be used for nesting.
2. Match un-nested marks with available steel lengths.
a. In the Unfulfilled Marks grid, select the marks that you want to nest.
b. In the Cutting Plan grid, select the steel lengths that you want to use.
3. Use the selected steel lengths to nest the selected marks. To do this, use one of the following buttons:
§ to nest a single instance of the mark
§ to nest all instances of the mark
If, for example, an un-nested mark has a quantity of 3, the button attempts to nest 1 instance of the mark and the button attempts to nest all 3 instances of the mark.
The nested marks are moved to the Covered Marks grid.
If you select several marks to nest, the nesting engine determines the optimal order in which they are cut from the bar. See the following note if you want to order the marks yourself.
|

|
§ You can also use the and buttons to nest marks. These buttons allow you to decide the cutting order of the marks rather than leave it to the nesting engine. To do this, select a single mark in the Unfulfilled Marks grid and click the button to move it to the Covered Marks grid. This is the first mark to be cut from the bar. Repeat this process to place un-nested marks on the length of steel, one-by-one.
Use the button to nest all instances of the single selected mark.
§ If you try to add more mark than fit on the selected bar, the following message is displayed:
The manual nest was unsuccessful and could not cover all selected Mark items from the lengths specified.
No mark are nested. You need to add more bars from the Available Lengths grid or reduce the selected mark.
§ When you have nested marks, you can view a graphic of each one in the Cutting Plan Viewer. To do this, click the mark in the Covered Marks grid. The associated graphic is displayed in yellow in the Cutting Plan Viewer.
§ You can reorder marks on the cutting plan. To do this, click the mark in the Covered Marks grid and use the and buttons to move it to a different location on the bar. This is shown in the Cutting Plan Viewer but does not re-order the list in the Covered Marks grid (unless it is ordered by the SequenceOnBar column).
|
Batch update required sections
This Batch Update form applies to the Nesting Wizard, Select Suppliers and Inventory Lengths, Required Sections grid. It allows you to quickly add, remove or edit supplier lengths, include or exclude inventory or welded bars, and specify whether to nest to higher or lower grade inventory.
You can apply these options for all items in the Required Sections grid by clearing the Only Selected Rows check box, or by selecting certain rows in the grid and selecting the Only Selected Rows checkbox.
Use the following instructions to update multiple items in the Nesting Wizard, Select Suppliers and Inventory Lengths, Required Sections grid:
1. In the Nesting Wizard > Select Suppliers and Inventory Lengths > Required Sections grid, select the items that you want to update.
To do this:
§ Press Ctrl A to select all lines, or
§ Press the Ctrl key and click several non-contiguous lines, or
§ Press the Shift key then click the first and last lines in a range.
2. Click Batch Update.
The Batch Update form is displayed:
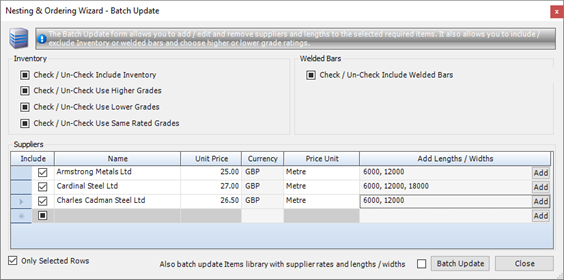
3. Update the fields as required.
Take a look at the tables below for a description of the available fields and buttons.
Select Only Selected Rows to update only the lines that you highlighted. If you do not select this check box, all items in the grid will be updated.
4. Click Batch Update to update the selected items.
Fields and buttons
Check boxes are used throughout the form. A check box can have one of the following states:
|
Check box state
|
Description
|
|

|
Selected
When you carry out the batch update, the option will be selected.
|
|

|
Cleared
When you carry out the batch update, the option will not be selected
|
|

|
Indeterminate
When you carry out the batch update, the option will remain as is.
|
Inventory
To batch update the Inventory options you must select Use Free Inventory on the Setup Options form or have some allocated inventory material.
|
Field
|
Description
|
|
Check / Un-Check Include Inventory
|
Select this check box to include available material from the inventory in the Lengths/Quantities Available grid.
Clear this check box to exclude material from the inventory in the Lengths/Quantities Available grid.
|
|
Check / Un-Check Use Higher Grades
|
Select this check box to include inventory material of a higher grade in the Lengths/Quantities Available grid. The material must be unallocated or allocated to this contract.
Clear this check box if you do not want to include inventory material of a higher grade in the Lengths/Quantities Available grid.
See About grades.
|
|
Check / Un-Check Use Lower Grades
|
Select this check box to include inventory material of a lower grade in the Lengths/Quantities Available grid. The material must be unallocated or allocated to this contract.
Clear this check box if you do not want to include inventory material of a lower grade in the Lengths/Quantities Available grid.
See About grades.
|
|
Check / Un-Check Use Same Rated Grades
|
Select this check box to include inventory material of the same grade in the Lengths/Quantities Available grid. The material must be unallocated or allocated to this contract.
Clear this check box if you do not want to include inventory material of the same grade in the Lengths/Quantities Available grid.
See About grades.
|
Welded Bars
|
Field
|
Description
|
|
Check / Un-Check Include Welded Bars
|
Select this check box to include welded bars in the Lengths/Quantities Available grid.
Clear this check box to exclude welded bars in the Lengths/Quantities Available grid.
See Weld selected lengths together.
|
Suppliers
Use this grid to add new suppliers for the selected items and to amend details for suppliers that are already listed. To amend the details for any supplier, you must first add them to the list. To do this, select the supplier from the drop-down list in the Name column as shown below:
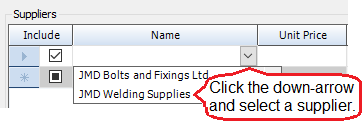
Then, you can:
§ Exclude a supplier from the Lengths/Quantities Available grid. To do this, clear the check box in the Include column.
§ Specify a different unit price and price unit.
See About unit prices.
§ Add supplier lengths. To do this, click the Add button in the Add Length/Widths column. The Add Supplier Lengths form is displayed. Type in the required lengths and click Close. The lengths are displayed in the Add Length/Widths column.
§ Use the information that you specify here on the Batch Update form to update the item library. To do this, select the Also batch update items library with supplier rates and lengths/widths check box. If you do not select this check box, the updates are not saved back to the item library.
Weld selected lengths together
A welded bar is one that is made when two or more shorter bars are "welded together" by the Nesting Wizard. The welded bar is available for prelim or detailed nesting.
You can create welded bars from material from the inventory, material from suppliers or material on a released but not yet received purchase order. The welded bar can be a combination of grades but not a combination of section sizes. Welded bars can only be created for non-linear items.
To create a welded bar:
1. In the Nesting Wizard > Select Suppliers and Inventory Lengths > Lengths/Quantities Available grid, select lengths to "weld" together.
2. Click Actions (button) > Weld selected lengths together.
The Contract Nesting Welded Bars form is displayed.
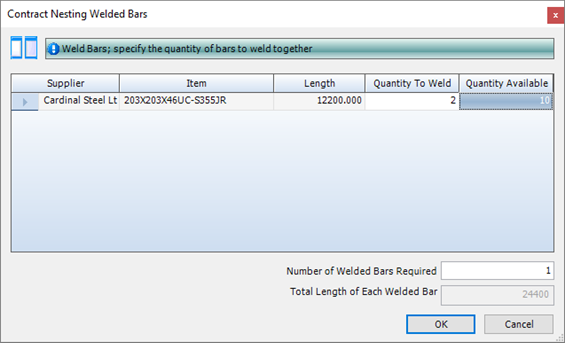
The selected bars are listed in the grid. In the above example, a single bar was selected. There are 999 bars of this length available. The intention is to weld two of them together.
3. Specify the quantity of each bar that you want to use to create the welded bar and the number of welded bars to create.
In the above example, 2 bars of length 6096mm are used to create 1 welded bar of 12192mm.
4. Click OK.
The welded bar is displayed Lengths / Quantities Available grid (where you can type values into the Unit Price and Price Unit fields) and is available for the nesting engine to use. Welded bars have this icon  .
.
|
|
§ If you use supplier lengths as a source for your welded bars, any purchase orders that are created list the individual lengths required to create the welded bar not the welded bar itself.
§ The individual lengths become one long welded bar only when they are "cut" using production cutting, production control or production console.
|
Batch update nesting results
This Batch Update form applies to the Nesting Wizard, Nesting Results/Manual Nest, Cutting Plan grid. It allows you to quickly update the supplier, supplier unit price, price unit, delivery location and delivery date for multiple items.
Use the following instructions:
1. In the Nesting Wizard > Nesting Results/Manual Nest > Cutting Plan grid, select the items that you want to update.
To do this:
§ Press Ctrl A to select all lines, or
§ Press the Ctrl key and click several non-contiguous lines, or
§ Press the Shift key then click the first and last lines in a range.
2. Click Batch Update.
The Batch Update form is displayed:
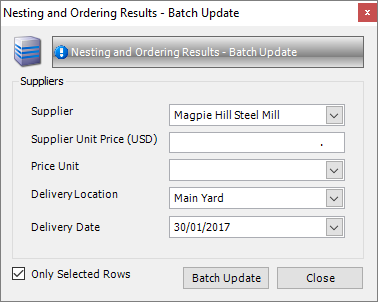
3. Update the fields as required.
Select Only Selected Rows to update only the lines that you highlighted. If you do not select this check box, all items in the grid will be updated.
4. Click Batch Update to update the selected items.
Open a saved nest
During the nesting and ordering process, you can save the nest that you have developed so that you can return to it later, typically when you have received quotations from your suppliers regarding material costs and availability.If you run the Nesting Wizard in prelim mode, saved nests are listed on the Contract Prelim Listing - Details form, under the Saved Nests tab.
If you run the Nesting Wizard in production mode, saved nests are listed on the Production Nesting and Ordering - Items to Nest form, under the Saved Nests tab. Double-click the line to open the nest.
In both cases, double-click a saved nest line to open the Nesting Results/Manual Nest screen of the Nesting Wizard. If anything has changed since you saved the nest, a message is displayed. For example, you may have run the wizard again and made revisions; items may have been modified or removed.
You can now continue with the nesting process.
Nesting reports
You can access reports from the sidebar menu. Go to Production > Production Reports.
See also:
Work with reports
List of reports
What's next?
At the end of production nesting and ordering, you should have one or more of the following:
§ Saved nest
When you receive the required information, you can open and complete any saved nests.
§ Purchase order
If you are sure that you need to order material, you can send purchase orders.
§ Request for information
If you have generated requests for information, you can send them out to your suppliers.
If you generated work orders prior to nesting, your next step is to progress the work orders through production. See About production control.
If you have not yet generated work orders, this is your next step. See About work orders.
Fields and buttons
Production Nesting and Ordering - Contracts
Use this form to select the contract phases and lots that contain the mark items that you want to nest.
Fields
|
Field
|
Description
|
|
Only show open contracts
|
This check box is selected by default. If you clear it, closed contracts are included in the Available Contract Phases/Lots grid.
|
|
Hide covered lots
|
Select this check box to exclude lots that have been fully nested from the Available Contract Phases/Lots grid.
|
Grids
The form has two grids, Available Contract Phases/Lots and Contract Phases/Lots Selected for Nesting:
§ The Available Contract Phases/Lots grid all of the contracts in the system that have an associated detailed listing containing mark items that can be nested. The contracts are broken down by phase and lot.
§ The Contract Phases/Lots Selected for Nesting grid lists the contract phases and lots that you have selected because they contain mark items that you want to nest. This grid may be populated when you first access the Production Nesting and Ordering form due to the contracts that you selected on the preceding search form.
To select contract phases/lots that contain mark items that you want to nest, simply select them in the Available Contract Phases/Lots grid and click the button to move them to the Contract Phases/Lots Selected for Nesting grid.
If there are contract phases/lots in the Contract Phases/Lots Selected for Nesting grid that contain no mark items of interest, select them and click the button to move them back to the Available Contract Phases/Lots grid.
You can view and select mark items that are available for nesting on the Items to Nest form.
Production Nesting and Ordering - Items to Nest
Use this form to select the mark items that you want to nest and launch the Nesting Wizard. (click Actions (button) > Nesting & Ordering > AutoCut > Selection).
See The Nesting Wizard.
The following sections give more detailed information about the grid and buttons on the form.
Grid
The grid has several smart filters, most of which list mark items with a particular status (the Supplier Quotations Requested smart filter and the Saved Nests smart filter are exceptions). In the grids that list mark items with a particular status, each row in the grid specifies the quantity of a particular mark item in a specific phase and lot. Mark items can be split across multiple phases and lots or between assemblies. This means that there may be more than one row for the same mark item.
The status of each prelim mark is represented by the following icons:
§ Released
Mark items must be lotted and released before you can nest them. See About Lotting. Mark items with a blue flag are ready to go.
§ Part Covered
This status means that the mark item has been part covered by a nest and that some of the material needed for the mark item is allocated or on order. You cannot manually change the status of a mark item to Part Covered; this is done automatically by the nesting and ordering process.
§ Covered
This status means that the mark item has been covered by a nest and all material needed for the mark item (on the phase and lot) is allocated or on order. You cannot manually change the status of a mark item to Covered; this is done automatically by the nesting and ordering process.
The information displayed in each smart filter is described in the following sections.
All Marks
Displays all of the mark items that appear in the detailed listings for the contract phases and lots that you selected on the Production Nesting and Ordering - Contracts form.
Not Covered
Displays the mark items that have yet to be nested. These mark items are from the detailed listings for the contract phases and lots that you selected on the Production Nesting and Ordering - Contracts form.
Part Covered
Displays the mark items that have been part nested. These mark items are from the detailed listings for the contract phases and lots that you selected on the Production Nesting and Ordering - Contracts form.
Supplier Quotations Requested
During the nesting and ordering process, you can raise an RFQ (Request For Quotation) to send out to a supplier to check on material costs and availability. If you have raised RFQs, they are listed here.
Saved Nests
During the nesting and ordering process, you can save the nest that you have developed so that you can return to it later, typically when you have received quotations from your suppliers regarding material costs and availability. Saved nests are listed here. Double-click a nest to open it and continue with the nesting and ordering process.
Covered
Displays the mark items that have been nested. These mark items are from the detailed listings for the contract phases and lots that you selected on the Production Nesting and Ordering - Contracts form.
Actions button
The following options are available:
|
Option
|
Description
|
|
View Mark Status
|
Select this option to view the Mark Status form.
|
|
View Item Status
|
Select this option to view the Item Status form.
|
|
View Cutting Plan
|
Available only for nested items.
Opens the Cutting Plan Viewer form, where you can view the selected mark item's nested cutting plan along with the supplier details and purchase order number.
See Cutting Plan Viewer.
|
|
Nesting and Ordering
|
Launches the Nesting Wizard.See The Nesting Wizard.
|
|
Refresh
|
Use this option to refresh the form after you have made updates.
|
|
Batch Update Mark Items
|
Select mark items in the grid and select this option to carry out a batch update.
See Batch update mark items.
|
|
View Prelim Batch Listing
|
Displays the Prelim Batch Listing form, where you can view prelim batch details.
|
|
View Drawing
|
Allows you to view the related CAD drawing in the following formats *.spf, *.dwg, *.dwf and *.dxf.
|
|
View CAM using StruCNC
|
Allows you to view the related CAM drawing.
|
|
Edit CAM
|
Allows you to edit and then save the CAM file or to batch edit multiple CAM files.
|
|
BIMReview
|
You can highlight selected marks or use one of the pre-defined views using the BIMReview viewer.
|
|
Resend Existing Supplier Quotation/Order Request (EDI)
|
Allows you to resend an EDI file to your supplier.
|
|
Cancel Existing Supplier Quotation/Order Request (EDI)
|
Use this option if you have sent an EDI file to a supplier and decide to withdraw the request for a quotation or cancel an order.
|
|
Export Supplier Quotation/Order Request (EDI)
|
Allows you to export your EDI File request to a file.
|
Nesting Wizard - Setup Options
Use this form to select the sources of the material that you need to fabricate the lengths/shapes for your contract.
Fields
|
Field
|
Description
|
|
Batch Name
|
This is a mandatory field.
Select a batch from the drop-down list or click the ellipsis button and define a batch on the resulting look-up form. The items that you are nesting are put into this batch.
See About batches.
|
|
Limit Locations to Facilities
|
These fields allow you to select a facility and or location within that facility. The inventory items that are available for use with this contract are limited to either the inventory for the facility or the inventory for the location, respectively.
If your company has only one facility or location, these fields are not available.
|
|
Limit Inventory to Locations
|
|
Sourcing Preferences
|
|
Use Suppliers
|
Select this check box if you want to fabricate the selected marks using material sourced from suppliers.
The options are:
§ Supplier Lengths
This option depends on these parameters from the item library (on the Item - Purchasing Information tab):
§ The supplier that is set as the default for the item
§ The standard lengths that are available from each supplier
Select the Supplier Lengths option here in the Nesting Wizard if you want to consider the standard lengths defined for the items' default suppliers. If you want to extend the search for appropriate standard lengths to all of the items' suppliers, also select the Use Multiple Suppliers check box.
§ Cut to Length
Select this option if you know that you're going to purchase material from a supplier and have the supplier cut the exact lengths that you need.
§ Mills Standard Length
This option depends on these parameters from elsewhere in the system:
§ In the supplier record (Supplier - Details tab), you can label a supplier as a steel mill.
§ In the item library (Item - Purchasing Information tab), you can list suppliers, including steel mills, of the item.
§ On the AutoCut Settings form (click the AutoCut Settings button at the bottom of this screen), set up the lengths that are available from the mill.
Rolling datesSelect this option if you want to consider the standard lengths offered by the items' steel mill supplier.
§ Entered Lengths
The Nesting Wizard uses only lengths that you enter on the next wizard screen (Select Suppliers and Inventory Lengths).
§ Use Multiple Suppliers
With reference to the Supplier Lengths option above, select this check box if you want to consider lengths from all suppliers, not just the default supplier. This includes steel mills that also act as regular suppliers and have standard lengths defined on the Item - Purchasing Information tab.
|
|
Use Free Inventory
|
Select this check box if you want to fabricate the selected marks using material sourced from unallocated inventory.
|
|
Use Free Purchase Orders
|
Select this check box if you want to fabricate the selected marks using material sourced from outstanding (meaning not yet received and, therefore, not yet lodged in the inventory) purchase orders that are not associated with a contract.
|
|
Use Theoretical Offcuts
|
Select this check box if you want to fabricate the selected marks using material sourced from the offcuts that result from existing uncut nests. On the AutoCut Settings form (click the AutoCut Settings button at the bottom of this screen), specify how marks should be nested.
|
|
Contract / Prelim Allocations
|
|
Allocated to this Contract
|
Select this option if you want to consider material that is allocated to this contract.
|
|
Allocated to this Batch
|
Select this option if you want to consider material that is allocated to this batch.
|
|
None
|
Select this option if you do not want to consider allocated material.
|
|
Match Prelim Mark Allocations
|
Not available for prelim nesting.
Select this option if you want to consider only material that is assigned to the corresponding prelim mark.
|
|
Theoretical Offcuts for the Contract
|
Not available for prelim nesting.
Select this check box if you want to consider only surplus material from other nests for this contract.
|
|
Purchase Orders
|
|
Facility
|
The facility, delivery location and delivery date that you specify here are included on any purchase orders that you raise at the end of the nesting process.
|
|
Default Delivery Location
|
|
Default Delivery Date
|
|
Show Values in
|
Select the currency in which to show prices.
|
|
Shape Options
|
|
Include CAM data
Use CAM data in preference to DXF data
|
Not available for prelim nesting.
Use these options if you want to have the nesting engine evaluate the mark item CAM data for angle and plate nesting.
|
|
Include DXF files
Use DXF data in preference to CAM data
|
Use these options if you want to have the nesting engine evaluate the mark item DXF data for plate nesting.
|
Buttons
|
Button
|
Description
|
|
AutoCut Settings
|
Click this button to open the AutoCut Settings form.
|
Nesting Wizard - Select Suppliers and Inventory Lengths
This form shows you the lengths of steel that you need (in the Required Sections grid) and the lengths that are available from the sources that you selected on the previous form (in the Lengths/Quantities Available grid). It allows you to refine your requirements and your sources.
Required Sections grid
This grid lists the steel items that are required to fabricate the marks for this contract. For each item, potential suppliers (including the inventory) are listed. When you select a supplier, the available quantity of the steel item is displayed in the Lengths/Quantities Available grid. The grid has the following features, as shown in the illustration below:
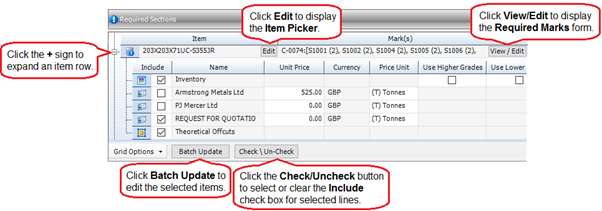
You can:
§ Click an item row (preceded by the  icon) to list all of the available suppliers in the Lengths/Quantities Available grid at the bottom of the form.
§ Expand an item row to view the possible sources for the steel item.
To do this, click the + sign as shown in the illustration below. For the resulting source rows, the following features and actions are available:
§ Each row is preceded by one of the following icons:
 means that the source is the inventory
 means that the source is a supplier or steel mill
 means that the source is a theoretical offcut
§ Click a source row to list the available suppliers in the Lengths/Quantities Available grid.
§ Edit the Unit Price and Price Unit fields for a regular supplier or steel mill.
See About unit prices.
§ You can elect to use alternative steel sections that may be available in the inventory. On the Inventory row, specify whether the alternative sections can be of a higher grade, lower grade, or the same grade. See About grades.
Buttons
|
Button
|
Description
|
|
Edit
|
Click the Edit button in the Item column to open the Item Picker.
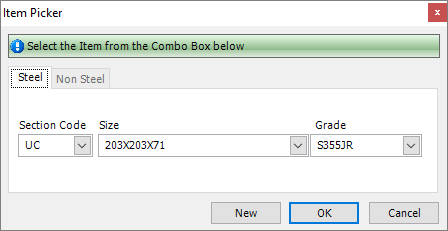
This form allows you to substitute the listed steel item for a different one. You can also click the New button to define an item in the item library. The Lengths/Quantities Available grid is automatically updated.
|
|
View/Edit
|
Click the View/Edit button in the Mark(s) column to open the Required Marks form
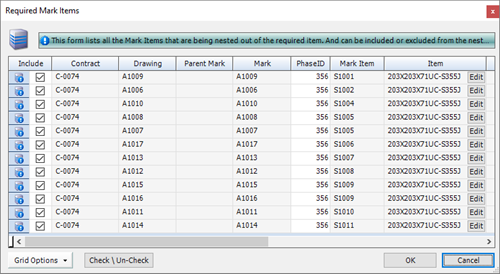
This form allows you to:
§ Select the marks that you want to nest (select or clear the check boxes in the Include column)
§ Edit the phase ID for the mark
§ Substitute the listed steel item for a different one. To do this, click the Edit button in the Item column. The Item Picker is displayed. Specify an alternative steel item and click OK. On the Nesting Wizard - Select Suppliers and Inventory Lengths form, new rows are created to accommodate your changes.
The Lengths/Quantities Available grid is automatically updated.
|
|
Batch Update
|
Click the Batch Update button to edit the selected rows.
See Batch update required sections.
|
|
Check/Uncheck
|
Select or clear the Include check box for a source row to indicate whether this source is to be included in the nesting process. To select or clear the check box for multiple rows, select the rows and click the Check/Uncheck button.
|
Lengths/Quantities Available
When you select either an item row or a supplier row in the Required Sections grid, the material that is available is listed here in the Lengths/Quantities Available grid. You can:
§ Select the supplier(s) from whom you want to source material in the nesting process. To do this, select the check box in the Include column. To select or clear the check box for multiple suppliers, select the rows and click the Check/Uncheck button.
The status of the material is indicated by the following icons:
 means that the material is an offcut length
means that the material is in inventory and has been allocated to this contract
 means that the material is on a released but not yet received purchase order
means that this material can be ordered from your supplier
§ Update the quantity, length, unit price, price unit and supplier price for each supplier.
See About unit prices.
§ Create a new row in the table by welding two bars together.
See Weld selected lengths together.
Buttons
Generic buttons
|
Button
|
Description
|
|
Previous
|
Move to the previous Nesting Wizard form.
|
|
Next
|
The nesting wizard reviews the material that you require to fabricate the listed marks and the material that is available. Based on the choices that you made here on the Select Suppliers and Inventory Lengths form and those that you made in AutoCut Settings, it allocates the material and presents the results on the next screen.
|
Nesting Wizard - Nesting Results/Manual Nest
This screen displays the results of the nesting process. It has two smart filter tabs:
§ Covered
The nested items are displayed in the Cutting Plan grid (see below)
§ Not Covered
This tab lists items that the Nesting Wizard is unable to nest. The Nesting Wizard may not be able to nest items for the following reasons:
§ There may not be enough material to nest all of the items
§ The available lengths of steel may not be long enough
§ In the item library, the Procurement field on the Item - Properties form may be set to something other than AutoCut.
Cutting Plan grid
This tab lists the cuts suggested by the nesting wizard. The list has three levels that you can expand or contract using the + or - signs as shown in the illustration below.
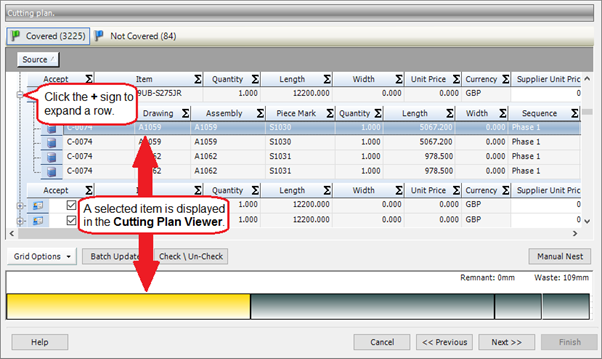
The list levels are as follows:
§ Source
At the top level is the material source, for example, the inventory, suppliers and steel mills.
When you expand a row, the next level is revealed.
§ Item
The second level lists the items that are available from the source and that are suggested for use during the fabrication process. If you do not want to accept some of the nesting results then clear the Accept check box for the particular row. When you order the material on the next wizard screen, these rows are ignored. To select or clear the Accept check box for multiple rows, select the rows and click the Check/Un-check button.
You can amend the Supplier Unit Price and Price Unit fields if necessary.
When you select a row at this level, the item is displayed in the Cutting Plan Viewer at the bottom of the screen and the total waste figure (excluding kerf and gripping/end zone values) is displayed.
When you expand a row, the final level is revealed.
§ Marks and mark items
The final level lists the prelim marks (prelim nesting only) or /mark items (production nesting only) that will be cut from the material item. The following icons are used:
 indicates a prelim mark (prelim nesting only)
 indicates a prelim mark that is to be cut from a theoretical offcut (prelim nesting only)
 indicates a mark item (production nesting only)
Select one or more rows to display the cuts graphically in the Cutting Plan Viewer. This is shown in the illustration above. The Cutting Plan Viewer is particularly useful as it clearly shows any rotated items; the grid shows the plane in which the items have been rotated, X, Y or Z.
You can batch update this information. See Batch update nesting results.
Nesting Wizard - Inventory/Suppliers and RFQ (Request for Quotation)
The settings on this screen apply to the sources of material that you selected in the previous wizard screens; these are the inventory, suppliers, steel mills, welded bars, and released but not yet received purchase orders. The sources that you selected are listed in the top half of the screen. For each, you have the option to carry out one of the following actions:
§ Allocate the material to the contract, batch and mark that you selected in a previous wizard screen and raise a purchase order if necessary.
§ Save the nest and raise a request for a quotation that you can send to your supplier to check material costs and availability.
Allocate and raise purchase orders
1. Select the Allocate/Order check box
2. In the Purchase Order column, select <New> if you want to raise a new purchase order, or select an existing open purchase order from the drop-down list.
Save the nest and request quotation
1. Select the Save/RFQ check box.
2. If you want to also raise RFQs, select the Send RFQ to the following suppliers check box and select one or more suppliers in the list.
RFQs are saved on the Contract Prelim Listing - Details form.
Nesting Wizard - Complete
The fields on this screen relate to the options that you chose on the previous wizard screen. If you want to raise purchase orders, specify whether to release and view them. If you want to save a nest, give it a name and description. Saved nests are listed on the Contract Prelim Listing - Details form, under the Saved Nests tab. Double-click the line to open the nest.
Fields
|
Field
|
Description
|
|
Allocate and order
|
|
Auto Release Purchase Order(s)
|
This field is available if you elected to raise purchase orders on the previous wizard screen.
Select the check box if you want to release the purchase order(s) when you click the Finish button.
|
|
View Purchase Order(s)
|
This field is available if you elected to raise purchase orders on the previous wizard screen.
Select the check box if you want to view the purchase orders when you click the Finish button.
|
|
Save nesting results and come back later
|
|
Name
|
This field is available if you elected to save a nest on the previous wizard screen.
Select the check box if you want to save a nest when you click the Finish button.
Prelim nests are saved on the Contract Prelim Listing - Details form.
|
|
Description
|
This field is available if you elected to save a nest on the previous wizard screen.
This is a free text field where you can type in a description for the saved nest.
|
AutoCut Settings - Details
Use this form to specify the allowances that should be made for kerf and gripping zones when calculating a nest, and also for specifying standard steel lengths if your supplier is a steel mill.
Cutting Settings
|
Field
|
Description
|
|
Saw Blade Thickness/Kerf
|
This is the allowance that is made for the material that is removed by the cutting process. It applies to every cut that is made.
|
|
Gripping/End-Zone
Non-useable
|
This is the allowance for a gripping area at one end of the parent bar.
|
|
Linear Nesting
|
The options are:
§ Standard
Select this option if you are making straight cuts.
§ Angle
Select this option if you are making angled cuts. In this case, the Can rotate for angle/bevel nesting option on the Section Type - Details form must be selected and the section must be symmetrical.
|
|
Angle Filler Gap/Part Spacing
|
This is the minimum gap between angled cuts. It is used when ordering material, but not in production.
|
Mill Settings
Use these fields to define the lengths of steel that you can purchase from a steel mill. Specify the shortest length, the longest length, and the increments supplied by the mill.
AutoCut Settings - Advanced
Use this form to specify optimisation parameters for nesting.
|
Field
|
Description
|
|
Min Reuseable Length / Width
|
The minimum length that can be returned to the inventory for future use.
|
|
Max Different Stocks
|
This parameter allows you to specify the maximum number of different steel sections and non-steel sections that can be used in nesting. If you have no upper limit, enter 0.
|
|
Max Different Pieces
|
This parameter allows you to specify the maximum number of different sized pieces of steel that can be placed together in the same layout/pattern. If you have no upper limit, enter 0.
|
|
Cost Optimisation Mode
|
Select this check box to have the nesting engine try to get the most cost effective cut instead of the most efficient use of the bars.
|
|
Optimiser Effort Level
|
This parameter has been set by STRUMIS. We recommend that you do not alter it.
If you set the optimiser to run more slowly, a more efficient nest may be produced as the nesting engine tries more permutations.
|
|
Number of Cutting Layouts
|
This parameter has been set by STRUMIS. We recommend that you do not alter it.
If you set the number of cutting layouts to a higher number, a more efficient nest may be produced as the nesting engine tries more cutting layouts.
|
|
Short Length Preference Factor
|
This parameter has been set by STRUMIS. We recommend that you do not alter it.
Specify the preference of shorter lengths over longer lengths.
|
AutoCut Settings - Nesting Engines
Use this form to specify the nesting engines to use for bars, angles and plate.
|
Field
|
Description
|
|
Angle Nesting Engine to use
|
The STRUMIS default engine is typically listed for all three cases, but you can change the engine if necessary.
|
|
Linear Nesting Engine to use
|
|
Plate Nesting Engine to use
|
|
Plate Nesting Engine units
|
Specify metric or imperial.
|
|
Prompt user to edit a nest
|
Select this check box to have third-party nesting software display the nesting results so that you can accept them before they are used in STRUMIS.
|
|
Show the nesting application when performing a nest
|
Select this check box to have third-party nesting software show progress on the screen.
|
AutoCut Settings - Theoretical Offcuts
This form allows you to specify how to use the leftovers of previous nests. You can:
§ Take the offcut of a previous nest and arrange items on it
§ Disregard the old nest and arrange items on the entire piece of material
AutoCut Settings - Inventory
Use this form to specify the order in which to use material in the inventory. The following options are available:
§ No Preference
The order in which material was added to the inventory is ignored.
§ First in - First out
The oldest material from inventory is used regardless of cost.
§ First in - Last out
The newest material from inventory is used regardless of cost.
Chapter 10
What's in this chapter?
About work orders
Create a work order using the Generate Contract Work Orders Wizard
Create a work order manually
Un-issue a work order
Find and edit a work order
Batch update marks
Batch update mark items
Find and edit a work order
Work order reports
What's next?
Fields and buttons
About work orders
A work order is a list of processes and timings that is used to process a contract, mark, mark item, non-steel item, or service.
§ Contract
This type of work order allows you to create contracts that can be billed as cost plus jobs (for example, for time and materials).
§ Contract mark
This type of work order lists the processes that are required to assemble a mark, for example, fabrication, treatment, loading, and erection.
§ Contract mark item
This type of work order lists the processes that are required to fabricate a mark item. The work order is usually given to the machine operators for cutting and drilling operations, for example.
§ Non-steel item
This type of work order lists the processes that are required to make non-contract items for stock. These are usually sold from inventory. A non-steel item work order is typically used in a bill of materials scenario.
§ Service/Non-productive
This type of work order is used to book times and work for extra activities such as maintenance, supervision, and employee activities.
The different types of work order are created using different tools within STRUMIS:
§ Use the Generate Contract Work Order Wizard (accessed through the Generate Contract Work Order form) to create contract mark and contract mark item work orders. The wizard uses production templates and, optionally, CAM data, to find the most efficient fabrication route through the workshop.
You can also use the Production Work Order form to create these work order types and to edit work orders that were created by the wizard.
§ Use the Production Work Order form to create contract, non-steel item, and service/non-productive work orders.
When you create a work order, it is automatically issued to production control.
Access
To access work orders, click the Generate Contract Work Orders button on the Contract Ribbon. Alternatively, from the sidebar menu, go to Production > Work Order or Production > Generate Contract Work Order.
Create a work order using the Generate Contract Work Orders Wizard
The Generate Contract Work Orders Wizard creates work orders for marks and mark items. It evaluates either production templates, or production workstations and production processes to find the most efficient fabrication route through the workshop. For mark items, you can also include CAM data in the evaluation. Marks and mark items must be lotted and released before you can create work orders for them (see About Lotting).
When the work orders have been created:
§ They are automatically issued to production
§ You can delete them using the Generate Contract Work Orders form (see Unissue a work order)
§ You can edit them using the Production Work Order form
Use the following instructions to create work orders:
1. Go to Production > Generate Contract Work Orders.
A list of contracts is displayed.
2. Double-click the contract for which you want to generate work orders.
The Generate Contract Work Orders form is displayed.
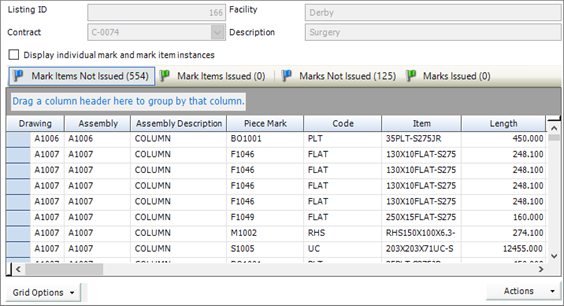
It lists marks and mark items for the contract in four smart filtered tabs: Mark Items Not Issued, Mark Items Issued, Marks Not Issued and Marks Issued.
See Generate Contract Work Orders - Details for more details.
3. To generate work orders for mark items, click the Mark Items Not Issued tab and select one or more mark items.
To generate work orders for marks, click the Marks Not Issued tab and select one or more marks.
4. Click Actions (button) > Issue To Production > Selection.
The Generate Contract Work Orders Wizard is launched. This leads you through the work order creation process.
The Generate Contract Work Orders Wizard
The wizard is described below. Screen illustrations are included so that you can identify the screen under discussion rather than to pinpoint specific features.
Screen 1: Generate Contract Work Orders Wizard - Welcome

This is simply a welcome screen and you can click Next immediately to continue to the next screen.
Screen 2: Generate Contract Work Orders Wizard - Work Order Creation Options

Use this wizard screen to specify the types of STRUMIS records and files that you want to use to find the most efficient fabrication route for your marks and mark items.
See Work Order Creation Options.
Click Next to continue to the next screen.
Screen 3: Generate Contract Work Orders Wizard - Templates and Processes

This screen shows the best fabrication route for each mark or mark item. The results are displayed in two grids, where you can amend process times and costs, add and remove processes, and select marks and marks items for which you do not want to create work orders.
See Templates and Processes.
Click Next to continue to the next screen.
Screen 4: Generate Contract Work Orders Wizard - Results/Create Work Orders
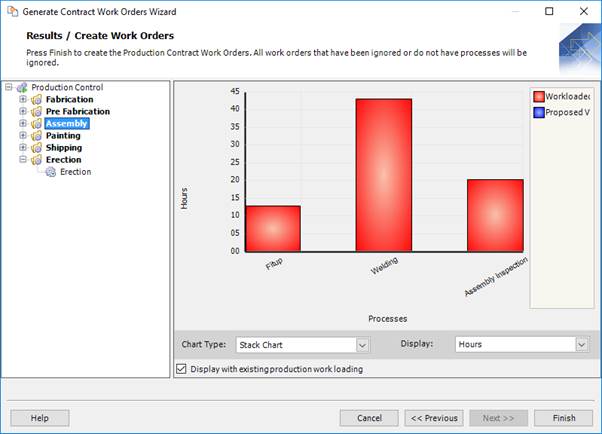
This is the final screen of the wizard. It presents an overview of the work orders as a graph.
See Results/Create Work Orders.
Click Finish to create the work orders and automatically issue them to production control.
Create a work order manually
The following instructions tell you how to create a work order using the Production Work Order form. Use this method to create contract, non-steel item and service/non-productive type work orders (see About work orders). If you are creating work orders for marks or for mark items, it is easier to use the Generate Contract Work Orders Wizard (from the Generate Contract Work Orders form). When you create work orders for marks and mark items, they must be lotted and released first (see About Lotting).
1. Go to Production > Work Order.
A list of open work orders is displayed.
2. Click New.
The Production Work Order form is displayed.
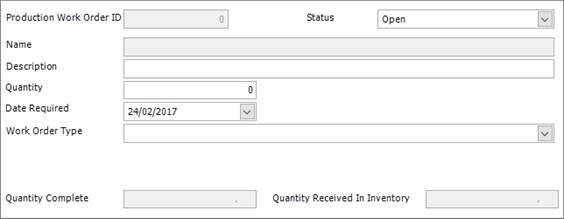
It has the following tabs:
§ Details
Specify the type of work order and the date required.
See Production Work Order Details for a full list of the fields and buttons on this tab.
§ Contract Mark
Only available for a work order type of Contract Mark.
Lists the contract marks that are allocated to the work order.
See Production Work Order Contract Mark for a full list of the fields and buttons on this tab.
§ Contract Mark Item
Only available for a work order type of Contract Mark Item.
Lists the contract mark items that are allocated to the work order.
See Production Work Order Contract Mark Item for a full list of the fields and buttons on this tab.
§ Processes
List the production processes for the work order.
See Production Work Order Processes for a full list of the fields and buttons on this tab.
3. Fill in the required information and click Save.
The work order is created and automatically issued to production control.
Un-issue a work order
Use the following instructions to delete work orders for selected marks or mark items.
1. Go to Production > Generate Contract Work Orders.
A list of contracts is displayed.
2. Double-click the contract for which you want to delete a work order.
The Generate Contract Work Orders form is displayed.

It lists marks and mark items for the contract in four smart filtered tabs: Mark Items Not Issued, Mark Items Issued, Marks Not Issued and Marks Issued.
See Generate Contract Work Orders - Details for more details.
3. To delete work orders for mark items, click the Mark Items Issued tab and select one or more mark items for which you want to delete work orders.
To delete work orders for marks, click the Marks Issued tab and select one or more marks for which you want to delete work orders.
4. Click Actions (button) > UnIssue > Selection.
Work orders are deleted for the selected marks or mark items.
Find and edit a work order
You can generate work orders manually using the Production Work Order form, or automatically using the Generate Contract Work Orders Wizard. In both cases, use the following instructions to find and edit a work order.
1. Go to Production > Work Order.
A list of open work orders is displayed.
2. Type your search criteria into the fields at the top of the page.
You can search for a work order by Name. For example, the following search returns a list of records with a name that begins with MI-WO-01.

3. Click Search.
Records matching your search criteria are listed.
4. Double-click a work order to edit it.
The Production Work Order Details form is displayed. It has the following tabs:
§ Details
Specify the type of work order and the date required.
See Production Work Order Details for a full list of the fields and buttons on this tab.
§ Contract Mark
Only available for a work order type of Contract Mark.
Lists the contract marks that are allocated to the work order.
See Production Work Order Contract Mark for a full list of the fields and buttons on this tab.
§ Contract Mark Item
Only available for a work order type of Contract Mark Item.
Lists the contract mark items that are allocated to the work order.
See Production Work Order Contract Mark Item for a full list of the fields and buttons on this tab.
§ Processes
List the production processes for the work order.
See Production Work Order Processes for a full list of the fields and buttons on this tab.
5. Make your changes and click Save.
|

|
§ If you leave the search fields blank, all records for the module are listed.
§ Click Clear to reset the search criteria.
§ Search criteria are not case sensitive.
§ You can use the following characters in the search fields:
*
Use the asterisk as a wildcard. If, for example, you wanted to show every member with a grade of –S275, type in *-S275. Every record in the module that ends with -S275 is displayed.
_
Use an underscore to represent any character; for example, _275 lists all records in the module with four characters that end with 275.
%
Use a percent sign to match any character that occurs multiple consecutive times. For example, C%per* would find both Cooper Steel Construction and Caper Fabrication Ltd.
[ ]
Use square brackets to denote a character range; for example, *U[B-C]* lists all UB codes and UC codes.
|
Batch update marks
Use these instructions to batch update multiple mark items on a detailed listing, when generating work orders, or from production control.
§ On the Contract Detailed Listing - Details form:
Select a drawing.
Select the marks that you want to update.
§ On the Generate Contract Work Orders - Details form:
Select the marks that you want to update.
§ On the Production Control form:
Select the marks that you want to update.
In all cases, use the following instructions:
1. Click Actions (button) > Batch Update Contract Marks.
The Contract Mark Batch Update form is displayed.
2. Complete the fields on this form using the following information:
|
Field
|
Description
|
|
Create Production Work Order
|
Select this check box to automatically create a work order in the Generate Contract Work Orders Wizard.
|
|
Apply to child mark(s)/mark item(s)
|
Select this check box to apply the setting for Create Production Work Order to any child marks or mark items associated with the mark.
|
|
Paint Finish
|
Select a paint finish from the drop-down list.
|
|
Execution Class
|
Select an execution class from the drop-down list.
|
|
Production Bundle
|
This field is available only when you access this form from production. It is used to group marks that are going through the production process together. A production bundle (unlike a batch) can be used to group items across different contracts.
|
|
Mark Notes
|
Type in a note. This is included on the Detailed Listing Mark - Notes form.
|
|
Append Notes
|
Select this check box to append the note to any others on the Detailed Listing Mark - Notes form. If the check box is cleared, the note is used to replace any that are present on the Detailed Listing Mark - Notes form.
|
|
Only Selected Rows
|
Select this check box to update only the selected marks. If the check box is cleared, all of the marks for the selected drawing are updated.
|
3. Click Batch Update.
Information is updated for the selected marks.
Batch update mark items
Use these instructions to batch update multiple mark items on a detailed listing, from production nesting and ordering, when generating work orders, or from production control.
§ On the Contract Detailed Listing - Details form:
Select a drawing.
Select a mark.
Select the mark items that you want to update.
§ On the Production Nesting and Ordering - Items to Nest form:
Select the mark items that you want to update.
§ On the Generate Contract Work Orders - Details form:
Select the mark items that you want to update.
§ On the Production Control form:
Select the mark items that you want to update.
In all cases, use the following instructions:
1. Click Actions (button) > Batch Update Contract Mark Items.
The Mark Item - Batch Update form is displayed.
2. Complete the fields on this form using the following information:
|
Field
|
Description
|
|
Ignore For Procurement
|
If you have a mechanism outside of STRUMIS for purchasing the material needed for this mark item, select this check box. During the nesting and ordering process, the mark item will have a status of Covered, meaning that no materials need to be purchased for its fabrication.
|
|
Create Production Work Order
|
Select this check box to allow the Generate Contract Work Orders Wizard to create a work order for the mark item when it is run.
|
|
Automatically Issue Inventory To Production (Backflush)
|
Select this check box to specify that the mark item's parent bar will be removed from the inventory when the mark item is cut in Production Control.
|
|
Apply changes to all Mark Items with the same name across the Contract
|
This batch update procedure updates multiple mark items that are associated with the selected mark. Select this check box if you want to expand the update to include mark items of the same name throughout the contract.
|
|
Paint Finish
|
Select a paint finish from the drop-down list.
|
|
Production Bundle
|
This field is available only when you access this form from production. It is used to group mark items that are going through the production process together. A production bundle (unlike a batch) can be used to group items across different contracts.
|
|
Mark Item Notes
|
Type in a note. This is included on the Component Mark Steel Item - Notes form.
|
|
Append Notes
|
Select this check box to append the note to any others on the Component Mark Steel Item - Notes form. If the check box is cleared, the note is used to replace any that are present on the Component Mark Steel Item - Notes form.
|
|
Only Selected Rows
|
Select this check box to update only the selected mark items. If the check box is cleared, all of the mark items for the selected mark are updated.
|
3. Click Batch Update.
Information is updated for the selected mark items.
Find and edit a work order
You can generate work orders manually using the Production Work Order form, or automatically using the Generate Contract Work Orders Wizard. In both cases, use the following instructions to find and edit a work order.
1. Go to Production > Work Order.
A list of open work orders is displayed.
2. Type your search criteria into the fields at the top of the page.
You can search for a work order by Name. For example, the following search returns a list of records with a name that begins with MI-WO-01.
3. Click Search.
Records matching your search criteria are listed.
4. Double-click a work order to edit it.
The Production Work Order Details form is displayed. It has the following tabs:
§ Details
Specify the type of work order and the date required.
See Production Work Order Details for a full list of the fields and buttons on this tab.
§ Contract Mark
Only available for a work order type of Contract Mark.
Lists the contract marks that are allocated to the work order.
See Production Work Order Contract Mark for a full list of the fields and buttons on this tab.
§ Contract Mark Item
Only available for a work order type of Contract Mark Item.
Lists the contract mark items that are allocated to the work order.
See Production Work Order Contract Mark Item for a full list of the fields and buttons on this tab.
§ Processes
List the production processes for the work order.
See Production Work Order Processes for a full list of the fields and buttons on this tab.
5. Make your changes and click Save.
|

|
§ If you leave the search fields blank, all records for the module are listed.
§ Click Clear to reset the search criteria.
§ Search criteria are not case sensitive.
§ You can use the following characters in the search fields:
*
Use the asterisk as a wildcard. If, for example, you wanted to show every member with a grade of –S275, type in *-S275. Every record in the module that ends with -S275 is displayed.
_
Use an underscore to represent any character; for example, _275 lists all records in the module with four characters that end with 275.
%
Use a percent sign to match any character that occurs multiple consecutive times. For example, C%per* would find both Cooper Steel Construction and Caper Fabrication Ltd.
[ ]
Use square brackets to denote a character range; for example, *U[B-C]* lists all UB codes and UC codes.
|
Work order reports
You can access reports from the sidebar menu. Go to Production > Production Reports.
See also:
Work with reports
List of reports
What's next?
When you have generated work orders, the next step is one of the following:
If you have already nested the mark items that are required for the contract, your next step is to progress the work orders through production. See About production control.
If you have not yet run through the nesting and ordering process, this is your next step. See About production nesting and ordering.
Fields and buttons
Production Work Order Details
Production Work Order - Details
Use this form to specify work orders manually or to view details of an existing work order.
Fields
|
Field
|
Description
|
|
Name
|
This is the unique name of the work order. By default, it is auto-numbered; see the Work order types table below for the prefixes. You can use the fields in Production Options to change the prefixes, change the subsequent auto-number, or to turn off auto-numbering.
|
|
Description
|
This is a free text field. Type in a description for the work order.
|
|
Quantity
|
This field is available for the following work order types:
§ Contract
§ Non-steel Item
§ Service/Non-productive
For work order types of Contract Mark and Contract Mark Item, the quantity is populated from the Generate Contract Work Orders Wizard.
|
|
Date Required
|
Specify a date by which the work order must be complete.
|
|
Work Order Type
(plus extra parameters)
|
See the Work order types table below.
|
|
Quantity Complete
Quantity Received In Inventory
|
You cannot edit these fields. They are automatically populated.
|
Work order types
|
Type
|
Description
|
|
Contract
|
You must create contract work orders manually; they cannot be created using the Generate Contract Work Orders Wizard.
This type of work order allows you to create contracts that can be billed as cost plus jobs (for example, for time and materials).
Default name prefix:
C-WO-
Additional parameters:
Contract: select a contract from the drop-down list
Additional tab:
None
|
|
Contract Mark
|
You can create a contract mark work order manually, but you would typically use the Generate Contract Work Orders Wizard.
This type of work order lists the processes that are required to assemble a mark.
Default name prefix:
M-WO-
Additional parameters:
Contract: select a contract from the drop-down list
Contract Mark: select a mark from the drop-down list
Additional tab:
Contract Mark: lists the marks that will be processed using this work order
|
|
Contract Mark Item
|
You can create a contract mark work order manually, but you would typically use the Generate Contract Work Orders Wizard.
This type of work order lists the processes that are required to fabricate a mark item.
Default name prefix:
MI-WO-
Additional parameters:
Contract: select a contract from the drop-down list
Contract Mark Item: select a mark item from the drop-down list
Additional tab:
Contract Mark Item: lists the mark items that will be processed using this work order
|
|
Non Steel Item
|
You must create non-steel item work orders manually; they cannot be created using the Generate Contract Work Orders Wizard.
This type of work order allows you to specify processes for standard products so that non-contract items can be made for stock and sold from inventory. It is typically used in a bill of materials scenario.
Default name prefix:
I-WO-
Additional parameters:
Non Steel Item: select a non-steel item from the drop-down list
Additional tab:
None
|
|
Service/Non-productive
|
You must create service/non-productive work orders manually; they cannot be created using the Generate Contract Work Orders Wizard.
This type of work order is used to book times and work for extra activities such as maintenance, supervision, and employee activities.
Default name prefix:
S-WO-
Additional parameters:
None
Additional tab:
None
|
Actions button
|
Option
|
Description
|
|
Print
|
Prints the production work order details.
|
|
Email as PDF
|
A new email opens with a PDF of the production work order details attached.
|
Production Work Order - Contract Mark
This form is available only when the Work Order Type field on the Production Work Order - Details form is set to Contract Mark. It lists the marks that are allocated to this work order. If you create work orders by running the Generate Contract Work Orders Wizard, the list is automatically populated. You can remove a mark (select it and press the Delete key on your keyboard), and restore it to the list (use the Add Mark button).
Production Work Order - Contract Mark Item
This form is available only when the Work Order Type field on the Production Work Order - Details form is set to Contract Mark Item. It lists the mark items that are allocated to this work order. If you create work orders by running the Generate Contract Work Orders Wizard, the list is automatically populated. You can remove a mark item (select it and press the Delete key on your keyboard), and restore it to the list (use the Add Mark Item button).
Production Work Order - Processes
Use this form to specify the list of production processes for the work order.
Fields
|
Column
|
Description
|
|
Process Number
|
The process number is populated automatically when you add a production process. It controls the order in which the processes are run. You can change the number if necessary. When you save the work order, the production process list is ordered according to the process number.
|
|
Process
|
Select a production process from the drop-down list.
|
|
Stage
|
The production stage is populated automatically when you add a production process. It is the stage (for example, fabrication, assembly, dispatch) associated with the process and you cannot change it here.
|
|
Workstation
|
If the production process requires a workstation, this column is populated with the default that is setup for the production process. You can select a different workstation from the drop-down list if necessary.
If the production process does not require a workstation, this field is set to N/A and is read-only. In this case, the Item Location field becomes available.
|
|
Item Location
|
If the production process requires a workstation, this field is populated with the location of the workstation specified in the Workstation column. It is read-only.
If the production process does not require a workstation, this field is populated with the location associated with the production process. You can select an alternative location from the drop-down list if necessary. The list of locations is limited to those of the type specified in the Item Location Type field on the Production Process - Details form.
|
|
Time Unit
|
Select Minutes, Hours or Days.
|
|
Unit Time
|
Enter a unit time.
This is the time (per unit) that the process will take.
|
|
Setup Time
|
Enter a setup time.
This is any preparation time required before the process begins. It is added to the total calculated unit time to produce the total process time.
|
|
Quantity At Process
|
|
|
Process Quantity Complete
|
|
|
Notes
|
Allows you to specify any custom notes to each process line. You can apply a predefined note. To do this, click the button in the Notes column, select a note from the Predefined Notes form, and click Save.
|
Generate Contract Work Orders - Details
Fields
|
Field
|
Description
|
|
Listing ID
|
The information contained in these fields is automatically populated from the contract that you selected on the Generate Contract Work Orders Search form.
|
|
Contract
|
|
Facility
|
|
Description
|
|
Display individual mark and mark item instances
|
Select this check box to have the grid show individual instances of marks and mark items. For example, if a mark item has a quantity of 5, clear the check box to show a single line in the grid with a quantity of 5. Select the check box to show five lines in the grid, each with a quantity of 1.
|
Grid
The grid has four smart filters:
§ Mark items not issued
Lists mark items that have no related work order. These have yet to be issued to production.
§ Mark items issued
Lists mark items that have been issued to production and, therefore, have an associated work order.
§ Marks not issued
Lists marks that have no related work order. These have yet to be issued to production.
§ Marks issued
Lists marks that have been issued to production and, therefore, have an associated work order.
Actions button
|
Field
|
Description
|
|
View Mark Status
|
Select this option to view the Mark Status form.
|
|
View Item Status
|
Select this option to view the Item Status form.
|
|
View Cutting Plan
|
Available only for nested items.
Opens the Cutting Plan Viewer form, where you can view the selected mark item's nested cutting plan along with the supplier details and purchase order number.
See Cutting Plan Viewer.
|
|
Issue to production
|
For unissued marks and mark items, this option opens the Generate Contract Work Orders Wizard.
|
|
Un-issue
|
For issued marks and mark items, this option deletes the associated work orders.
|
|
View Work Order
|
For unissued marks and mark items, this option opens the Production Work Order form for the selected item.
|
|
View Timesheets
|
For issued marks and mark items, this option opens the Employee Timesheet Search form for any timesheets created for the associated work order.
|
|
View Drawing
|
Allows you to view the related CAD drawing in the following formats *.spf, *.dwg, *.dwf and *.dxf.
|
|
View CAM using StruCNC
|
Allows you to view the related CAM drawing.
|
|
Edit CAM
|
Allows you to edit and then save the CAM file or to batch edit multiple CAM files.
|
|
BIMReview
|
You can highlight selected marks or use one of the pre-defined views using the BIMReview viewer.
|
|
Batch Update Contract Marks or
Batch Update Mark Items
|
Opens the Batch Update form to allow you to change details of one or more marks or mark items.
See Batch update marks
See Batch update mark items
|
|
Refresh Grid
|
Refreshes the grid to display the latest position of all work orders.
|
Generate Contract Work Orders Wizard - Work Order Creation Options
Use this wizard screen to specify the types of STRUMIS records and files that you want to use to find the most efficient fabrication route for your marks and mark items.
Optimisation Mode
|
Field
|
Description
|
|
Use Production Templates
|
Select this check box to have the wizard use production templates to determine the best fabrication route.
You then have the opportunity to have the wizard select templates that achieve either the fastest or the cheapest fabrication route. Speed and cost are calculated based on the timings and fabrication costs set up for the production workstation and production process.
|
|
Bypass Template Logic
|
Select this check box to have the wizard use information from the production workstations and production processes to determine the best fabrication route.
|
Mark Item Options
|
Field
|
Description
|
|
Include CAM Processing
|
This field is used when generating work orders for mark items only.
You can select the Include CAM Processing check box if you have CAM files linked to your mark items. The CAM files are then used along with the workstation rules and production templates to determine the best fabrication route for the mark item.
|
Generate Contract Work Orders Wizard - Templates and Processes
As this screen opens the wizard calculates the best fabrication route for each mark or mark item. The results are displayed in two grids, where you can make amendments and select marks and marks items for which you do not want to create work orders.
Templates grid
This grid, at the top of the screen, lists the marks and mark items and shows the production template that has been chosen for each. You can:
§ Elect not to create work orders for certain marks and mark items
To do this, select the check box in the Ignore column for the mark or mark item that you want to exclude. To exclude multiple marks or mark items, select them and click the Check/Un-check button.
§ Decrease the quantity of the mark or mark item required
To create work orders for fewer marks or mark items, decrease the number in the Quantity column. You cannot increase this number.
§ Select a different production template
To do this, select a different production template in the Production Template column. The processes in the Process grid are updated.
§ Check the rules
To do this, click Check Rules in the Check Rules column.
The Check Template and Workstation Rules form is displayed. It lists the templates and workstations that have been evaluated by the wizard. Where the wizard decided not to use a particular workstation, the rule that prompted that decision is shown. In the example below, the Profile Cutting process for a particular mark item cannot be carried out on the workstation Peddinghaus FDB 2500. This is because the section from which the mark item is to be fabricated is not allowed on this machine.

Processes grid
This grid, at the bottom of the screen lists the processes from all of the production templates in the Templates grid along with the workstations that will be used. In the grid, you can amend the following information:
§ Process number
§ Process
§ Workstation
§ Times and costs (Time Unit, Hourly Rate, Unit Time, and Setup Time)
You can also use the Batch Update button to add, update or remove processes for one or more marks or mark items. This is a quick way to add a rarely used process (such as specialised treatment) to a work order without modifying or creating a production template. Use Update Suggested Templates to update rows in the Templates grid to a template that is available for all the selected rows.
Actions button
|
Option
|
Description
|
|
View Mark Status
|
Select this option to view the Mark Status form.
|
|
View Item Status
|
Select this option to view the Item Status form.
|
|
View Drawing
|
Allows you to view the related CAD drawing in the following formats *.spf, *.dwg, *.dwf and *.dxf.
|
|
View CAM using StruCNC
|
Allows you to view the related CAM drawing.
|
Generate Contract Work Orders Wizard - Results/Create Work Orders
This is the final wizard screen. It presents an overview of the work orders as a graph.
Tree diagram and graph
The tree diagram on the left hand side, allows you to select values to display on the graph in the following ways:
§ When you select Production Control, the graph displays data for each production stage.
§ When you select a production stage, the graph displays data for each production process.
§ When you select a production process, the graph displays data for each production workstation (if any exist).
Fields
|
Field
|
Description
|
|
Chart Type
|
Select an option from the drop-down list. This field allows you to change the view of the graph from column to pie and from a 2D view to a 3D view.
|
|
Display
|
Select an option from the drop-down list. This field allows you to view the mark or mark items in the work order by hours, weight or quantity.
|
|
Display with existing production work loading
|
Select this check box to refresh the graph with the entire work load in Production Control for all work orders that have yet to be completed.
|
Chapter 11
Ordering, receiving and returning goods
What's in this chapter?
About ordering, receiving and returning goods
Suppliers
Purchase orders
Purchase order receipts
Purchase invoices
Purchase order returns
About ordering, receiving and returning goods
If you need to buy material for a contract, you typically use either preliminary or detailed nesting and ordering to determine what you need and to raise the corresponding purchase orders. You can, alternatively raise purchase orders manually. Whichever method you use to raise purchase orders, when you receive the material, you can create a receipt and add the material to the available stock in the inventory. You can keep track of incoming invoices from your suppliers and make a note of when you pay them, and you can raise a purchase order return to record any goods that you have to return to the supplier.
Before you can order material, however, you must set up suppliers. You can do this partly on the Supplier form (as described later in this chapter), and partly in the item library (see Supplier Lengths).
This chapter describes the processes involved in setting up suppliers and in ordering, receiving and returning goods.
Suppliers
About suppliers
Use a Supplier record to store your suppliers' names, contact details and payment terms. You can choose to record one supplier at a time, or you can use the Setup Wizard to import supplier details from Microsoft Outlook or a csv file. When you have recorded a supplier, it can be used throughout the system, for example:
§ When you set up and maintain the item library, listing suppliers for each item, along with cost prices, is essential
§ When you want to purchase an item, the supplier is a key element on the purchase order
§ When you source materials for a contract through the STRUMIS nesting and ordering facility, selecting suppliers is an integral part of the process
You can label a supplier as a steel mill. The lengths of steel that are available are recorded differently depending on whether the supplier is a standard supplier or a steel mill:
§ For a standard supplier, available steel lengths are specified in the item library (Item - Purchasing Information > Supplier Lengths (button)).
For a steel mill, available steel lengths are specified on an ad hoc basis, either when you add a line to a purchase order, or on the AutoCut Settings form during nesting and orderingCost prices are specified for both in the item library. See About cost prices.
Access
To access supplier records, from the sidebar menu, go to Purchasing & Suppliers > Supplier.
When you create or edit a supplier record, you will use the Supplier form.
Create a supplier record
The following instructions tell you how to manually create a supplier record.
|

|
Use the search facility to make sure the supplier is not already in the system.
See Find and edit a supplier if you need help with this.
|
1. Go to Purchasing & Suppliers > Supplier.
A list of suppliers is displayed.
2. Click New.
The Supplier form is displayed.

It has the following tabs:
§ Details
Enter general details such as the name of the supplier and payment terms.
See Supplier - Details for a full list of the fields and buttons on this tab.
§ EDI
Coming soon!
§ Addresses/Contacts
Enter contact details for the supplier.
See Supplier - Addresses for a full list of the fields and buttons on this tab.
§ Custom Fields
See Supplier - Custom Fields for a full list of the fields and buttons on this tab.
§ Attachments
See Supplier - Attachments for a full list of the fields and buttons on this tab.
§ Information
See Supplier - Information for a full list of the fields and buttons on this tab.
3. Fill in basic supplier information in the Details tab and click Save.
4. Add one or more addresses and contacts in the Addresses/Contacts tab and click Save.
See also:
Add contact details
|

|
If you are creating multiple supplier records, use the Save As New button.
When you have completed and saved the first set of supplier details, you can simply change the supplier name and click Save As New to save the same details under the new name.
|
Add contact details
Use the following instructions to add one or more addresses (for example, the address of the head quarters and a subsidiary or local office) and contacts for your customer or supplier.
1. On the Addresses/Contacts form, type into the fields Address Type, Line 1, Line 2 and so on. When you begin to type, a plus sign (+) is displayed at the beginning of the address line (circled in red below).

2. Click the + to display the contact information fields.
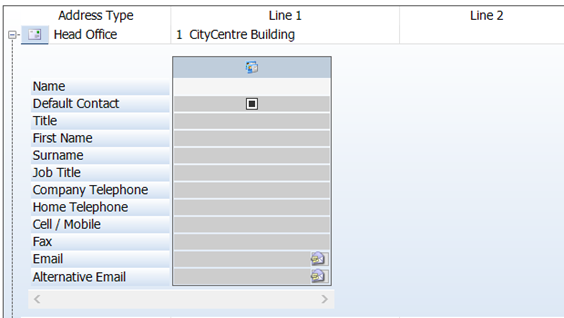
3. Type in your contact information.
4. To add multiple contacts for this address, click the button circled in red below.
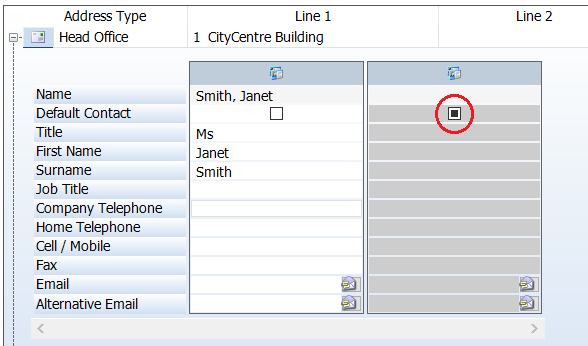
5. Click the Default Contact check box to indicate the default contact.
6. Click Save.
Find and edit a supplier record
1. Open the Search form from the sidebar menu.
To do this, go to Purchasing & Suppliers > Supplier.
2. Enter search criteria and click the Search button.
Records that match your search criteria are listed.
3. Double-click a record to edit it.
For complete information, see Find and edit an existing record.
Report supplier details
1. Go to Purchasing & Suppliers > Purchasing & Suppliers Reports.
A list of reports is displayed.
2. Double-click Suppliers Report.
The Run Report form is displayed.
3. Select an output option and click Run Report.
Fields and buttons
Supplier - Details
Note: items that are displayed in drop-down lists are usually pre-defined. Please speak to your system administrator if you need extra options.
|
Field
|
Description
|
|
Supplier ID
|
Populated automatically.
|
|
Name
|
Type in or edit the name of the supplier.
|
|
Supplier Type
|
Do one of the following:
§ Select a supplier type (for example, bolt supplier or welding supplier) from the drop-down list.
§ Add and select a new supplier type in the look-up dialog, which you can access by clicking the elipsis (...) button.
|
|
Currency
|
Select a currency from the drop-down list. This is the currency that your supplier uses for business transactions.
|
|
External Reference
|
This is a free text field where you can store an extra reference number, for example, the code used by the supplier to reference your company.
|
|
Default Payment Terms
|
Select the supplier's payment terms from the drop-down list. A typical example is Net 90, which means that payment is required 90 days after the invoice date.
|
|
Default Tax Code
|
Choose a tax code from the drop-down list. For example, if your supplier is based in the UK, you might use a tax code to enter a VAT rate. This is automatically added to the invoice.
|
|
Steel Mill Supplier
|
Select this check box if this supplier is a steel mill. This affects how you specify the lengths of steel that are available for this supplier for nesting and ordering:
§ For suppliers that are not steel mills (clear this check box), you define standard steel lengths in the item library (see Item - Purchasing Information).
§ For suppliers that are steel mills (select this check box), you define standard steel lengths on an ad hoc basis during nesting and ordering (see AutoCut Settings).
You can define a roll schedule for a steel mill. See About roll references.
|
|
Shipping Agent
|
Select this check box if the supplier is a shipping agent.
|
Supplier -EDI
Coming soon!
Supplier - Addresses/Contacts
For information about how to use this form, see Add contact details.
Note: items that are displayed in drop-down lists are usually pre-defined. Please speak to your system administrator if you need extra options.
Address fields
|
Field
|
Description
|
|
Address ID
|
System generated
|
|
Version
|
System generated
|
|
AddressSourceTypeID
|
System generated
|
|
SourceKey
|
System generated
|
|
Address Type
|
Specify the type of address, for example, the head office or billing address.
|
|
Lines 1, 2, 3 and 4
ZIP/Postal Code
Country
|
Type in the address details.
|
Contact fields
|
Field
|
Description
|
|
Contact ID
|
System generated
|
|
Version
|
System generated
|
|
Name
|
System generated
|
|
AddressID
|
System generated
|
|
Default Contact
|
Select this check box to indicate the default contact for this address.
|
|
Title
First Name
Surname
Job Title
Company Telephone
Home Telephone
Cell/Mobile
Fax
|
Type in the contact details.
|
|
Email
Alternative Email
|
Type in an email address. The button at the end of the line opens a blank email where the recipient is populated with this email address.
|
Purchase orders
About purchase orders
You can use STRUMIS to order goods in one of the following ways:
§ Automatically, by generating purchase orders through nesting and ordering
§ Manually, by creating a purchase order record and specifying the goods that you want to buy
You might decide to use the manual method to order goods for general use or to replenish items that you keep in stock. If, however, you order materials for use on a specific contract, we recommend that you do so through nesting and ordering.
Both methods use the Purchase Order form. The Details tab holds general information about the order, including supplier details and delivery date. The Lines tab lists the goods that you want to purchase; you can add steel and non-steel items and also free line items, which are goods and services that are not in your Item Library. Finally, the Notes tab allows you to add text to your purchase order.
Purchase orders have an associated status that you can change as the order progresses through your company's purchasing process. For example, the Preparation status indicates that you are working on the order and the Released status means that the purchase order is complete, has been approved, and is locked down so that no further changes can be made.
When you have specified the details of the purchase order, you can email it or print and post it to your supplier.
In addition to the basic purchase order process, you can create receipts to keep track of items that arrive at your site and those that are still outstanding. You can also make a note of invoices that you receive from your supplier and of any goods that you return.
Access
To access purchase orders, click the Purchase Orders button on the Contract Ribbon. Alternatively, from the sidebar menu, go to Purchasing & Suppliers > Purchase Order.
When you create or edit a purchase order, you will use the Purchase Order form.
Recommended workflow
Take a look at the following table. It shows the steps that you need to take to progress a purchase order through the system.
The following sections give detailed instructions about how to carry out the actions described in the above process.
Create a purchase order
The following instructions tell you how to manually create a purchase order.
|

|
Use the search facility to make sure the purchase order is not already in the system.
See Find and edit a purchase order if you need help with this.
|
1. Go to Purchasing & Suppliers > Purchase Order.
A list of purchase orders is displayed.
2. Click New.
The Purchase Order form is displayed.
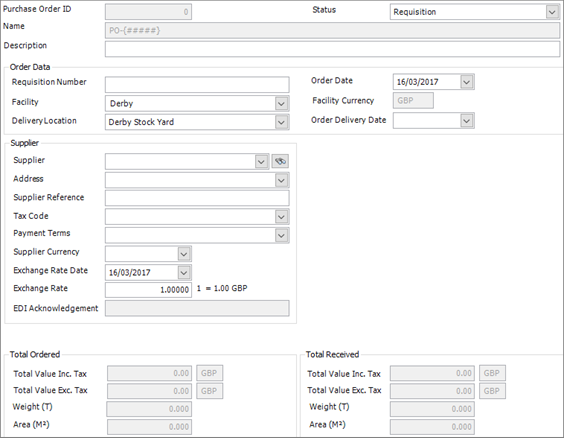
It has the following tabs:
§ Details
Enter general details such as the name of the supplier and the status of the purchase order.
See Purchase Order - Details for a full list of the fields and buttons on this tab.
§ Lines
Check, edit or add the items that you want to order.
See Purchase Order - Lines for a full list of the fields and buttons on this tab.
§ Notes
Add notes to the purchase order; for example, to clarify packaging or delivery instructions.
See Purchase Order - Notes for a full list of the fields and buttons on this tab.
§ Custom Fields
See Purchase Order - Custom Fields for a full list of the fields and buttons on this tab.
§ Attachments
See Purchase Order - Attachments for a full list of the fields and buttons on this tab.
§ Information
See Purchase Order - Information for a full list of the fields and buttons on this tab.
3. Fill in basic information in the Details tab and click Save.
4. Add the items that you want to purchase in the Lines tab and click Save.
See also:
Add a steel item to the purchase order
Add a non-steel item to the purchase order
Add a free line item to the purchase order
5. Add any notes to the purchase order in the Notes tab and click Save.
See also:
Add notes to a purchase order
Add a steel item to a purchase order
The following instructions tell you how to add steel items that you want to buy to a purchase order.
1. Open a purchase order.Click the Lines tab.
The Lines tab lists the items that you want to buy from your supplier.
2. Click the button shown in the illustration below.

3. Select the Add Steel Item option.
The Purchase Order Steel Item form is displayed.
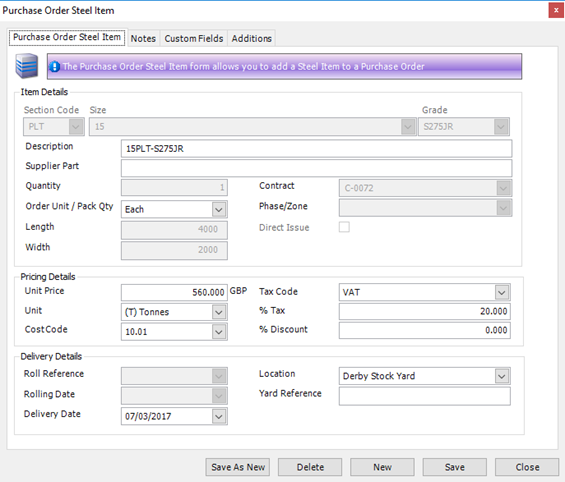
4. Complete the fields.
Purchase Order Steel Item tab
|
Field
|
Description
|
|
Section Code
Size
Grade
|
Use these fields to specify the steel item that you want to add to the purchase order.
|
|
Description
|
A description is generated depending on the steel item that you selected above. You can edit the text if necessary.
|
|
Supplier Part
|
If you have specified a supplier's part number for this item on the Item - Purchasing Information form, it is displayed here; otherwise, use the field to type in your supplier's part number.
|
|
Quantity
Order Unit
|
Enter the quantity of the item that you want to purchase and specify the units that apply.
|
|
Length
Width
|
Specify the length, or the length and width of the steel item. You can right-click either of these fields to specify whether the value is Metric or Imperial.
|
|
Contract
|
If you want to allocate the item for use with a specific contract, select the contract here. If you do not specify a contract, this will be a free (meaning available for use by any contract) item when it is received into the inventory.
|
|
Phase/Zone
|
Specify the phase for which this steel item is being ordered.
|
|
Direct Issue
|
This field becomes available when you select a contract. Select the check box if you want the steel item to be delivered directly to the building site.
|
|
Unit Price
Unit
|
These fields are populated from information on the Item - Purchasing Information form. You can edit them if necessary.
See About cost prices.
|
|
Cost Code
|
This field is populated from information on the Item - Details form. You can edit it if necessary.
See About cost codes and cost centres.
|
|
Tax Code
|
This field is populated from information on the Supplier - Details form. You can edit it if necessary.
See About tax codes.
|
|
% Tax
|
This field is automatically populated depending on the tax code you selected above.
|
|
% Discount
|
This field is populated from information on the Item - Purchasing Information form. You can edit it if necessary.
|
|
Roll Reference
|
This is the mill's rolling code for the product. This field is only available if your supplier is a mill. It is populated from information on the Item - Purchasing Information form. You can edit it if necessary.
|
|
Rolling Date
|
This is the mill's roll date for the selected roll reference. This field is only available if your supplier is a mill.
|
|
Delivery Date
|
Select the agreed delivery date for this steel item from the drop-down list.
|
|
Location
|
Select the location to which the item will be delivered.
|
|
Yard Reference
|
You can optionally type in a sub-location for delivery.
|
Notes tab
See Add notes to a purchase order.
Custom Fields tab
See Custom Fields.
Additions tab
5. Click Save.
The steel item is added to the grid on the Purchase Order - Lines form.
Add a non-steel item to a purchase order
The following instructions tell you how to add non-steel items that you want to buy to a purchase order.
1. Open a purchase order.Click the Lines tab.
The Lines tab lists the items that you want to buy from your supplier.
2. Click the button shown in the illustration below.
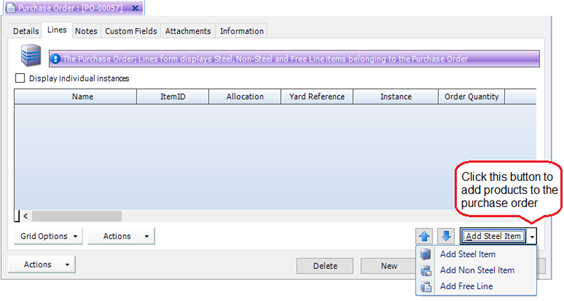
3. Select the Add Non Steel Item option.
The Purchase Order Non Steel Item form is displayed.

4. Complete the fields.
Purchase Order Non Steel Item tab
|
Field
|
Description
|
|
Item
|
Use this field to specify the non-steel item that you want to add to the purchase order.
|
|
Description
|
A description is generated depending on the non-steel item that you selected above. You can edit the text if necessary.
|
|
Supplier Part
|
If you have specified a supplier's part number for this item on the Item - Purchasing Information form, it is displayed here; otherwise, use the field to type in your supplier's part number.
|
|
Quantity
Order Unit
|
Enter the quantity of the item that you want to purchase and specify the units that apply.
|
|
Contract
|
If you want to allocate the item for use with a specific contract, select the contract here. If you do not specify a contract, this will be a free (meaning available for use by any contract) item when it is received into the inventory.
|
|
Phase/Zone
|
Specify the phase for which this non-steel item is being ordered.
|
|
Direct Issue
|
This field becomes available when you select a contract. Select the check box if you want the non-steel item to be delivered directly to the building site.
|
|
Unit Price
Unit
|
These fields are populated from information on the Item - Purchasing Information form. You can edit them if necessary.
See About cost prices.
|
|
Cost Code
|
This field is populated from information on the Item - Details form. You can edit it if necessary.
See About cost codes and cost centres.
|
|
Tax Code
|
This field is populated from information on the Supplier - Details form. You can edit it if necessary.
See About tax codes.
|
|
% Tax
|
This field is automatically populated depending on the tax code you selected above.
|
|
% Discount
|
This field is populated from information on the Item - Purchasing Information form. You can edit it if necessary.
|
|
Delivery Date
|
Select the agreed delivery date for this non-steel item from the drop-down list.
|
|
Delivery Location
|
Select the location to which the item will be delivered.
|
|
Yard Reference
|
You can optionally type in a sub-location for delivery.
|
Notes tab
See Add notes to a purchase order.
5. Click Save.
The non-steel item is added to the grid on the Purchase Order - Lines form.
Add a free line item to a purchase order
The following instructions tell you how to add free line items to a purchase order. These are items or services that are not in the Item Library, for example, delivery fees or consultancy fees.
1. Open a purchase order.Click the Lines tab.
The Lines tab lists the items that you want to buy from your supplier.
2. Click the button shown in the illustration below.
3. Select the Add Free Line option.
The Purchase Order Free Text Item form is displayed.

4. Complete the fields.
Purchase Order Free Line Item tab
|
Field
|
Description
|
|
Line Text
|
This is a free text field where you can describe the item or service that you want to add to the purchase order.
|
|
Quantity
|
Enter the quantity of the item or service that you want to purchase.
|
|
Weight
|
If applicable, enter the weight of the item that you want to purchase.
|
|
Contract
|
If you want to allocate the item for use with a specific contract, select the contract here. If you do not specify a contract, this will be a free (meaning available for use by any contract) item when it is received into the inventory.
|
|
Phase/Zone
|
Specify the phase for which this item or service is being purchased.
|
|
Unit Price
Unit
|
Enter the unit price and specify the unit.
See About cost prices.
|
|
Cost Code
|
See About cost codes and cost centres.
|
|
Tax Code
|
See About tax codes.
|
|
% Tax
|
This field is automatically populated depending on the tax code you selected above.
|
|
% Discount
|
If your supplier gives you a discount on the list price of the item or service that you want to buy, enter the percentage here.
|
|
Delivery Date
|
Select the agreed delivery date for this item or service from the drop-down list.
|
Notes tab
See Add notes to a purchase order.
5. Click Save.
The free line item is added to the grid on the Purchase Order - Lines form.
Update multiple lines in a purchase order
The following instructions tell you how to use the Purchase Order Batch Update form to make changes to multiple purchase order items.
1. Open a purchase order.Click the Lines tab.
The Lines tab lists the items that you want to buy.
2. Select the items that you want to update.
To do this:
§ Press Ctrl A to select all lines, or
§ Press the Ctrl key and click several non-contiguous lines, or
§ Press the Shift key then click the first and last lines in a range.
3. Click Actions (button) > Batch Update as shown in the illustration below.
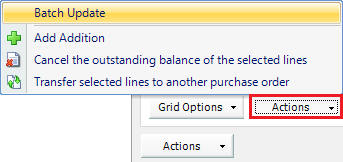
The Purchase Order Line Batch Update form is displayed.

4. Update the fields on any of the tabs (Delivery Details, Pricing Information, Notes and Additions).
Select Only Selected Rows to update only the lines that you highlighted. If you do not select this check box, all purchase order items in the Lines grid will be updated.
If you do not want to update some of the fields, leave them blank.
5. Click Batch Update to update the selected purchase order items.
Transfer lines between purchase orders
Use the following instructions to move lines from one purchase order to another.
On the Purchase Order - Lines form:
1. Select the lines that you want to move.
2. Click Actions (button 1, as shown in the illustration below) > Transfer selected lines to another purchase order.
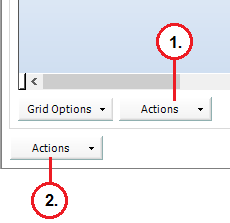
The Search for Purchase Order form is displayed:
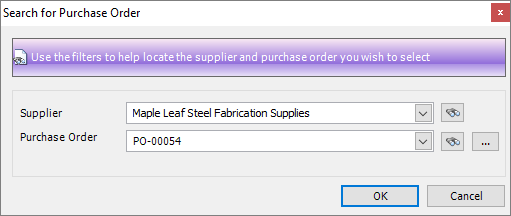
3. Select the supplier and purchase order to which you want to transfer the lines.
4. Click OK.
The lines are moved to the purchase order that you selected.
Add notes to a purchase order
You may want to add notes to your purchase order, for example, to clarify packaging or delivery instructions.You can add notes that apply to:
§ The whole purchase order
§ An individual line on the purchase order.
In each case, you can either type in the note on an ad hoc basis, or you can select a note from a predefined list. Use the batch update facility on the Lines tab to enter or update the same note for multiple items.
|

|
Purchase order notes appear on the printed purchase order that you send to your supplier.
|
Add notes that apply to the whole purchase order
1. Open a purchase order.Follow the instructions in Add notes to a record.
Add notes that apply to one purchase order item
1. Open a purchase order.Click the Lines tab.
The Lines tab lists the items that you want to buy.
2. Double click the line to which you want to add a note.
The form that is displayed depends on whether the selected item is a steel item, non-steel item or free line item. In all cases there is a Notes tab.
3. Follow the instructions in Add notes to a record.
Email a purchase order to your supplier
Use the following instructions to attach a purchase order to an email, ready to send to a supplier.
1. Open a purchase order.Click Actions (button) > Reports > Email Sales Order As PDF.
A new email opens with a PDF of the purchase order attached.
2. Type in a message and send the email.
|

|
You can check the purchase order before you send it; click Actions (button) > Reports > Print Purchase Order to display the purchase order on the screen.
|
Copy a purchase order
Instead of creating a purchase order from scratch, you can copy a similar one and make minor adjustments. Use the following instructions.
1. Open a purchase order.Click Actions (button) > Copy Purchase Order.
The Copy Purchase Order form is displayed.

2. Complete the fields on the form using the following information:
|
Field
|
Description
|
|
Name
|
Automatically populated.
|
|
Supplier
|
Select the destination supplier from the drop-down list.
|
|
Supplier Address
Facility
Delivery Location
|
These fields are automatically populated when you select a supplier. You can change them if necessary.
|
|
Order Delivery Date
|
This field is set to today's date. You can change it if necessary.
|
|
Line Value Options
|
Select one of the following options:
§ No Change
Line values are copied from the originating purchase order to the new purchase order with no changes.
§ Apply Item Supplier Rates
If the new purchase order uses a different supplier, and the supplier has cost prices defined for the goods ordered, these values are used.
§ Apply Item Default Rate
If the new purchase order uses a different supplier, and the supplier does not have cost prices defined for the goods ordered, the items' default price is used.
§ Set to Zero
Sets all rates to zero
For full information, see About cost prices.
|
|
Copy Additions
|
Select Yes or No depending on whether you want to copy the additions.
|
3. Click Copy.
A copy of the original purchase order is created with the amendments that you requested.
Cancel a purchase order
Use the following instructions to cancel selected purchase order lines or to cancel the whole purchase order.
To cancel selected purchase order lines
1. Open a purchase order.
(See Find and edit a purchase order.)
2. Click the Lines tab and select the lines that you want to cancel.
3. Click Actions (button 1, as shown in the illustration below) > Cancel the outstanding balance of the selected lines.
The Cancel outstanding balance message is displayed.
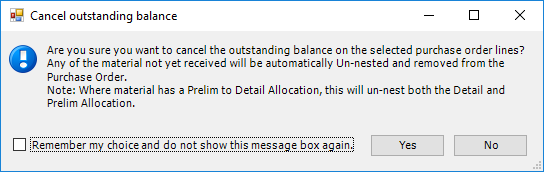
4. If you are sure that you want to cancel the selected lines, click Yes.
|

|
If the material has been used for nesting and has not yet been received, it is un-nested and deleted from the purchase order. This includes material that is on order for both prelim and detailed nesting.
|
The selected lines on the Purchase Order - Lines form are deleted.
To cancel the whole purchase order
1. Open a purchase order.
(See Find and edit a purchase order.)
2. Click Actions (button) > Cancel Purchase Order.
The Cancel Purchase Order message is displayed.
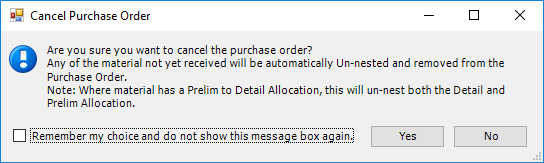
3. If you are sure that you want to cancel the purchase order, click Yes.
|

|
If the material has been used for nesting and has not yet been received, it is un-nested and deleted from the purchase order. This includes material that is on order for both prelim and detailed nesting.
|
All lines on the Purchase Order - Lines form are deleted and the purchase order status is set to Closed.
Find and edit a purchase order
1. Open the Search form from the sidebar menu.
To do this, go to Purchasing & Suppliers > Purchase Order.
2. Enter search criteria and click the Search button.
Records that match your search criteria are listed.
3. Double-click a record to edit it.
For complete information, see Find and edit an existing record.
Purchase order reports
You can access reports from the sidebar menu. Go to Purchasing & Suppliers > Purchasing & Suppliers Reports.
See also:
Work with reports
List of reports
Fields and buttons
Purchase Order - Details
Use this form to specify the details of a purchase order.
|
Field
|
Description
|
|
Name
|
This field is automatically populated if the auto-naming/numbering option is turned on in Purchasing & Suppliers Options; otherwise, type in a unique name for the purchase order.
|
|
Description
|
This is a free text field. Use it to provide more information about the purchase order.
|
|
Status
|
Select a status from the drop-down list. Purchase orders can have the following states:
§ Requisition or Preparation
In STRUMIS, there is no difference between the Requisition and Preparation states. Both are provided so that larger companies can run through a formal ordering process. For example, a department in the company raises a requisition and submits it for approval to the procurement department. The procurement department approves the requisition and changes the status from Requisition to Preparation. A status of Preparation indicates that the procurement department are working on the purchase order. For example, it may be that they are waiting for a supplier to confirm prices. When the order is in this state, limited actions (using the Actions button) are available.
§ Released
When you change the status of a purchase order to Released, this locks down the order, meaning that you can make no further changes to it.
§ Closed
When all of the items on the order have been received and paid for, set the status to Closed.
|
|
Requisition number
|
You can optionally use this field to enter a requisition number. Larger companies typically use an ordering process where a purchase requisition is raised internally, approved by a manager, then forwarded to a purchasing department. The purchasing department then raise a purchase order to be sent to an external third party. If you have such a process in place, use this field to note the requisition number.
|
|
Facility
Facility Currency
|
When you select a facility from the drop-down list, the associated facility currency is displayed.
|
|
Delivery Location
|
Select a delivery location from the drop-down list.
|
|
Order Date
|
This field is automatically populated with today's date. You can type in a different date or select one from the drop-down list, if, for example, the order was placed yesterday or last week.
|
|
Order Delivery Date
|
Select the expected delivery date from the drop-down list. You can change this later if necessary, for example if the order does not arrive when you expected it.
|
|
Supplier fields
|
Select a supplier from the drop-down list. The other fields in this group are populated from the supplier record. You can edit them if necessary.
The Supplier Reference is an optional field where you can note any reference that you receive from the supplier; for example, if you are raising a purchase order in response to a quotation that you received from your supplier, you can enter the quotation number here.
If the supplier currency differs from the facility currency (above), then you can specify an exchange rate date and an exchange rate. See
|
|
Total Ordered
Total Received
|
These fields give you an at-a-glance comparison of the value, weight and area of goods ordered against goods received. The values are updates as lines are added to or deleted from the purchase order.
|
Purchase Order - Lines
Use this form to check, edit or add items that you want to order.
Grid
Details of the items that you have added to your purchase order are listed in the grid. Use the Add Steel Items button (and the down-arrow button to the right) to add steel items, non-steel items, and free line items.
See Add a steel item to the purchase order
See Add a non-steel item to the purchase order
See Add a free line item to the purchase order
|

|
§ Use the and buttons to change the list order of selected items.
§ Double-click a line to edit the item.
§ You can update multiple lines using the Batch Update button.
See Update multiple lines in the purchase order.
§ Click a line and press the Delete key to delete it.
|
Actions buttons
There are two Actions buttons on the Purchase Order - Lines form. These are labelled in the illustration below:
Actions button 1
This Actions button gives you the following menu options:
Actions button 2
This Actions button gives you the following menu options:
|
Menu option
|
Description
|
|
Reports
|
This option allows you to generate or e-mail a Purchase Order Report, or to generate an Outstanding Orders, Overdue Orders or Purchase Order by Contract report.
|
|
Send EDI Purchase Order
|
|
|
Export EDI Purchase Order
|
|
|
Receive EDI Updates
|
|
|
Receive Order
|
When you take receipt of the items on the purchase order, select this option to generate a purchase order receipt record.
See About purchase order receipts.
|
|
Copy Purchase Order
|
Instead of creating a purchase order from scratch, you can copy a similar one and make minor adjustments.
See Copy a purchase order.
|
|
Cancel Purchase Order
|
You can cancel and delete a purchase order.
See Cancel a purchase order.
|
|
View Item Status
|
Opens the Item Status form for the selected purchase order line.
|
Purchase Order - Notes
This tab displays notes that apply to the purchase order. They appear on the printed purchase order that you send to your supplier.
See Add notes to a purchase order.
Purchase order receipts
About purchase order receipts
When you receive goods from a supplier, record the receipt in STRUMIS. The incoming items will relate to a purchase order that you previously raised in the STRUMIS system. This means that you can search for outstanding items on a purchase order and add them as received items to a Purchase Order Receipt form. Each receipt is associated with one supplier only. One receipt may include goods from several purchase orders.
When you have finished working with the purchase order receipt, complete it, and you can optionally print it and email it. Completing a purchase order receipt adds the received goods to the inventory and updates the corresponding purchase order(s). The purchase order is closed when the balance reaches zero.
Access
To access purchase order receipts, from the sidebar menu, go to Purchasing & Suppliers > Purchase Order Receipts.
When you create or edit a purchase order receipt, you will use the Purchase Order Receipt form.
Recommended workflow
Take a look at the following table. It shows the steps that you need to take to receive items on a purchase order.
|
Action
|
Where?
|
Show me how to...
|
|
1. Goods arrive at the delivery location specified on the purchase order. You unload and store them in the appropriate locations.
|
Outside of the STRUMIS system
|
|
|
2. Open the associated purchase order.
The status of the purchase order should be Released at this point.
|
Purchase Order form
|
Search for a purchase order
|
|
3. Create a purchase order receipt.
The items that you ordered are listed.
|
Purchase Order form, click Actions (button) > Receive Order
|
Create a purchase order receipt
|
|
4. Record the details of any items that you received from the same supplier but a different purchase order. (Optional step.)
|
Purchase Order Receipt form, Details tab
|
Add items to a purchase order receipt
|
|
5. Complete the purchase order receipt.
The inventory is automatically updated.
The originating purchase order is automatically updated.
|
Purchase Order Receipt form, Complete button
|
Complete a purchase order receipt
|
|
6. Send a receipt to your supplier. (Optional.)
|
Purchase Order Receipt form, click Actions (button) > Print or Email as PDF
|
Email a receipt to your supplier
|
The following sections give detailed instructions about how to carry out the actions described in the above process.
Create a purchase order receipt
The most common way to create a purchase order receipt is from within a purchase order. The following instructions tell you how to do this.
1. Open a purchase order.
To create a purchase order receipt, the purchase order must have a status of Released.
2. Click Actions (button) > Receive Order.
A Purchase Order Receipt form is created and displayed. It lists the items from the purchase order.
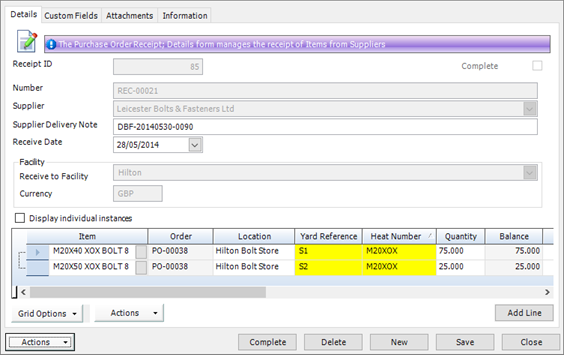
It has the following tabs:
§ Details
Enter supplier details and list the items that you have received.
See Purchase Order Receipt - Details for a full list of fields and buttons on this tab.
§ Custom Fields
See Purchase Order Receipt - Custom Fields for a full list of the fields and buttons on this tab.
§ Attachments
See Purchase Order Receipt - Attachments for a full list of the fields and buttons on this tab.
§ Information
See Purchase Order Receipt - Information for a full list of the fields and buttons on this tab.
3. Supplier information is pre-populated from the purchase order. Specify a delivery note reference and the date when you received the goods, and click Save.
You can add extra lines if the receipt covers items from other purchase orders. See Add items to a purchase order receipt.
|

|
You can also create a purchase order receipt from the menu.
1. Go to Purchasing & Suppliers > Purchase Order Receipts.
A list of purchase order receipts is displayed.
2. Click New.
The Purchase Order Receipt form is displayed.
3. Record the items that you received and click Save.
See Add items to a purchase order receipt for further details.
|
Add items to a purchase order receipt
As the most common way to create a purchase order receipt is from within a purchase order, you only need the instructions below if you want to add extra items to the receipt. For example, if the receipt covers items from the same supplier, but a different purchase order.
1. Open a purchase order receipt.
The Purchase Order Receipt - Details form is displayed.
2. Click the Add Line button.
The Receivable Purchase Order Lines window is displayed.
This form provides a search facility. It allows you to search for items that you have previously requested using a purchase order and that have not yet been received.
Only outstanding items from released purchase orders are returned.
Only purchase orders from the supplier that you specified on the Purchase Order Receipt - Details form are included in the search.
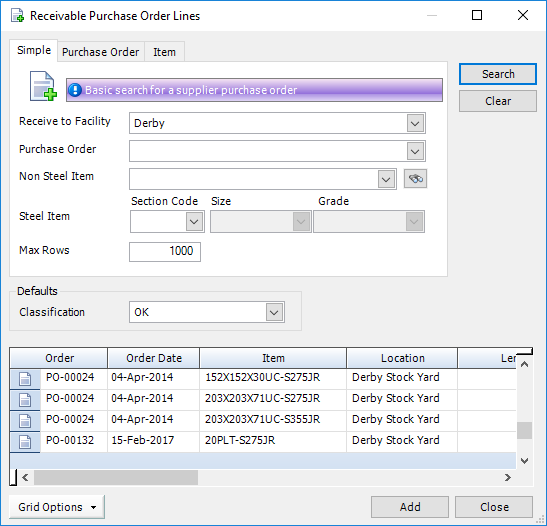
The following tabs are available:
§ Simple
§ Purchase Order
§ Item
3. Type search criteria into any of the tabs and click Search.
Items matching your search criteria are listed.
4. Select the items that you want to add to the Purchase Order Receipt - Details form and click Add.
The selected items are added to the purchase order receipt.
|

|
You can add items from several different purchase orders to the purchase order receipt. The only condition is that the items must come from the same supplier.
|
Update multiple lines in a purchase order receipt
The following instructions tell you how to use the Purchase Order Receipt Batch Update form to make changes to multiple purchase order receipts.
1. Open a purchase order receipt.On the Details tab, select the items that you want to update.
To do this:
§ Press Ctrl A to select all lines, or
§ Press the Ctrl key and click several non-contiguous lines, or
§ Press the Shift key then click the first and last lines in a range.
2. Click Actions (button) > Batch Update as shown in the illustration below.
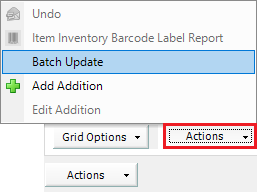
The Purchase Order Receipt Batch Update form is displayed.

3. Update the fields on either of the tabs (Details and Additions).
Select Only Selected Rows to update only the lines that you highlighted. If you do not select this check box, all purchase order receipts in the grid will be updated.
If you do not want to update some of the fields, leave them blank.
4. Click Batch Update to update the selected purchase order receipts.
Complete the purchase order receipt
1. Open a purchase order receipt.Click the Complete button.
|

|
§ You cannot edit the fields in a completed purchase order receipt. If you want to record more items that you have received from your supplier, go back to the related purchase order and raise another receipt.
§ When you complete a purchase order receipt, the goods that you receive from the supplier are added to the inventory and the originating purchase order is updated.
|
Find and edit a purchase order receipt
1. Open the Search form from the sidebar menu.
To do this, go to Purchasing & Suppliers > Purchase Order Receipt.
2. Enter search criteria and click the Search button.
Records that match your search criteria are listed.
3. Double-click a record to edit it.
For complete information, see Find and edit an existing record.
Email a receipt to your supplier
Use the following instructions to attach a receipt to an email, ready to send to a supplier.
1. Open a purchase order receipt.Click Actions (button) > Email As PDF.
A new email opens with a PDF of the receipt attached.
2. Type in a message and send the email.
|

|
Check the receipt before you send it; click Actions (button) > Print to display the receipt on the screen.
|
Purchase order receipt reports
You can access reports from the sidebar menu. Go to Purchasing & Suppliers > Purchasing & Suppliers Reports.
See also:
Work with reports
List of reports
Fields and buttons
Purchase Order Receipt - Details
Use this form to record the goods that you have received from a particular supplier.
Fields
|
Field
|
Description
|
|
Number
|
This field is automatically populated if the auto-naming/numbering option is turned on in Purchasing & Suppliers Options; otherwise, type in a unique name for the purchase order receipt.
|
|
Supplier
|
If you created a purchase order receipt from within a purchase order, this field is pre-populated; otherwise, select a supplier from the drop-down list. This is the supplier from whom you have received goods.
|
|
Supplier Delivery Note
|
This is a free text field. Use it to store the reference number from the supplier's delivery note.
|
|
Receive Date
|
This is the date on which the goods were received. It defaults to today, but you can select a different date from the drop-down list.
|
|
Receive to Facility
|
If your business has multiple locations, select a facility; otherwise use the default setting.
|
|
Currency
|
The facility currency is automatically loaded from the facility record. You cannot change it here.
|
Grid
Details of the items that you have received are listed in the grid.
The Display Individual Instances check box influences the way in which items are listed. It applies only to steel items. If you specified a quantity of, for example, 5 items in the purchase order, select this check box to list each of the 5 items on a separate line. If you clear the check box, the items appear on a single line with a quantity of 5.
Use the Add Line button to add items from any purchase order associated with the supplier you selected above. This is only necessary when the receipt covers items from other purchase orders. See Record items that you receive for more information.
Buttons
The following non-standard buttons are available on the Purchase Order Receipt - Details form:
§ Complete
§ Actions
There are two Actions buttons on the Purchase Order Receipt - Details form. These are labelled in the illustration below:
The buttons are described in the following sections.
Complete button
When you have finished recording the items that you received from your supplier, click this button to complete the purchase order receipt. When you complete a purchase order receipt:
§ You can no longer edit fields or add items
If you want to record more received items, you have to raise another receipt.
§ Received items are added to the inventory
§ The originating purchase order is updated
The outstanding quantities for items not fully received is updated to reflect the balance. If the balance is zero, the purchase order is closed.
Actions button 1
This Actions button gives you the following menu options:
|
Menu option
|
Description
|
|
Undo
|
If a purchase order receipt is completed, but one of the items was received in error, use this option to undo the delivery of that one item and update the purchase order accordingly.
|
|
Item Inventory Barcode Label Report
|
When the purchase order receipt is completed, you can generated an Item Barcode Label report. A unique barcode is created for each item, based on its inventory tracking number.
|
|
Batch Update
|
See Batch update lines in the purchase order receipt.
|
|
Add Addition
|
|
|
Edit Addition
|
|
Actions button 2
This Actions button gives you the following menu options:
|
Menu option
|
Description
|
|
Print
|
Prints the purchase order receipt to the screen.
|
|
Email As PDF
|
Opens your email client and attaches a PDF of the purchase order receipt.
|
Purchase invoices
About purchase invoices
This facility allows you to keep track of incoming invoices and their payment. When you receive an invoice from a supplier, create a purchase invoice in STRUMIS and populate it with information from the invoice that you received. This includes the supplier's details and a list of the items on their invoice. You can add steel and non-steel items one-by-one. Typically, however, you will have received the items for which you are being invoiced and will have generated a purchase order receipt. If this is the case, you can populate the purchase invoice with items from the purchase order receipt.
When you have recorded the incoming supplier invoice in a STRUMIS purchase invoice, you can optionally have a manager or your finance department approve it for payment. Once approved, you can export the purchase invoice to your accounts system for processing. Finally, when the invoice has been paid, make a note of this in STRUMIS.
Access
To access purchase invoices, from the sidebar menu, go to Purchasing & Suppliers > Purchase Invoices.
When you create or edit a purchase invoice, you will use the Purchase Invoice form.
Recommended workflow
Take a look at the following table. It shows the steps that you need to take to progress a purchase order through the system. This is the simplest case; variations and extras are listed after the table.
|
Action
|
Where?
|
Show me how to...
|
|
1. You receive an invoice from your supplier and you want to record it within the STRUMIS system
|
Outside of the STRUMIS system
|
|
|
2. Create a purchase invoice.
Type in the details of the invoice received from your supplier and list the items for which payment is required.
The status of the purchase invoice is automatically set to Preparation.
|
Purchase Invoice form, Details tab
Purchase Invoice form, Lines tab
|
Create a purchase invoice
Add a steel item to the purchase invoice
Add a non-steel item to the purchase invoice
Add a free line item to the purchase invoice
Add a receipt to the purchase invoice
|
|
3. Change the status from Preparation to Awaiting Approval and send the purchase invoice to the approving manager.
|
Purchase Invoice form, Details tab, Status field
Purchase Invoice form, click Actions (button) > Email Invoice
|
Change the status of a purchase invoice
|
|
4. When approved, lock down the purchase invoice.
Change the status from Awaiting Approval to Approved. You cannot make any more changes to the purchase invoice.
This step is typically carried out by the approving manager.
|
Purchase Invoice form, Details tab, Status field
|
Change the status of a purchase invoice
|
|
5. Export the purchase invoice to your accounts system and make a note of the export.
|
System > Transaction Interface, then select a Purchase Invoice Export interface
Purchase Invoice form, Information tab, Exported field
|
Make a note of the export
|
|
6. Pay your supplier and make a note that payment has been made.
|
Payments are made outside of the STRUMIS system
Purchase Invoice form, Information tab, Paid field
|
Make a note of the payment
|
The following sections give detailed instructions about how to carry out the actions described in the above process.
Create a purchase invoice
The following instructions tell you how to create a purchase invoice.
|

|
Use the search facility to make sure the purchase invoice is not already in the system.
See Find and edit a purchase invoice if you need help with this.
|
1. Go to Purchasing & Suppliers > Purchase Invoice.
A list of purchase invoices is displayed.
2. Click New.
The Purchase Invoice form is displayed.

It has the following tabs:
§ Details
Enter supplier details.
See Purchase Invoice - Details for a full list of fields and buttons on this tab.
§ Lines
List the items that appear on a supplier's invoice.
See Purchase Invoice - Lines for a full list of fields and buttons on this tab.
§ Notes
Add notes to your purchase invoice, for example, to clarify payment instructions.
See Purchase Invoice - Notes for a full list of fields and buttons on this tab.
§ Custom Fields
See Purchase Invoice - Custom Fields for a full list of fields and buttons on this tab.
§ Attachments
See Purchase Invoice - Attachments for a full list of fields and buttons on this tab.
§ Information
See Purchase Invoice - Information for a full list of fields and buttons on this tab.
3. Fill in basic information in the Details tab and click Save.
4. Add the items that appear on the supplier's invoice in the Lines tab and click Save.
See also:
Add a steel item to the purchase invoice
Add a non-steel item to the purchase invoice
Add a free line item to the purchase invoice
Add a receipt to the purchase invoice
5. Add any notes to the purchase invoice in the Notes tab and click Save.
See also:
Add notes to a purchase invoice
Add a steel item to a purchase invoice
The following instructions tell you how to add steel items to a purchase invoice. Use this method to take items that appear on a supplier's invoice and reproduce them on a STRUMIS Purchase Invoice form.
1. Open a purchase invoice.Click the Lines tab.
The Lines tab lists the items that are on the supplier's invoice.
2. Click the button shown in the graphic below to add new items.

3. Select the Add Steel option.
The Purchase Invoice Steel Item form is displayed.
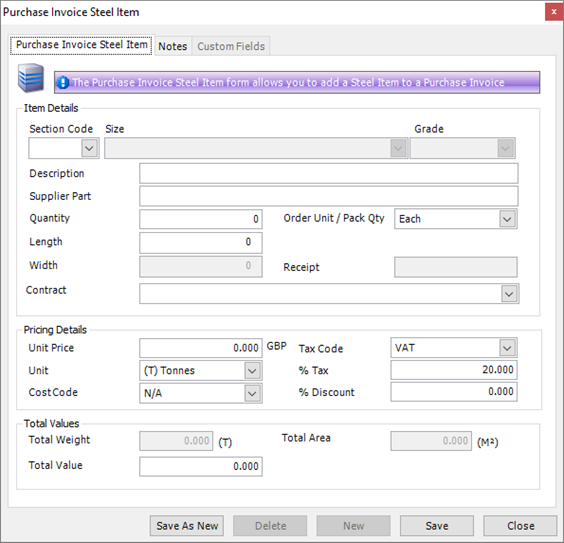
4. Complete the fields.
Purchase Invoice Steel Item tab
|
Field
|
Description
|
|
Section Code
Size
Grade
|
Use these fields to specify the steel item that you want to add to the purchase invoice.
If the supplier that you selected on the Details tab matches one of those in the Purchasing Information tab for this item in the Item Library, the following fields are automatically populated: Supplier Part, Unit Price, Unit, Cost Code, Tax Code, %Tax and Discount%.
|
|
Description
|
A description is generated depending on the steel item that you selected above. You can edit the text if necessary.
|
|
Supplier Part
|
This is an optional free text field where you can type in your supplier's part number.
|
|
Quantity
Order Unit
|
Enter the quantity of the item that appears on the supplier's invoice and specify the units that apply.
|
|
Length
Width
|
Specify the length, or the length and width of the steel item. You can right-click either of these fields to specify whether the value is Metric or Imperial.
|
|
Contract
|
If you want to allocate the item for use with a specific contract, select the contract here. If you do not specify a contract, this will be a free (meaning available for use by any contract) item when it is received into the inventory.
|
|
Receipt
|
Not available for a steel item.
|
|
Unit Price
Unit
|
Enter the unit price and specify the unit.
See About cost prices.
|
|
Cost Code
|
See About cost codes and cost centres.
|
|
Tax Code
|
See About tax codes.
|
|
% Tax
|
This field is automatically populated depending on the tax code you selected above.
|
|
% Discount
|
If your supplier gives you a discount on the list price of the steel items, enter the percentage here.
|
|
Total Values
|
The total weight, area and value for the item are shown. You can edit the total value so that you can allow for differences between the value that has been calculated and the value that appears on the supplier's invoice.
|
Notes tab
See Add notes to a purchase invoice.
Custom Fields tab
See Purchase Invoice - Custom Fields.
5. Click Save.
The steel item is added to the grid on the Purchase Invoice - Lines form.
Add a non-steel item to a purchase invoice
The following instructions tell you how to add non-steel items to a purchase invoice. Use this method to take items that appear on a supplier's invoice and reproduce them on a STRUMIS Purchase Invoice form.
1. Open a purchase invoice.Click the Lines tab.
The Lines tab lists the items that are on the supplier's invoice.
2. Click the button shown in the graphic below to add new items.
3. Select the Add Non Steel option.
The Purchase Invoice Non Steel Item form is displayed.
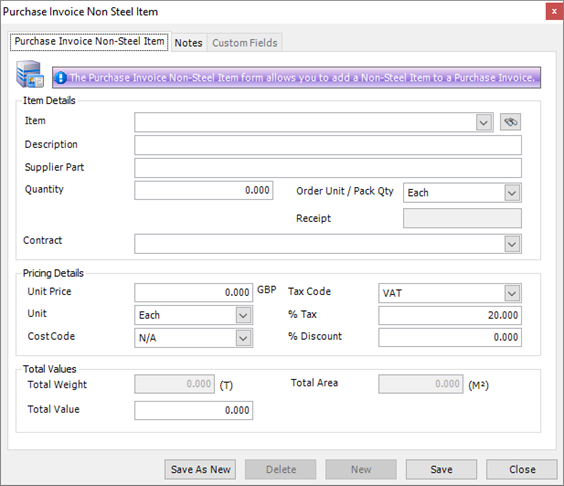
4. Complete the fields.
Purchase Invoice Non-steel Item tab
|
Field
|
Description
|
|
Item
|
Select an item from the drop-down list.
If the supplier that you selected on the Details tab matches one of those in the Purchasing Information tab for this item in the Item Library, the following fields are automatically populated: Supplier Part, Unit Price, Unit, Cost Code, Tax Code, %Tax and Discount%.
|
|
Description
|
A description is generated depending on the non-steel item that you selected above. You can edit the text if necessary.
|
|
Supplier Part
|
This is an optional free text field where you can type in your supplier's part number.
|
|
Quantity
Order Unit
|
Enter the quantity of the item that appears on the supplier's invoice and specify the units that apply.
|
|
Receipt
|
Not available for a non-steel item.
|
|
Contract
|
If you want to allocate the item for use with a specific contract, select the contract here. If you do not specify a contract, this will be a free (meaning available for use by any contract) item when it is received into the inventory.
|
|
Unit Price
Unit
|
Enter the unit price and specify the unit.
See About cost prices.
|
|
Cost Code
|
See About cost codes and cost centres.
|
|
Tax Code
|
See About tax codes.
|
|
% Tax
|
This field is automatically populated depending on the tax code you selected above.
|
|
% Discount
|
If your supplier gives you a discount on the list price of the non-steel items, enter the percentage here.
|
|
Total Values
|
The total weight, area and value for the item are shown. You can edit the total value so that you can allow for differences between the value that has been calculated and the value that appears on the supplier's invoice.
|
Notes tab
See Add notes to a purchase invoice.
Custom Fields tab
See Purchase Invoice - Custom Fields.
5. Click Save.
The non-steel item is added to the grid on the Purchase Invoice - Lines form.
Add a free line item to a purchase invoice
The following instructions tell you how to add free line items to a purchase invoice. Use this method to take items that appear on a supplier's invoice and reproduce them on a STRUMIS Purchase Invoice form.
1. Open a purchase invoice.Click the Lines tab.
The Lines tab lists the items that are on the supplier's invoice.
2. Click the button shown in the graphic below to add new items.
3. Select the Add Free Line option.
The Purchase Invoice Free Line Item form is displayed.

4. Complete the fields.
Purchase Invoice Non-steel Item tab
|
Field
|
Description
|
|
Line Text
|
Type in a description of the free line item.
|
|
Quantity
|
Enter the quantity of the item that appears on the supplier's invoice.
|
|
Weight
|
If applicable, enter the unit weight of the item as it appears on the supplier's invoice.
|
|
Receipt
|
Not available for a free line item.
|
|
Contract
|
If you want to allocate the item for use with a specific contract, select the contract here. If you do not specify a contract, this will be a free (meaning available for use by any contract) item when it is received into the inventory.
|
|
Unit Price
Unit
|
Enter the unit price and specify the unit.
See About cost prices.
|
|
Cost Code
|
See About cost codes and cost centres.
|
|
Tax Code
|
See About tax codes.
|
|
% Tax
|
This field is automatically populated depending on the tax code you selected above.
|
|
% Discount
|
If your supplier gives you a discount on the list price of the item, enter the percentage here.
|
|
Total Values
|
The total weight, area and value for the item are shown. You can edit these fields so that you can allow for differences between the values that have been calculated and the values that appear on the supplier's invoice.
|
Notes tab
See Add notes to a purchase invoice.
Custom Fields tab
See Purchase Invoice - Custom Fields.
5. Click Save.
The free line item is added to the grid on the Purchase Invoice - Lines form.
Add items to a purchase invoice using a purchase order receipt
The following instructions tell you how to steel, non-steel and free line items to a purchase invoice by way of a purchase order receipt. Use this method to take items that appear on a supplier's invoice and reproduce them on a STRUMIS Purchase Invoice form.
1. Open a purchase invoice.Click the Lines tab.
The Lines tab lists the items that are on the supplier's invoice.
2. Click the button shown in the graphic below to add new items.
3. Select the Add Receipt option.
The Purchase InvoiceFree - Pick Receipt form is displayed.

It lists the un-invoiced purchase order receipts that are outstanding for the supplier that you selected on the Purchase Invoice - Details tab.
4. Select the items that you want to add to the Purchase Invoice - Lines form.
To do this:
§ Press Ctrl A to select all lines, or
§ Press the Ctrl key and click several non-contiguous lines, or
§ Press the Shift key then click the first and last lines in a range.
5. Click Add Receipt(s).
The selected items are added to the grid on the Purchase Invoice - Lines form.
Add notes to a purchase invoice
You may want to add notes to your purchase invoice, for example, to clarify payment instructions. You can add notes that apply to:
§ The whole purchase invoice
§ An individual line on the purchase invoice
In each case, you can either type in the note on an ad hoc basis, or you can select a note from a predefined list.
The following instructions tell you how to add notes:
Add notes that apply to the whole purchase invoice
1. Open a purchase invoice.Click the Notes tab.
The Notes tab displays notes that apply to the whole purchase invoice.
2. Click the Predefined Notes button.
The Predefined Notes form is displayed.
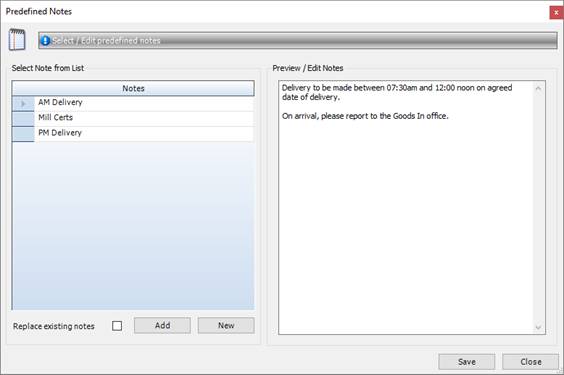
3. Select a note from the list and click Add.
The note is included in the Purchase Invoice - Notes tab.
|
|
§ Instead of selecting a predefined note, you can simply type an ad hoc note into the Purchase Invoice - Notes tab.
§ On the Predefined Notes form, you can create a predefined note for use with this and other purchase invoices:
Click the New button.
At the prompt, specify a name for the new note and click OK.
The name is added to the list on the Predefined Notes form.
Select the name in the list and type in the note in the Preview/Edit Notes area.
Click Save.
|
Add notes that apply to one purchase invoice item
To add notes to a purchase invoice item, read the instructions above, but apply the notes in the Purchase Invoice - Lines tab as follows:
1. Open a purchase invoice. Find and edit a purchase invoice
2. Click the Lines tab.
The Lines tab lists the items that you have transcribed from the supplier's invoice.
3. Double click the line to which you want to add a note.
The form that is displayed depends on whether the selected item is a steel item, non-steel item or free line item. In all cases there is a Notes tab.
4. Click the Notes tab.
5. Follow the instructions above for adding notes that apply to the whole purchase invoice.
Find and edit a purchase invoice
1. Open the Search form from the sidebar menu.
To do this, go to Purchasing & Suppliers > Purchase Invoice.
2. Enter search criteria and click the Search button.
Records that match your search criteria are listed.
3. Double-click a record to edit it.
For complete information, see Find and edit an existing record.
Purchase invoice reports
You can access reports from the sidebar menu. Go to Purchasing & Suppliers > Purchasing & Suppliers Reports.
See also:
Work with reports
List of reports
Fields and buttons
Purchase Invoice - Details
Use this form to record details of a supplier's invoice.
Fields
|
Field
|
Description
|
|
Name
|
This field is automatically populated if the auto-naming/numbering option is turned on in Purchasing & Suppliers Options; otherwise, type in a unique name for the purchase invoice.
|
|
Description
|
This is a free text field. Use it to provide more information about the purchase invoice.
|
|
Status
|
Select a status from the drop-down list. Purchase invoices can have the following states:
§ Preparation
Use this status to show that you are working on the purchase invoice.
§ Awaiting Approval
Larger companies often use a payment process where a supplier's invoice (or, if you handle purchases within STRUMIS, the purchase invoice) is sent to a manager for approval. This is an optional status to show that the invoice is waiting to be approved by a manager.
§ Approved
Use this status to show that the purchase invoice has been approved and can be exported to your accounting system using Transaction Interfaces. A purchase invoice with a status of Approved cannot be edited.
When you have exported the purchase invoice to your accounting system, select the Exported check box on the Information tab.
When your company has paid the purchase invoice, select the Paid check box on the Information tab.
|
|
Facility
|
Select a facility from the drop-down list.
|
|
Invoice Date
|
This field defaults to today but you can select a date from the drop-down list if necessary.
|
|
Supplier
|
Select a supplier from the drop-down list. The Supplier Billing Address, Supplier Reference, Tax Code, and Payment Terms fields are automatically populated from the supplier record.
|
|
Currency
|
The Facility Currency field is automatically populated with information from the facility record that you selected above. The Supplier Currency field is automatically populated from the supplier record that you selected above. If the currencies are different, you can specify an exchange rate and the date from which the rate was used.
|
|
Total Invoiced
|
The fields in this group show the total weight, area and value invoiced.
|
Actions button
This Actions button gives you the following menu options:
|
Menu option
|
Description
|
|
Print Invoice
|
Prints the purchase invoice to the screen.
|
|
Email Invoice
|
Opens your email client and attaches a PDF of the purchase invoice.
|
|
View Item Status
|
Not available on this tab.
|
Purchase Invoice - Lines
Use this form to check, edit or add items that appear on the supplier's invoice and for which payment is due.
Grid
Details of the items that you have added to your purchase invoice are listed in the grid. Use the Add Steel Items button (and the down-arrow button to the right) to add steel items, non-steel items, free line items and receipts.
See Add a steel item to the purchase invoice
See Add a non-steel item to the purchase invoice
See Add a free line item to the purchase invoice
See Add a receipt to the purchase invoice
|

|
§ Double-click a line to edit the item.
§ Click a line and press the Delete key on your keyboard to delete it.
|
Actions button
This Actions button gives you the following menu options:
|
Menu option
|
Description
|
|
Print Invoice
|
Prints the purchase invoice to the screen.
|
|
Email Invoice
|
Opens your email client and attaches a PDF of the purchase invoice.
|
|
View Item Status
|
Opens the Item Status form for the selected purchase invoice line.
|
Purchase Invoice - Notes
This tab displays notes that apply to the purchase invoice. They appear on the printed purchase invoice.
See Add notes to a purchase invoice.
Purchase Invoice - Information
This tab records information about who created or updated the Purchase Invoice form and the dates on which these actions took place.
For Purchase Invoice forms only, the following additional check boxes are available:
§ Exported
Select this check box when you have exported this purchase invoice to your accounts system. Your username and the date are automatically recorded.
§ Paid
Select this check box when you have paid your supplier for the items on this purchase invoice. Your username and the date are automatically recorded.
Purchase order returns
About purchase order returns
Use a purchase order return if goods are faulty or damaged and you have to return them to the supplier. To do this, create a purchase order return; specify the supplier to whom you are returning goods and list the goods that you want to return. You can only return steel and non-steel items for which you previously created and completed a purchase order receipt. They must also be tracked (steel and non-steel) and quantity tracked (non-steel only) items. Items that are not tracked are not displayed in the list of available inventory to return.
When you have populated the Purchase Order Return - Details form, return the goods and mark the form as Complete. The listed items are automatically removed from the inventory and the originating purchase order is automatically updated.
Access
To access purchase order returns, from the sidebar menu, go to Purchasing & Suppliers > Purchase Order Returns.
When you create or edit a purchase invoice, you will use the Purchase Order Return form.
Recommended workflow
Take a look at the following table. It shows the steps that you need to take to progress a purchase order return through the system.
|
Action
|
Where?
|
Show me how to...
|
|
1. You want to return goods to a supplier.
|
|
|
|
2. Create a purchase order return.
Specify the supplier and a reason for returning the goods. List the items that you want to return. These must have previously been included in a completed purchase order receipt.
|
Purchase Order Return form, Details tab
|
Create a purchase order return
Add items to the purchase order return
|
|
3. Finalise the purchase order return so that no more changes can be made to it. To do this, mark the purchase order return as Complete.
|
Purchase Order Return form, Details tab, Complete button
|
Complete the purchase order return
|
|
4. Return the goods.
|
Outside of the STRUMIS system
|
|
The following sections give detailed instructions about how to carry out the actions described in the above process.
Create a purchase order return
The following instructions tell you how to create a purchase order return.
|

|
Use the search facility to make sure the purchase order return is not already in the system.
See Find and edit a purchase order return if you need help with this.
|
1. Go to Purchasing & Suppliers > Purchase Order Return.
A list of purchase order returns is displayed.
2. Click New.
The Purchase Order Return form is displayed.
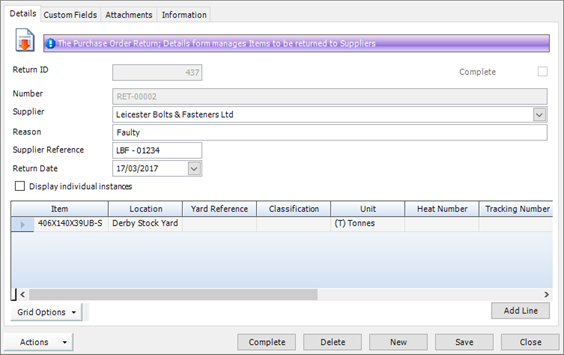
It has the following tabs:
§ Details
Enter supplier details.
See Purchase Order Return - Details for a full list of fields and buttons on this tab.
§ Custom Fields
See Purchase Order Return - Custom Fields for a full list of fields and buttons on this tab.
§ Attachments
See Purchase Order Return - Attachments for a full list of fields and buttons on this tab.
§ Information
See Purchase Order Return - Information for a full list of fields and buttons on this tab.
3. Fill in basic information and add the items that you intend to return in the Details tab and click Save.
See also:
Add items to the purchase order return
Add items to a purchase order return
This topic tells you how to add items that you want to return to your supplier to a purchase order return.
1. On the Purchase Order Return - Details form, click the Add Line button to add items.
The Pick Inventory to Return window is displayed.
It allows you to search the inventory for steel or non-steel items that you want to return to your supplier.

2. Enter search criteria and click Search.
If you do not want to return the total quantity from the purchase order line, use one of the following methods:
a. If the item is tracked, select the Display Individual Instances. This lists each item individually so that you can choose which to return.
b. If the item is not tracked or if you do not want to return specific instances of the item, specify the quantity that you want to return in the Quantity column.
3. Select the items that you want to return and click Add.
The selected items are added to the Purchase Order Return - Details form.
4. When you have added the relevant items, click Close to return to the Purchase Order Return - Details form.
5. Save the Purchase Order Return - Details form.
The inventory items that you added are locked and cannot be used.
Find and edit a purchase order return
1. Open the Search form from the sidebar menu.
To do this, go to Purchasing & Suppliers > Purchase Order Return.
2. Enter search criteria and click the Search button.
Records that match your search criteria are listed.
3. Double-click a record to edit it.
For complete information, see Find and edit an existing record.
Purchase order return reports
You can access reports from the sidebar menu. Go to Purchasing & Suppliers > Purchasing & Suppliers Reports.
See also:
Work with reports
List of reports
Fields and buttons
Purchase Order Return - Details
Use this form to specify the items that are to be returned to the supplier.
Fields
|
Field
|
Description
|
|
Number
|
This field is automatically populated if the auto-naming/numbering option is turned on in Purchasing & Suppliers Options; otherwise, type in a unique name for the purchase order return.
|
|
Supplier
|
Select a supplier from the drop-down list. This is the supplier to whom the listed items will be returned.
|
|
Reason
|
This is an optional free text field where you can specify the reason that you are returning the listed items. For example, items may be damaged, carry defects or they are not as ordered.
|
|
Supplier Reference
|
This is an optional field. You might use it to note the supplier's delivery note reference, invoice reference, or collection note number, for example.
|
|
Return Date
|
This field defaults to today, but you can select a different date from the drop-down list if necessary.
|
Grid
Details of the items that you want to return to the supplier are listed in the grid.
The Display Individual Instances check box influences the way in which items are listed and depends on the way in which items are tracked. If the item is tracked, and you specified a quantity of, for example, 5 items to be returned, select this check box to list each of the 5 items on a separate line. If you clear the check box, the items appear on a single line with a quantity of 5. If the item is quantity tracked, the Display Individual Instances check box has no effect.
Use the Add Line button to add steel and non-steel items that were ordered from the supplier you selected above. You can only add items for which you have created and completed a purchase order receipt. The Quantity field is available so that you can specify the quantity to be returned.
Use the Delete key on your keyboard to remove lines added in error or to remove specific instances when in display individual instance mode.
See Add items to the purchase order return for more information.
Buttons
The following buttons are available on the Purchase Order Return - Details form:
§ Complete
§ Actions
The buttons are described in the following sections.
Complete button
When you have finished listing the items that you want to return to your supplier, click this button to complete the purchase order return. This action cannot be undone.
When you complete a purchase order return:
§ You can no longer edit fields or add items
If you want to return more items, you have to raise another purchase order return.
§ Returned items are removed from the inventory
§ The originating purchase order is updated
Actions button
This Actions button gives you the following menu options:
|
Menu option
|
Description
|
|
Print
|
Prints the purchase order return to the screen.
|
|
Email As PDF
|
Opens your email client and attaches a PDF of the purchase order return. The return number is used as the filename.
|
Chapter 12
Maintaining the inventory
What's in this chapter?
About the inventory
Search the inventory
Transfer inventory
Change classification
Allocate or un-allocate inventory
Exchange bars
Issue to contract / work order
Add inventory
Inventory adjustment
Inventory batch update
Edit inventory
View item history
View shape
Cutting Plan Viewer
UpdatePricing
Inventory reports
About the inventory
The inventory lists all of the material that you currently hold as stock. This includes steel items, non-steel items and assembled marks. Each item of inventory is associated with a location, and in turn, the location is associated with a facility. Locations can include stockyards, internal workshops and external locations such as sub-contractor sites and the final delivery site.
The inventory is populated in the following circumstances:
§ When you receive a purchase order
See About purchase order receipts.
§ When you receive items from a work order
You can do this when you have fabricated items in your work shop and want to store the completed items in the inventory. It applies to non-steel items and assembled marks such as plate girders
See About Receive From Work Order.
Access
To access the inventory, click the Item Inventory button on the Contract Ribbon. Alternatively, from the sidebar menu, go to Items & Inventory > Inventory.
Search the inventory
Use the following instructions to search the inventory.
1. Go to Items &Inventory > Inventory.
The Inventory Search screen is displayed.
2. Type your search criteria into the fields at the top of the page.
On the General tab, you can elect to search the whole inventory, or only steel items, non-steel items or marks. The option that you select affects the format of the Name field. You can search for items at a particular facility or location. For example, the following search returns steel items with section code W, size 6X12 and grade A529-50 that are located in Workshop 1.
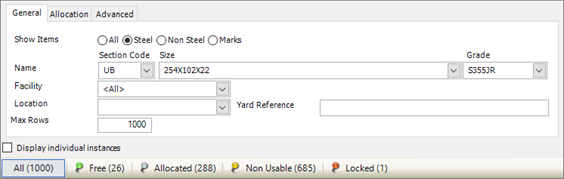
On the Allocation tab, you can narrow the search by contract and phase/zone.
On the Advanced tab, you can narrow the search by classification, tracking number, item group, item class or section length.
3. Click Search.
Records matching your search criteria are listed. You can now select a line and carry out a variety of actions, as shown in the next step.
4. Select one or more lines and click the Actions button.
The following options (minus reporting options) are available. Click the links to find out more.
Transfer Inventory
Change Classification
Allocate / Un-allocate Inventory
Exchange Bars
Issue to Contract/Work Order
Add Inventory
Inventory Adjustment
Batch Update
Edit Inventory
View Item Status
View Item History
View Shape
View Cutting Plan
Current Transaction
Update Pricing
|

|
§ If you leave the search fields blank, all records for the module are listed.
§ Click Clear to reset the search criteria.
§ Search criteria are not case sensitive.
§ You can use the following characters in the search fields:
*
Use the asterisk as a wildcard. If, for example, you wanted to show every member with a grade of –S275, type in *-S275. Every record in the module that ends with -S275 is displayed.
_
Use an underscore to represent any character; for example, _275 lists all records in the module with four characters that end with 275.
%
Use a percent sign to match any character that occurs multiple consecutive times. For example, C%per* would find both Cooper Steel Construction and Caper Fabrication Ltd.
[ ]
Use square brackets to denote a character range; for example, *U[B-C]* lists all UB codes and UC codes.
|
Transfer inventory
You can transfer an inventory item from its current location to a different location, a site, a sub-contractor site, a workshop, or a facility.
1. Search the inventory for the items to be transferred.
See Search the inventory for more information.
2. Select one or more items to be transferred and click the Actions button.
3. Choose Transfer Inventory, then one of the following options:
§ Location Transfer
§ Site Transfer
§ Issue To Sub Contractor
§ Workshop Transfer
§ Facility Transfer
The screen that is displayed has slightly different Destination fields depending on which option you choose. The example below shows a location transfer:

4. Fill in the required information:
Type text into the Description field to identify this transfer. The description that you type here is displayed when you carry out an Inventory Transactions Search.
The Date defaults to today, but you can change it if necessary.
Choose the destination Location from the drop-down list and specify a Yard Reference and Shipping Agent if necessary.
In the grid, type in the Quantity that you want to transfer.
5. Click Save.
6. Click Complete to move the inventory items.
|

|
To print or email the details of a completed transfer, click Actions (button) > Print or Actions (button) > Email as PDF.
The Inventory Transactions Search allows you to review transfers.
|
Change classification
Use item classifications to group inventory items. You can define classifications in the Item Classification Details screen. The following instructions tell you how to assign a classification to an inventory item.
1. Search the inventory for the items to be assigned a classification.
See Search the inventory for more information.
2. Select one or more items and click the Actions button.
3. Choose Change Classification.
The Change Classification screen is displayed.

4. Fill in the required information:
Type text into the Description field to identify this classification change. The description that you type here is displayed when you carry out an Inventory Transactions Search.
The Date defaults to today, but you can change it if necessary.
Choose a classification from the drop-down list.
In the grid, type in the Quantity that you want to re-classify.
5. Click Save.
6. Click Complete to change the classification of the inventory items.
|

|
To print or email the details of a completed classification change, click Actions (button) > Print or Actions (button) > Email as PDF.
The Inventory Transactions Search allows you to review classification changes.
|
Allocate or un-allocate inventory
You can allocate or unallocate inventory items to particular contracts or assign inventory items as free stock.
1. Search the inventory for the items to be allocated, unallocated, or assigned as free stock.
See Search the inventory for more information.
2. Select one or more items and click the Actions button.
3. Choose Allocate / Un-allocate Inventory.
The Allocation Change form is displayed.
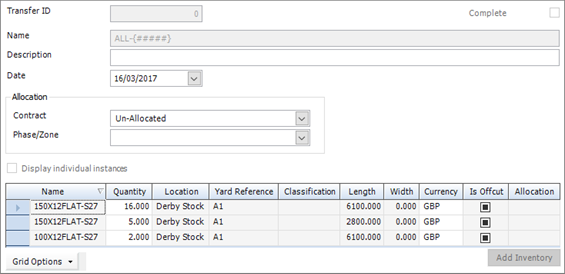
4. Fill in the required information:
Type text into the Description field to identify this allocation change. The description that you type here is displayed when you carry out an Inventory Transactions Search.
The Date defaults to today, but you can change it if necessary.
Choose the Contract and Phase/Zone to which you want to (un)allocate inventory.
In the grid, type in the Quantity that you want to (un)allocate.
5. Click Save.
6. Click Complete to (un)allocate the inventory items.
|

|
To print or email the details of an allocation change, click Actions (button) > Print or Actions (button) > Email as PDF.
The Inventory Transactions Search allows you to review allocation actions.
|
Exchange bars
You can exchange bars from within the inventory and from the production console. You can replace a bar that has been selected for cutting with another identical bar. This is useful, for example, when the original bar is inaccessible in the stockyard.
1. Search the inventory for the bar to be exchanged.
See Search the inventory for more information.
2. On the Inventory Search form, select the Display individual instances check box.
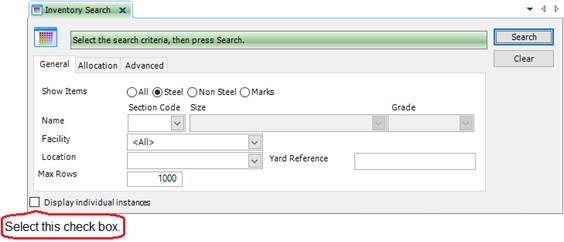
3. Select the bar and click the Actions button.
4. Choose Exchange Bars.
The Exchange Bars screen is displayed.
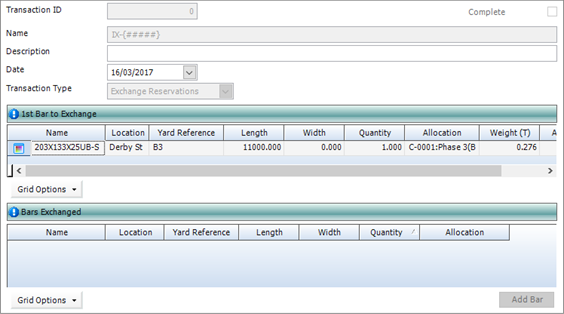
The screen shows basic information about the exchange; it also has two grids. The top grid shows the bars to be exchanged. The bottom grid has an Add Bar button, which allows you to choose a replacement bar. Replacement bars are then displayed in the bottom grid. The following instructions tell you how to exchange bars in more detail.
5. Fill in the required information:
Type text into the Description field to identify this exchange. The description that you type here is displayed when you carry out an Inventory Transactions Search.
The Date defaults to today, but you can change it if necessary.
6. In the top grid, select the bar to be exchanged.
7. Click Add Bar.
The Item to Exchange screen is displayed.

It lists the bars that are available as replacements.
8. Select a replacement bar and click Add, then Close.
You are returned to the Exchange Bars screen and the selected replacement bar is listed in the bottom grid.
9. Click Save.
10. Click Complete to finalise the exchange.
|
|
To print or email the details of a completed exchange, click Actions (button) > Print or Actions (button) > Email as PDF.
The Inventory Transactions Search allows you to review exchanges. Use a Transaction Type of Exchange Reservations.
|
Issue to contract / work order
You can allocate inventory items for use in particular work orders.
1. Search the inventory for the items to be allocated to a work order.
See Search the inventory for more information.
2. Select one or more items and click the Actions button.
3. Choose Issue to Contract / Work Order.
The Issue to Contract / Work Order screen is displayed.
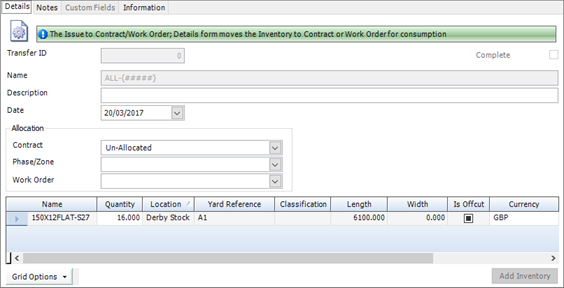
4. Fill in the required information:
Type text into the Description field to identify this allocation. The description that you type here is displayed when you carry out an Inventory Transactions Search.
The Date defaults to today, but you can change it if necessary.
Choose the Contract, Phase/Zone and Work Order to which you want to allocate inventory.
In the grid, type in the Quantity that you want to allocate.
5. Click Save.
6. Click Complete to (un)allocate the inventory items.
|

|
To print or email the details of an allocation change, click Actions (button) > Print or Actions (button) > Email as PDF.
The Inventory Transactions Search allows you to review allocation actions.
|
Add inventory
You can add items to the inventory through the purchase order process. There are, however, situations when this is not necessary or not practical; for example, when you first set up the STRUMIS system and add existing stock to the inventory, or if you do not use the purchase order process in STRUMIS. You can only add goods that are defined in the item catalogue.
1. Go to the Search Inventory form.
See Search the inventory for more information.
2. Click the Actions button.
3. Choose Add Inventory.
The Inventory Adjustment screen is displayed.

4. Fill in the required information:
Type text into the Description field to identify this inventory adjustment. The description that you type here is displayed when you carry out an Inventory Transactions Search.
The Date defaults to today, but you can change it if necessary.
Choose a Facility from the drop-down list if required.
5. Click Save.
6. Click Add Item.
The Adjustment Line screen is displayed.

7. Fill in the details of the item that you want to add to the inventory.
Choose an Item Type. The option that you choose here affects the fields that are displayed in the Item Details section.
In the Item Details section, specify an item and enter values for the Quantity, Order Unit, Length, Width, Contract and Phase/Zone. If you do not specify a contract, the item is allocated to free inventory.
Add more details as required in the Inventory Details and Pricing Details sections.
8. Click Save, then Close.
You are returned to the Inventory Adjustment screen.
9. Click Complete to add the goods to the inventory.
|

|
§ To print or email the details of a completed inventory adjustment, click Actions (button) > Print or Actions (button) > Email as PDF.
§ The Inventory Transactions Search allows you to review inventory additions.
|
Inventory adjustment
You may need to make adjustments to the inventory; for example, if you carry out a stock check and need to amend the quantity of some items.
1. Search the inventory for the items to be adjusted.
See Search the inventory for more information.
2. Select one or more items and click the Actions button.
3. Choose Inventory Adjustment.
The Inventory Adjustment screen is displayed and the items that you selected are listed.

4. Type text into the Description field to identify this inventory adjustment. The description that you type here is displayed when you carry out an Inventory Transactions Search.
The Date defaults to today, but you can change it if necessary.
5. Make the necessary adjustments:
a. If you only need to adjust quantities, edit the values in the Quantities column.
b. If you need to make more detailed adjustments, double-click the relevant item.
The Adjustment Line screen is displayed:

Make the necessary adjustments and click Save, then Close.
You are returned to the Inventory Adjustment screen.
6. Click Complete to finalise the adjustments.
|

|
§ To print or email the details of a completed adjustment, click Actions (button) > Print or Actions (button) > Email as PDF.
§ The Inventory Transactions Search allows you to review inventory adjustments.
|
Inventory batch update
Coming soon!
Edit inventory
Use the Edit Inventory form to amend the details of unallocated inventory items.
1. Search the inventory for the items to be edited.
See Search the inventory for more information.
2. Select an item and click the Actions button.
3. Choose Edit Inventory.
The Edit Inventory form is displayed for the item that you selected.
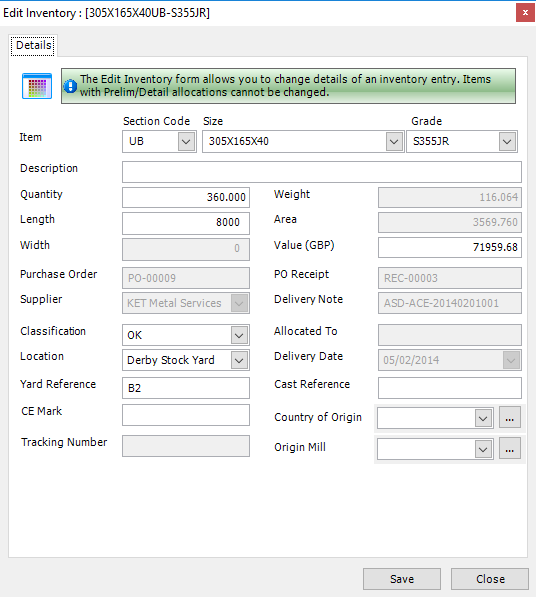
4. Make the necessary adjustments and click Save, then Close.
View item history
Use the View Item History form to view the full history of selected inventory items.
1. Search the inventory for the item to be viewed.
See Search the inventory for more information.
2. Select an item and click the Actions button.
3. Choose View Item History.
The Item History form is displayed for the item that you selected.

It lists the full history for the item.
4. When you have finished viewing the history,click Close.
View shape
Use the following instructions to check whether an inventory item is shaped. If the plate is shaped then the check box in the Has Shape column on the Inventory Search grid is selected. you may have to use the grid options to display the Has Shape column.
For shaped items, use the following instructions to view the shape:
1. Search the inventory for the item of interest.
See Search the inventory for more information.
2. Select an item and click the Actions button.
3. Choose View Shape.
The Drawing Viewer shows the shape of the item that you selected.
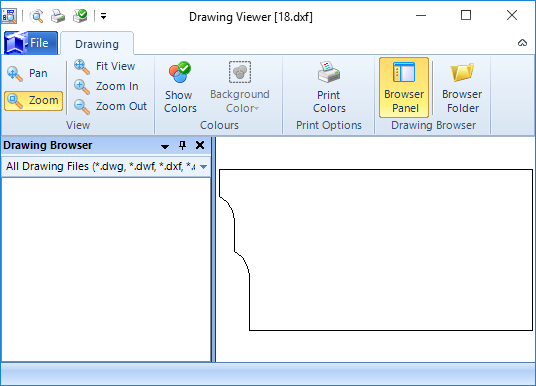
4. Close the Drawing Viewer when you have finished viewing the shape.
Cutting Plan Viewer
When an item has been through the nesting process, you can use this form to view the resulting cutting plan.

Each row in the grid shows a bar that has been allocated for cutting by the nesting process. Click the + sign at the beginning of a row to expand it. The mark items that are to be cut (or have been cut) from the bar are listed. Click a mark item to show its sequence on the bar (in yellow at the bottom of the form).
Current Transaction…Release Locks - Inventory items that are part of an incomplete Inventory document appear as Locked on Inventory Search form. Releasing the lock will move the Inventory back into free stock.
· Current Transaction…Open Transaction – For Locked Inventory items, this option opens the Inventory Transaction document relating to the selected line.
UpdatePricing
You can increase or decrease the prices of a batch of inventory items by an amount or by a percentage. You can also set the price of each item in the batch to a specified amount.
1. Search the inventory for the items to be updated..
See Search the inventory for more information.
2. Select one or more items and click the Actions button.
3. Choose Update Pricing.
The Inventory Pricing Batch Update screen is displayed.

4. Fill in the required information:
Type text into the Description field to identify this pricing update. The description that you type here is displayed when you carry out an Inventory Transactions Search.
In the Apply By field, specify whether to set the price for each selected item to a specified amount (Value), or whether to update the prices by an amount or a percentage (Value Increase/Decrease or Percentage Increase/Decrease).
Specify the new price/amount by which to increase or decrease/percentage by which to increase or decrease.
5. Click Batch Update.
The prices of the selected items are updated.
Inventory reports
You can access reports from the sidebar menu. Go to Items & Inventory > Items & Inventory Reports.
See also:
Work with reports
List of reports
Chapter 13
What's in this chapter?
About production
Production control
Production console
Receive from work order
Employee timesheets
Production delivery notes
About production
When you create a work order for a nested mark item, it is automatically issued to production. This means that you can view it on the Production Control form. If the mark item has also been nested, you can begin to progress it through the fabrication process to completion and delivery. The Production Control form allows you to keep track of all of the mark items that are currently under fabrication.
Workstation operators have access to the production console facility. This allows them to see the mark items that are to be processed at their workstation and to move mark items on to the next process. You can record the length of time taken to process mark items on an employee timesheet.
If some of the items that you make are not for a specific contract and are to stored for future use, you can receive them into the inventory at the end of the production process.
You can produce delivery notes to accompany mark items at any stage in the fabrication process.
This chapter describes the various aspects of the production process in more detail.
Production control
About production control
The Production Control form gives an overview of all work that is currently in progress in your company. It enables you to progress and keep track of work orders through production.
When you issue a work order to production, it is displayed on the Production Control form. The form is broken down by production stages, processes and workstations; you can click any of these to view the work orders that are currently at a particular stage, undergoing a process, or being cut or drilled at a workstation.
You can progress work orders from one process to another and add, update and remove work order processes on an ad hoc basis. When all of the processes are complete, you can print a delivery note if required.
Access
To access production control, click the Production Control button on the Contract Ribbon. Alternatively, from the sidebar menu, go to Production > Production Control.
Progress work orders through the system
Use the following instructions to move items forward through the required production processes.
1. Go to Production > Production Control.
The Production Control form is displayed.
2. In the explorer, on the left side of the form, select a process or workstation.
The work orders that are undergoing the process or being fabricated at the workstation are displayed in the grid on the right side of the form.
3. In the grid, select the work orders that you want to move to the next process and click Actions (button) > Move Quantities Forward.
The Production Control - Move form is displayed.

For full information about this form, please see Production Control - Move.
4. Click the Move button.
The items in the list are moved to the next process and the Production Control form is updated.
When a mark item is moved from the first process in production control, the inventory is updated and a production cutting document is produced. The document notes the removal of the parent bar from inventory and delivery to the workshop for cutting. The inventory is also later updated with the mark item and any offcuts that result from the process. You can see these changes on the inventory search form.
|

|
§ You may have a work order with a quantity of more than one. In this case, you can move some of the quantity to the next process. To do this, edit value in the Quantity to Move column.
§ If you want to skip one or more processes, you can edit the Move to Process column. To do this, either select a process from the drop-down list in the Move to Process column, or click the Next Process button below the grid.
§ f you want to move an item to an earlier process, you can edit the Move to Process column. To do this, either select a process from the drop-down list in the Move to Process column, or click the Previous Process button below the grid.
§ When you have selected the next process for the work order, you can also select an alternative location (in the Location column) and workstation (in the Workstation column) if necessary.
|
Find a work order in production control
If you run a busy workshop with many items in production at the same time, you may want to filter the information on the Production Control form to show, for example, only mark items, or work orders for one specific contract, or work orders for a particular location.
Use the following instructions to filter information on the Production Control form.
1. Go to Production > Production Control.
The Production Control form is displayed.
2. Click the Filter button at the top right of the form.
The Production Control - Work Order Filter form is displayed.
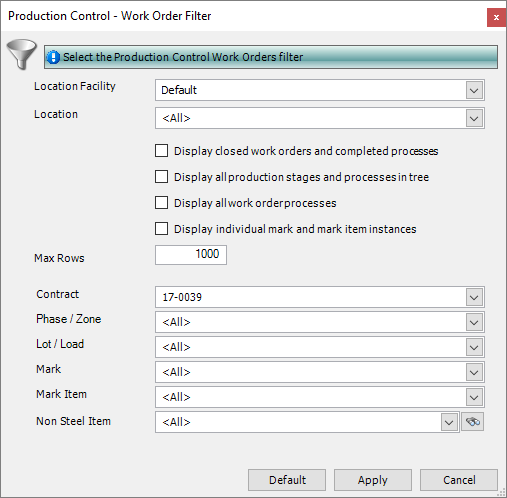
3. Specify the criteria that you want to use to filter the information on the Production Control form. For example, in the illustration above, only work orders for contract 17-0039 will be displayed in the Production Control grid when these criteria are applied.
4. Click the Apply button.
The information on the Production Control form is filtered according to your criteria.
|

|
To remove a filter and have the Production Control form show information about all of the current work orders in production:
1. Click the Default button to restore the default settings, meaning that no filters are used.
2. Click the Apply button to apply the default settings to the Production Control form.
|
Add, update or remove work order processes
You can amend the processes that are defined for work orders in production. The batch update facility on the Production Control form allows you to add, update and remove processes from one or more work orders on an ad hoc basis. Use the following instructions to add a process:
1. Go to Production > Production Control.
The Production Control form is displayed.
2. In the explorer on the left side of the form, select a process or workstation.
The work orders that are currently undergoing the process are displayed in the grid.
3. In the grid on the right side of the form, select one or more work orders for which you want to add a process.
4. Click Batch Update > Add Work Order Processes.
The Add Processes form is displayed.

5. Complete the fields on this form using the following information:
|
Field
|
Description
|
|
Select the process to update/remove
|
|
For all Production Process
|
When you add a process, this field is not available.
When you update a process, select the process that you want to update from the drop-down list.
When you remove a process, select the process that you want to delete from the drop-down list.
|
|
Create new process as/Update selected process to
|
|
Production Process
|
Select the process that you want to add from the drop-down list.
When you remove a process, this field is not available.
|
|
Workstation
|
If the process requires a workstation, select one from the drop-down list.
When you remove a process, this field is not available.
|
|
Item Location
|
If the process does not require a workstation, select a location from the drop-down list.
When you remove a process, this field is not available.
|
|
Time Unit
|
Select minutes, hours or days as the time unit for the timings specified below.
When you remove a process, this field is not available.
|
|
Unit Time
|
Specify how long the process takes.
When you remove a process, this field is not available.
|
|
Setup Time
|
Specify any preparation time that is required for the process.
When you remove a process, this field is not available.
|
|
Add Process After
|
Select a process from the drop-down list. The new process is added after the one that you select here. If the process that you select here does not exist in the work order, the new process is added to the bottom of the work order's process list.
When you update a process, this field is not available.
When you remove a process, this field is not available.
|
|
Only Selected Rows
|
The Only Selected Rows check box is selected by default. Clear the check box if you want to update all of the work orders in the Production Control grid.
|
6. Click OK.
The processes are updated for the selected work orders.
|

|
The instructions to update or remove a process from one or more work orders on the Production Control form are similar to those listed above. Use the following commands:
Batch Update > Update Work Order Processes
Batch Update > Remove Work Order Processes
When you update a process, it is equivalent to removing a process and adding a new one. You cannot update the details of a process that is already on the work order.
|
Hold a mark or mark item
Use the following instructions to put a mark on hold. This means that it cannot be progressed to the next process.
1. Go to Production > Production Control.
The Production Control form is displayed.
2. In the explorer on the left side of the form, select a process or workstation.
The work orders that are currently undergoing the process are displayed in the grid.
3. In the grid on the right side of the form, select the work order for the mark or mark item that you want to put on hold.
4. Click Actions (button) > Hold Mark or Hold Mark Item.
The On Hold Notes form is displayed.
5. Type in the reason for which you want to hold the mark or mark item and click OK.
The mark or mark item is put on hold. This is indicated by a red flag icon next to the work order. The work order cannot be progressed through production until it is no longer on hold.
|
|
To release a mark or mark item from the holding status, use the option:
Actions (button) > Unhold Mark or Unhold Mark Item
|
Batch update marks
Use these instructions to batch update multiple mark items on a detailed listing, when generating work orders, or from production control.
§ On the Contract Detailed Listing - Details form:
Select a drawing.
Select the marks that you want to update.
§ On the Generate Contract Work Orders - Details form:
Select the marks that you want to update.
§ On the Production Control form:
Select the marks that you want to update.
In all cases, use the following instructions:
1. Click Actions (button) > Batch Update Contract Marks.
The Contract Mark Batch Update form is displayed.
2. Complete the fields on this form using the following information:
|
Field
|
Description
|
|
Create Production Work Order
|
Select this check box to automatically create a work order in the Generate Contract Work Orders Wizard.
|
|
Apply to child mark(s)/mark item(s)
|
Select this check box to apply the setting for Create Production Work Order to any child marks or mark items associated with the mark.
|
|
Paint Finish
|
Select a paint finish from the drop-down list.
|
|
Execution Class
|
Select an execution class from the drop-down list.
|
|
Production Bundle
|
This field is available only when you access this form from production. It is used to group marks that are going through the production process together. A production bundle (unlike a batch) can be used to group items across different contracts.
|
|
Mark Notes
|
Type in a note. This is included on the Detailed Listing Mark - Notes form.
|
|
Append Notes
|
Select this check box to append the note to any others on the Detailed Listing Mark - Notes form. If the check box is cleared, the note is used to replace any that are present on the Detailed Listing Mark - Notes form.
|
|
Only Selected Rows
|
Select this check box to update only the selected marks. If the check box is cleared, all of the marks for the selected drawing are updated.
|
3. Click Batch Update.
Information is updated for the selected marks.
Batch update mark items
Use these instructions to batch update multiple mark items on a detailed listing, from production nesting and ordering, when generating work orders, or from production control.
§ On the Contract Detailed Listing - Details form:
Select a drawing.
Select a mark.
Select the mark items that you want to update.
§ On the Production Nesting and Ordering - Items to Nest form:
Select the mark items that you want to update.
§ On the Generate Contract Work Orders - Details form:
Select the mark items that you want to update.
§ On the Production Control form:
Select the mark items that you want to update.
In all cases, use the following instructions:
1. Click Actions (button) > Batch Update Contract Mark Items.
The Mark Item - Batch Update form is displayed.
2. Complete the fields on this form using the following information:
|
Field
|
Description
|
|
Ignore For Procurement
|
If you have a mechanism outside of STRUMIS for purchasing the material needed for this mark item, select this check box. During the nesting and ordering process, the mark item will have a status of Covered, meaning that no materials need to be purchased for its fabrication.
|
|
Create Production Work Order
|
Select this check box to allow the Generate Contract Work Orders Wizard to create a work order for the mark item when it is run.
|
|
Automatically Issue Inventory To Production (Backflush)
|
Select this check box to specify that the mark item's parent bar will be removed from the inventory when the mark item is cut in Production Control.
|
|
Apply changes to all Mark Items with the same name across the Contract
|
This batch update procedure updates multiple mark items that are associated with the selected mark. Select this check box if you want to expand the update to include mark items of the same name throughout the contract.
|
|
Paint Finish
|
Select a paint finish from the drop-down list.
|
|
Production Bundle
|
This field is available only when you access this form from production. It is used to group mark items that are going through the production process together. A production bundle (unlike a batch) can be used to group items across different contracts.
|
|
Mark Item Notes
|
Type in a note. This is included on the Component Mark Steel Item - Notes form.
|
|
Append Notes
|
Select this check box to append the note to any others on the Component Mark Steel Item - Notes form. If the check box is cleared, the note is used to replace any that are present on the Component Mark Steel Item - Notes form.
|
|
Only Selected Rows
|
Select this check box to update only the selected mark items. If the check box is cleared, all of the mark items for the selected mark are updated.
|
3. Click Batch Update.
Information is updated for the selected mark items.
Send CAM or DXF data to a workstation
If you have imported a CAM or DXF file for a mark item, you can issue the file to the CNC machine that resides at a the workstation. You can send CAM or DXF files to a workstation before the mark item arrives there.
Use the following instructions:
1. Go to Production > Production Control.
The Production Control form is displayed.
2. In the explorer on the left side of the form, select a process or workstation.
The work orders that are currently undergoing the process are displayed in the grid.
3. In the grid on the right side of the form, select the work order that is associated with the mark item for which you want to send CAM data.
4. Click Actions > Send CAM Data to Workstation.
The Send CAM to Workstation form is displayed.
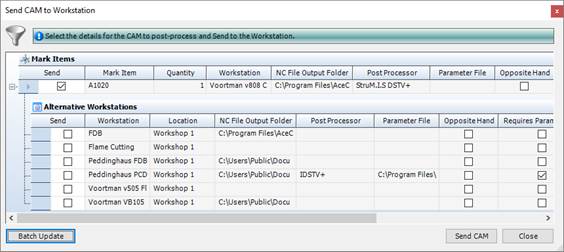
5. Ensure that the workstation details are correct.
The first line shows the workstation from the work order, but you can select other suitable workstations from the Alternative Workstations area of the grid. This enables you to send CAM to an alternative workstation or to multiple workstations.
The workstation in the grid gives details of the parameter file to be used, the CAM file output location and other CAM related information. This information comes from the workstation definition. If the parameter file, target folder or postprocessor are incorrect, errors are generated and you must update the workstation definition (see About workstations).
6. Click Send CAM.
The CAM file is generated in the specified output folder.
Production control reports
You can access reports from the sidebar menu. Go to Production > Production Reports.
See also:
Work with reports
List of reports
What's next?
Fields and buttons
Production Control
You can create a work order for a contract, a mark, a mark item, a non-steel item, and for service-type activities where no fabrication is required (see About work orders). Work orders of all types are shown on the Production Control form. From here, you can progress work orders through a list of processes, add and remove processes on an ad hoc basis, and put a mark or mark item on hold to prevent its progress through production. If a workstation is required for the fabrication of a mark or mark item, you can also send CAM or DXF data to the workstation. You can view a variety of information about the work order, add notes to a process, and manage delivery notes from the Production Control form.
The form is divided into two sections; on the left, an explorer, and on the right, a grid. These areas are indicated in the illustration below:
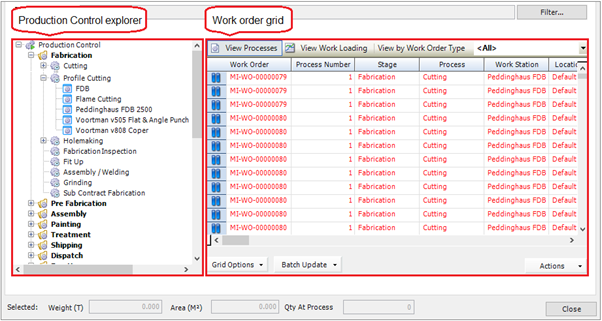
Explorer
All of the work orders that are open in STRUMIS are displayed in the Production Control Explorer. The work orders are broken down by production stages, processes and workstations. You can click a production process, for example, to display the work orders that are currently undergoing that process. The work orders are listed in the grid.
Use the Filter button at the top of the form to reduce the number of work orders that are displayed. See Find a work order in production control.
Grid
The grid has the following tabs:
§ View Processes
The grid shows work orders for the production stage, process or workstation that you selected in the explorer. The work orders may be currently in progress, waiting to be started or completed. The icon on each row of the grid indicates the state of the work order. Hover over the icon to display a description of the work order's current state. Double-click a row in the grid to view details of the associated work order.
To view only work orders of a certain type, select the type from the Use the View by Work Order Type drop-down list.
§ View Work Loading
You can view a process workload on a chart. Select the type of chart (column, 3D column, pie or 3D pie) from the Chart Type drop-down list and the type of data that you want to see (weight, hours or quantity) from the Display drop-down list. If you select a 3D chart, you can press the Alt key on your keyboard and use your mouse to rotate the chart.
You can view the workload for one particular process or for all processes:
To view the workload for one particular process, select the process in the explorer and select the Display planned production workloading check box.
To view the workload for all processes, clear the Display planned production workloading check box.
To view only work orders of a certain type, select the type from the Use the View by Work Order Type drop-down list.
Buttons
The following buttons are available on the Production Control form.
Filter
Use the Filter button to reduce the number of work orders displayed on the Production Control form. See Find a work order in production control.
Batch Update
Actions
|
Option
|
Description
|
|
Move Quantities Forward
|
See Progress work orders through production.
|
|
Move Quantities Backward
|
|
Delivery Notes
|
See also:
About delivery notes
Create a delivery note
Add a work order to a delivery note
|
|
Reports
|
Allows you to generate a Weekly Production Report or a Contract Overview Report.
|
|
Generate Work Order
Bar Code Report
|
Produces a report that can be used to move work orders using barcoding.
|
|
View Mark Status
|
Select this option to view the Mark Status form.
|
|
View Cutting Plan
|
If the selected process is a cutting process, use this option to display the cutting plan associated with the work order.
See Cutting Plan Viewer.
|
|
View Work Order
|
Opens the Production Work Order form for the selected work order.
|
|
View Timesheets
|
Displays employee timesheets filtered by the current contract, work order, process or workstation.
|
|
View Inventory Transactions
|
Opens the Inventory Transactions Search form for the selected work order.
|
|
View Work Order Movement History
|
Opens the Production Control Movement History search form, which tells you when the work order moved between different processes and gives a full history of the work order over a specified time period.
|
|
Add Note
|
Displays the Add Production Work Order Process Note form:

The notes that you add are visible in the Production Control grid and you can run a Production Work Order Process Notes report to view all notes for a contract or work order.
|
|
Hold Mark
|
See Hold a mark or mark item.
|
|
Unhold Mark
|
|
Hold Mark Item
|
|
Unhold Mark Item
|
|
View Drawing
|
Allows you to view the related CAD drawing in the following formats *.spf, *.dwg, *.dwf and *.dxf.
|
|
View CAM with StruCNC
|
Allows you to view the related CAM drawing.
|
|
Edit CAM
|
Allows you to edit the related CAM drawing in StruCNC.
|
|
BIMReview
|
You can highlight selected marks or use one of the pre-defined views using the BIMReview viewer.
|
|
Send CAM Data to Workstation
|
See Send CAM or DXF data to a workstation.
|
|
Send DXF Data to Workstation
|
See Send CAM or DXF data to a workstation.
|
|
Refresh Grid
|
Refreshes the grid to display the latest position of all work orders.
|
Production Control - Move
Use this form to move items forward through the required production processes. You can also move items to earlier processes.
Fields
|
Field
|
Description
|
|
Moved By Employee
|
This is an optional field.
Specify the employee who moved the work order on to the next process. Select an employee from the drop-down list. Selecting an employee here does not create an employee timesheet.
|
|
Moved On
|
Specify the date when the work order was moved.
|
Grid
The grid lists the work orders that you selected on the Production Control form. It is split into two parts:
§ Move From Process
This part of the grid shows information about the process that is currently being carried out for the work order.
You can remove a work order from the grid to prevent it being moved to the next process. To do this, select the work order and press the Delete key on your keyboard.
§ Move To Process
This part of the grid shows information about the next process that will be carried out when you move the work order on. You can edit the Quantity to Move, Move to Process, Location, and Workstation columns as follows:
You may have a work order with a quantity of more than one. In this case, you can move some of the quantity to the next process. To do this, edit value in the Quantity to Move column.
If you want to skip one or more processes, you can edit the Move to Process column. To do this, either select a process from the drop-down list in the Move to Process column, or click the Next Process button below the grid.
When you have selected the next process for the work order, you can also select an alternative location (in the Location column) and workstation (in the Workstation column) if necessary.
Receive from Work Order Options
Production Cutting Movement Options
These options allow you to print or preview the report specified in the Default Cutting Report.
Inventory is only moved when you cut mark items.
Production Delivery Note Options
These options allow you to print or preview delivery notes.
Buttons
|
Button
|
Description
|
|
Next Process
Previous Process
|
Use these buttons to scroll through the processes that are available for the work order. The processes are shown in the Move to Process part of the grid.
You can skip one or more processes or you can move an item to an earlier process. You may want to skip processes in the following situation:
For simplicity, you set up a production template that contains all of the processes that you carry out in your workshop. These processes are carried through to the work order for a particular mark item. The mark item, however, needs to undergo a small subset of the possible processes. Even though all of the processes are available in the work order, you can skip them, allowing the mark item to undergo only the processes necessary for its fabrication.
|
|
Move
|
When you are ready to move the items, click the Move button.
All of the items in the list are moved to the next process, and the Production Control form is updated.
If you choose to move only part of the work order quantity, the work order is displayed under both the current process and the new process.
Mark items cannot be moved though a cutting process unless there is sufficient inventory; this is indicated on the Production Control grid in the Can Move Quantity field.
|
Production console
About production console
Production console is an easy to use interface for workstation operators. It shows the work that needs to be done at a particular workstation as well as work in progress. It is typically used on computers that are situated close to a workstation so that operators can log the time it takes to process a mark or mark item (or other type of work order).
Initially, the production console shows the work that is to be done on all workstations, but you can carry out a simple, one-time-only setup to show work that is to be done on one particular workstation.
After the setup, for any mark or mark item, you can:
§ Move material to the next process
§ Use Start and Stop buttons to have the production console record the time that you spent on processing marks and mark items. The information is used to produce a timesheet for each machine operator and times and costs are fed into the contract budget.
Access
You can access the production console through the menu system (from the sidebar menu, go to Production > Production Console) or by logging into STRUMIS with a Production Console Edition licence.
Customise your view
When you first open the production console, it shows the items to be processed on all workstations. The following instructions tell you how to reduce the items in the list so that it shows only the work that is relevant to a particular employee. This is typically the work that is to be done on a particular workstation, but you can filter on various criteria.
Filter and employee information is saved so that the setup does not have to be done every time the console is used. It can only be changed by admin users of the production console.
1. If you use a full version of STRUMIS, go to Production > Production Console.
The Production Console form is displayed.
If you log into STRUMIS with a Production Console Edition licence, the Production Console form is displayed when you log in.

2. Select an employee from the drop-down list.
This is the employee for whom you are setting up the production console.
3. Click the Filter button in the top right-hand corner of the form.
The Production Console - Work Order Filter form is displayed.
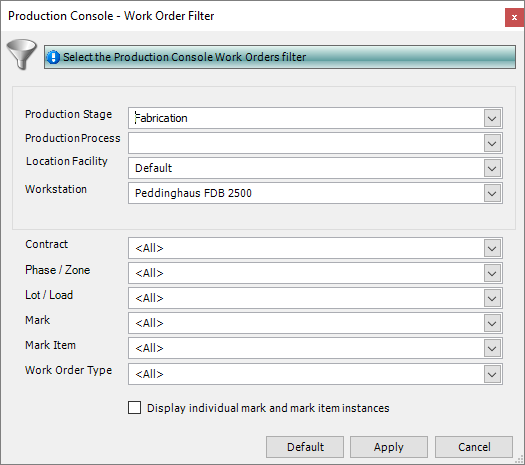
You can filter work using the following criteria: production stage, production process, facility, workstation, contract, phase/zone, lot/load, mark, mark item, and work order type.
4. Select the necessary filter criteria for the employee and click Apply.
The Production Console - Work Order Filter form closes and the items in the list on the production console are reduced according to the filter criteria that you selected.
Process material
Use the following instructions to move items through production.
1. If you use a full version of STRUMIS, go to Production > Production Console.
The Production Console form is displayed.
If you log into STRUMIS with a Production Console Edition licence, the Production Console form is displayed when you log in.
2. In the Not Started smart filter, select a row in the grid and click the Start button.
This indicates that you are starting to process the item. The item is displayed in the Current Activity smart filter to show that you are busy with it.
3. When you finish processing the item, go to the Current Activity smart filter, select the item, and click the Stop button.
The Quantity to Move form is displayed.
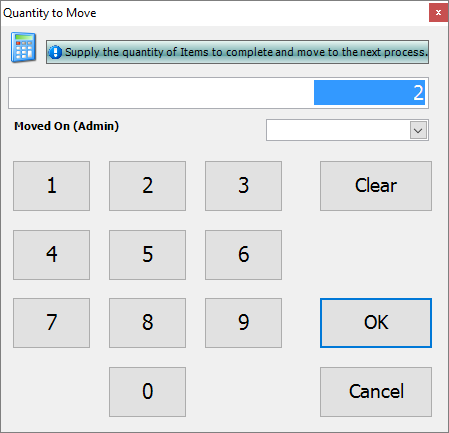
4. Specify the quantity to stop and click OK.
The finished items are moved to the next process and a timesheet entry is created to show the time that it has taken to process the item.
|

|
§ Instead of using the Start and Stop buttons, you can click the Move button to move the item to the next process. No employee timesheet entry is created.
§ If you select multiple lines on which to work, and then click Start, the items that you selected are considered to be in a batch for the purposes of the production console. You must process the items in a batch together. The rules are:
§ The items in a batch are stopped together.
On the Quantity to Move form, you must enter the total quantity to move all of the items in the batch to the next process. You can also enter a quantity of 0; if you do this, the items remain at the current process and a timesheet entry is created to show that you have worked on them.
§ The items in a batch are cancelled together.
When the batch moves to the next process, the next operator can work on the items individually.
§ If you start a work order by accident, you can cancel it. On the Production Console form, in the Current Activity smart filter, select the work order and click the Cancel button. This returns the work order to the Not Started smart filter and does not create a timesheet entry. You can then start the work order at a later time.
§ If you start a work order and then need to take a break, you can log the amount of time that you have spent on the work order so far, return the work order to the Not Started smart filter, and re-start it when you get back from your break. To do this, stop the work order in the Current Activity smart filter, and on the Quantity to Move form, click Clear, then OK.
A timesheet entry is created for the time that you spent on the work order but not for the break time.
§ If you select the Specify Returned Offcuts check box, when you click the Stop button, the Quantity to Move form looks like this:
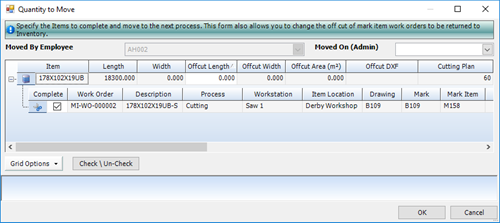
You can specify an offcut length and width to return to the inventory.
This is only available for mark item type work orders.
The offcut is only returned to the inventory when the cutting plan is complete.
§ If you select the Enter Cutting Info check box, when you click the Stop button, the Quantity to Move form is replaced by the Production Console - Simple Cutting form, where you can enter offcut and traceability information.

|
Fields and buttons
Production console
The production console is an easy-to-use interface for machine operators. On this form, an administrator can set up a view for each employee, and the employee can progress items through production. Timesheet entries are created when you process items from this form.
Fields
|
Field
|
Description
|
|
Filter Options
|
See Customise your view.
|
|
Facility
|
Select a facility.
|
|
Employee
|
Select an employee.
See Customise your view.
|
|
Auto Refresh (mins)
|
Sets the frequency at which the production console grid is regenerated.
|
|
Specify returned offcuts
|
If you select this check box, when you stop a cutting process, you can enter information about the offcuts that you want to return to the inventory. See Process material.
|
|
Enter cutting info
|
If you select this check box, when you stop a cutting process, you can enter information about offcuts and material traceability. See Process material.
|
Grid
The grid is divided into the following smart filters:
§ Not Started
This is the default view and shows the marks and mark items that are ready to be moved through production.
§ Current Activity
This shows the marks and mark items on which you are currently working.
The grids use icons to identify the material status of items. These are listed in the table below:
|
Icon
|
Description
|
|

|
Uncut mark item
The mark item that has yet to be cut out of the parent bar.
This status allows the mark item to be moved forward in the production cycle only if the necessary material is available in the inventory.
|
|

|
Mark item awaiting material allocation
The mark item does not have material allocated via production nesting and ordering.
This status does not allow the mark item to be progressed through the production cycle. You must allocate the required material.
|
|
|
Cut Mark Item
The mark item has been cut out of the parent bar, or the mark item is set to Ignore for Procurement.
This status allows the mark item to be progressed through the production cycle.
|
|

|
Process already started
The item has already been started by another employee. The employee's name is shown when you hover the mouse over the icon.
This status allows the item to be started by another employee to assist with progressing it through the production cycle.
|
|

|
Assembled mark
|
|

|
Non-steel item work order
|
|

|
Service/Non-productive work order
|
Buttons
The following buttons are available on the Production Console form.
Filter
See Customise your view.
Move, Start, Stop, Cancel
See Process material.
Actions
|
Option
|
Description
|
|
View Mark Status
|
Select this option to view the Mark Status form.
|
|
View Cutting Plan
|
Available only for nested items.
Opens the Cutting Plan Viewer form, where you can view the selected mark item's nested cutting plan along with the supplier details and purchase order number.
See Cutting Plan Viewer.
|
|
On Screen Keyboard
|
|
|
Move
|
See Process material.
|
|
Start
|
|
Stop
|
|
Cancel
|
|
View Drawing
|
Allows you to view the related CAD drawing in the following formats *.spf, *.dwg, *.dwf and *.dxf.
|
|
View CAM using StruCNC
|
Allows you to view the related CAM drawing.
|
|
Edit CAM
|
Allows you to edit and then save the CAM file or to batch edit multiple CAM files.
|
|
BIMReview
|
You can highlight selected marks or use one of the pre-defined views using the BIMReview viewer.
|
|
Add Note
|
Displays the Add Production Work Order Process Note form:
You can run a Production Work Order Process Notes report to view all notes for a contract or work order.
|
|
Print Reports
|
|
|
Exchange Bars
|
See Exchange bars.
|
|
Batch Update
|
|
|
Refresh Grid
|
Use this option to refresh the form after you have made updates.
|
Receive from work order
About the Receive From Work Order utility
The Receive From Work Order utility is used to receive steel items (marks) and non-steel items into the inventory from a completed work order. These steel and non-steel items are those that you fabricate for stock.
Access
To access this facility, from the sidebar menu, go to Production > Receive From Work Order.
When you create or edit this type of record, you will use the Receive Inventory From A Work Order form.
Receiving steel items
When you fabricate a mark, you begin by creating a detailed listing. When you add a mark to a detailed listing, you can flag it as being receivable into inventory (see Add a mark). You then generate a work order for the mark and progress it through production. On completion of the fabrication processes, you can create a receive from work order record, add the work order to it, and receive the mark (steel item) into your inventory. You can use this functionality, for example if you fabricate plate girders for stock.
Receiving non-steel items
When you fabricate non-steel items for stock, you create a non-steel item type work order (see Create a work order manually) and progress it through the fabrication processes to completion. You can then create a receive from work order record, add the work order to it, and receive the non-steel items into your inventory.
Find and edit a Receive From Work Order record
Use the following instructions to find and edit a Receive From Work Order record.
1. Go to Production > Receive From Work Order.
A list of open Receive From Work Order records is displayed.
2. Type your search criteria into the fields at the top of the page.
You can search for a record by Name. For example, the following search returns a list of records with a name that begins with RWO-0001.
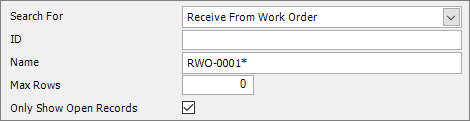
3. Click Search.
Records matching your search criteria are listed.
4. Double-click a record to edit it.
The Receive Inventory From A Work Order - Details form is displayed. It has the following tabs:
§ Details
Specify the facility where the steel and non-steel items are to be received and add the work orders associated with the items.
See Receive Inventory From a Work Order - Details for a full list of the fields and buttons on this tab.
§ Notes
Add notes to the receipt.
See Receive Inventory From a Work Order - Notes for a full list of the fields and buttons on this tab.
§ Custom Fields
See Receive Inventory From a Work Order - Custom Fields for a full list of the fields and buttons on this tab.
§ Information
See Receive Inventory From a Work Order - Information for a full list of the fields and buttons on this tab.
5. Make your changes and click Save.
|
|
§ If you leave the search fields blank, all records for the module are listed.
§ Click Clear to reset the search criteria.
§ Search criteria are not case sensitive.
§ You can use the following characters in the search fields:
*
Use the asterisk as a wildcard. If, for example, you wanted to show every member with a grade of –S275, type in *-S275. Every record in the module that ends with -S275 is displayed.
_
Use an underscore to represent any character; for example, _275 lists all records in the module with four characters that end with 275.
%
Use a percent sign to match any character that occurs multiple consecutive times. For example, C%per* would find both Cooper Steel Construction and Caper Fabrication Ltd.
[ ]
Use square brackets to denote a character range; for example, *U[B-C]* lists all UB codes and UC codes.
|
Receive steel and non-steel items from a work order
The following instructions tell you how to receive steel and non-steel items from a completed work order into your inventory.
1. Go to Production > Receive From Work Order.
A list of open Receive From Work Order records is displayed.
2. Click New.
The Receive Inventory From a Work Order form is displayed.
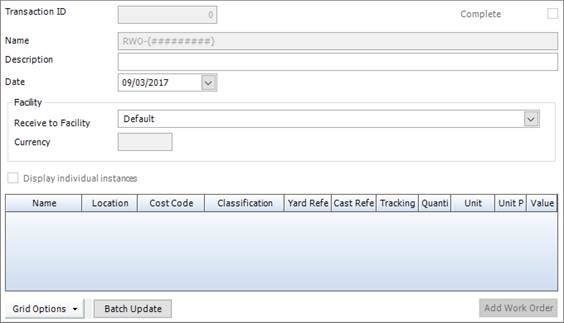
It has the following tabs:
§ Details
Specify the facility where the items are to be received and the add work orders associated with the items.
See Receive Inventory From a Work Order - Details for a full list of the fields and buttons on this tab.
§ Notes
Add notes to the receipt.
See Receive Inventory From a Work Order - Notes for a full list of the fields and buttons on this tab.
§ Custom Fields
See Receive Inventory From a Work Order - Custom Fields for a full list of the fields and buttons on this tab.
§ Information
See Receive Inventory From a Work Order - Information for a full list of the fields and buttons on this tab.
3. Enter a name (if not automatically populated) and description for the record.
Specify the facility where the items are to be received.
Click Save.
4. Add the work orders to be received into inventory. To do this:
a. Click the Add Work Order button.
The Add Work Order form is displayed.
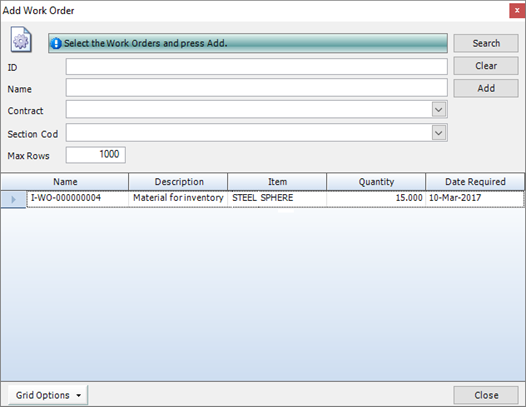
The form lists completed work orders for non-steel items and for marks that you flagged as Receivable into Inventory in the detailed listing. If there are many work orders in the list, you can reduce the number by searching for a particular name, contract (steel items only) or section code (steel items only).
b. Select the work orders that you want to add to the receipt and click Add.
The selected work orders are added to the grid on the Receive Inventory From a Work Order -Details form.
5. Amend the details if necessary.
For each work order, you can change the receiving location, cost code, yard reference, cast reference, quantity, unit, and unit price. If you want to amend the details for multiple lines, use the batch update facility. See Batch update work orders.
6. Click Save.
7. When the steel and non-steel items physically arrive in your inventory, click the Complete button. This closes the Receive From Work Order record and updates the inventory records.
Batch update work orders
Use these instructions to batch update multiple work order lines on the Receive Inventory From a Work Order - Details form.
1. Open a Receive From Work Order record.Select the work orders that you want to update.
2. Click the Batch Update button.
The Receive From Work Order Batch Update form is displayed.
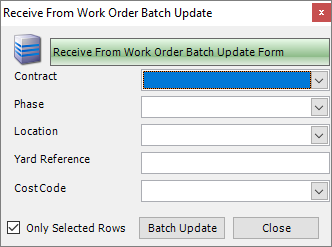
3. Complete the fields on this form using the following information:
|
Field
|
Description
|
|
Contract
|
Steel items only
Use these fields if you want to allocate the steel items to a contract or contract and phase in the inventory. Select a contract or a contract and a phase from the drop-down lists.
|
|
Phase
|
|
Location
|
To batch update the location, yard reference and cost code, select options from the relevant drop-down list.
|
|
Yard Reference
|
|
Cost Code
|
|
Only Selected Rows
|
The Only Selected Rows check box is selected by default. Clear the check box if you want to update all of the work orders on the Receive Inventory From a Work Order - Details form.
|
4. Click Batch Update.
Information is updated for the selected work orders.
Fields and buttons
Receive Inventory From a Work Order - Details
Use this form to receive non-steel items from a completed work order into your inventory.
Fields
|
Field
|
Description
|
|
Name
|
This field is automatically populated if the auto-naming/numbering option is turned on in Production Options; otherwise, type in a unique name for the receipt.
|
|
Description
|
This is a free text field where you can type in more information about this receipt.
|
|
Date
|
Select a date from the drop-down list. This is the date on which the inventory is received.
|
|
Facility
|
|
Receive to Facility
|
Select a facility from the drop-down list. This is the facility at which the inventory is received.
|
|
Currency
|
This field is automatically populated from the facility record.
|
|
Display individual instances
|
If a work order has a quantity of more than one, you can display it in the grid as one line or several lines. For example, if a work order has a quantity of 6:
Select the Display individual instances check box to display one line with a quantity of 6
Clear the Display individual instances check box to display six lines, each with a quantity of 1
|
Grid
The grid lists the work orders that you have added to the Receive From Work Order record. These are the work orders that are associated with the non-steel items that are to be received into your inventory. Use the Add Work Order button to add work orders to the list.
For each work order, you can change the receiving location, cost code, yard reference, cast reference, quantity, unit, and unit price. Use the Batch Update button to update multiple lines.
Buttons
|
Button
|
Description
|
|
Batch Update
|
Opens the Receive From Work Order Batch Update form, where you can update multiple work orders in the grid. See Batch update work orders.
|
|
Add Work Order
|
Opens the Add Work Order form, which lists completed work orders and allows you to add them to the receipt. See Receive non-steel items from a work order.
|
|
Complete
|
When the non-steel items physically arrive in your inventory, use this button to complete the receipt. This closes the Receive From Work Order record and updates the inventory records.
|
Employee timesheets
About employee timesheets
Use employee timesheets to record the amount of time that an employee spends working on a production process. You can fill in a timesheet manually or, if the employee uses the production console, timesheet entries are created automatically. When an employee uses the production console, the time period between clicking the Start button and the Stop button is measured and added to the employee timesheet. If you have specified hourly rates for the workstation, the process and the employee, these are included on the timesheet and fed into the contract budget.
You can use a transaction interface to export approved employee timesheets to third party accounting software.
Access
To access employee timesheets, click the Employee Timesheets button on the Contract Ribbon. Alternatively, from the sidebar menu, go to Production > Employee Timesheet.
When you create or edit a timesheet, you will use the Employee Timesheet form.
Find and edit an employee timesheet
The following instructions tell you how to search for an existing employee timesheet.
1. Go to Production > Employee Timesheet.
A list of timesheet entries is displayed. The entries are broken down by employee.
2. Type your search criteria into the fields at the top of the page.
You can search for the timesheet entries associated with an employee, a cost code, contract, work order, pork order process, workstation, or a date range. You can further narrow down the timesheet entries to those that are open and those for active employees. For example, the following search returns a list of the timesheet entries for the work that employee EMP001 did on contract 14-0002.

3. Click Search.
Timesheet entries matching your search criteria are listed.
4. Double-click a timesheet entry in the list to edit it.
The Employee Timesheet form is displayed. It has the following tab:
§ Weekly Timesheet
Add and amend timesheet entries for the employee.
See Employee Timesheet - Weekly Timesheet for a full list of the fields and buttons on this tab.
5. Make your changes and click Save.
|
|
§ If you leave the search fields blank, all records for the module are listed.
§ Click Clear to reset the search criteria.
§ Search criteria are not case sensitive.
§ You can use the following characters in the search fields:
*
Use the asterisk as a wildcard. If, for example, you wanted to show every member with a grade of –S275, type in *-S275. Every record in the module that ends with -S275 is displayed.
_
Use an underscore to represent any character; for example, _275 lists all records in the module with four characters that end with 275.
%
Use a percent sign to match any character that occurs multiple consecutive times. For example, C%per* would find both Cooper Steel Construction and Caper Fabrication Ltd.
[ ]
Use square brackets to denote a character range; for example, *U[B-C]* lists all UB codes and UC codes.
|
Create a timesheet entry
The following instructions tell you how to manually create a timesheet entry for an employee. Timesheet entries are also created automatically if the employee uses the production console to process material (see About production console).
1. Go to Production > Employee Timesheet.
A list of timesheet entries is displayed. The entries are broken down by employee.
2. Click New.
The Employee Timesheet - Weekly Timesheet form is displayed.
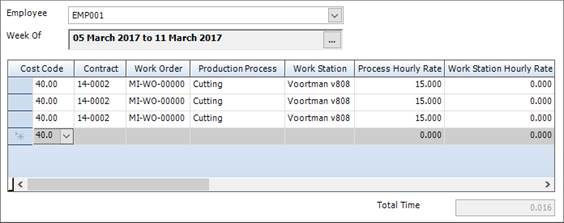
It has the following tab:
§ Weekly Timesheet
Add and amend timesheet entries for the employee.
See Employee Timesheet - Weekly Timesheet for a full list of the fields and buttons on this tab.
3. Select an employee from the drop-down list.
The week is automatically set to the current week, and any existing timesheet entries are listed. You can select a different week if necessary. The cost code is also automatically populated.
4. Specify the contract, work order, process or workstation against which you want to log time. The hourly rates columns are automatically populated depending on your choices.
5. Enter a number of hours for at least one of the days of the week.
6. Click Save.
The employee hours are saved and used to populate the contract budget.
|
|
You can export timesheet entries to a third-party accounts software package by using a transaction interface. The timesheet entries must be approved before you can export them. To approve a timesheet entry, select the Approved check box. When a timesheet entry is successfully exported, select the Exported check box.
|
Employee timesheet reports
You can access reports from the sidebar menu. Go to Production > Production Reports.
See also:
Work with reports
List of reports
Fields and buttons
Employee Timesheet - Weekly Timesheet
Use this form to record the time spent by an employee on processing material. The form lists manually created timesheet entries and timesheet entries that were created automatically when the employee used the production console to process material (see About production console).
Fields
|
Field
|
Description
|
|
Employee
|
Select an employee from the drop-down list. This is the employee for whom you want to create or edit timesheet entries.
|
|
Week Of
|
Select a week from the drop-down list.
|
Grid
The grid lists manually created and automatically created timesheet entries for the selected employee during the selected week.
|
Field
|
Description
|
|
Cost Code
|
The cost code is automatically populated when you select an employee. It comes from the employee record.
|
|
Contract
|
When you create a manual timesheet entry, select theses pieces of information from their respective drop-down lists.
If you are reviewing an automatic timesheet entry, several of these fields may have been populated by the production console. You can amend the information.
|
|
Work Order
|
|
Production Process
|
|
Work Station
|
|
Process Hourly Rate
|
This value is automatically populated if you selected a process above. It comes from the production process record. You can change it.
|
|
Workstation Hourly Rate
|
This value is automatically populated if you selected a workstation above. It comes from the production workstation record. You can change it.
|
|
Employee Hourly Rate
|
This value is automatically populated with the hourly rate that you specified for the employee in the employee record. You can change it.
|
|
Sun to Sat
|
Each day of the week is displayed. Enter the number of hours that the employee worked.
|
|
Total
|
Shows the total time spent on this timesheet entry.
|
|
Notes
|
This is a free text field. You can use it to enter more information about the timesheet entry.
|
|
Approved
Approved By
Approved On
|
You can export timesheet entries to a third-party accounts software package by using a transaction interface. The timesheet entries must be approved before you can export them.
To approve a timesheet entry, select the Approved check box. The approver and date of approval is recorded.
|
|
Exported
Exported By
Exported On
|
When a timesheet entry is successfully exported, select the Exported check box. The exporter and the date of export is recorded.
|
Production delivery notes
About delivery notes
When you transport marks and mark items from one site to another, you can send a delivery note with them. You may want to do this when you send mark items to a third-party paint shop, when you deliver finished items to the erection site, or when an item moves from one workstation to another.
You can group the work orders for several marks and mark items that will be transported together from one location (the originating location) to another (the destination location) on the same delivery note. The originating location is a facility. The destination location can be a storage, workshop, or subcontractor type location, or an erection site or contract off-site location that is defined in the contract.
Use the following steps to print delivery notes:
1. Create delivery notes on the Production Delivery note form. See Create a delivery note.
2. Add work orders to a delivery note from the Production Control form. See Add a work order to a delivery note.
3. Print delivery notes on the Production Delivery Note form, the Production Control form, or the Production Control - Move form. See Print a delivery note.
When you add work orders to a delivery note, they can have different routes through production, but they must have the same process location. For example, imagine that you have five marks (M1, M2, M3, M4 and M5). They are going through production and are to be delivered together to a third-party paint shop called JD Paint. Each mark has a work order. Each work order has a list of processes. Each process has a location.
M1 and M2 are to be painted. They each have a process called Painting in their respective work orders, and for both of the Painting processes (the one for M1 and the one for M2), the location is the third-party paint shop, JD Paint.
M3, M4 and M5 are to be galvanised. They each have a process called Galvanising in their respective work orders, and for all three of the Galvanising processes (the one for M3, the one for M4 and the one for M5), the location is the third-party paint shop, JD Paint.
The work orders for all five marks can be added to the same delivery note because, even though they make use of two different processes (Painting and Galvanising), the processes take place at the same location (JD Paint).
Access
To access delivery notes, click the Production Delivery Notes button on the Contract Ribbon. Alternatively, from the sidebar menu, go to Production > Production Delivery Notes.
When you create or edit a delivery note, you will use the Production Delivery Note form.
Create a delivery note
Use the following instructions to create a delivery note:
1. Go to Production > Production Delivery Notes.
A list of delivery notes is displayed.
2. Click New.
The Production Delivery Note - Details form is displayed.
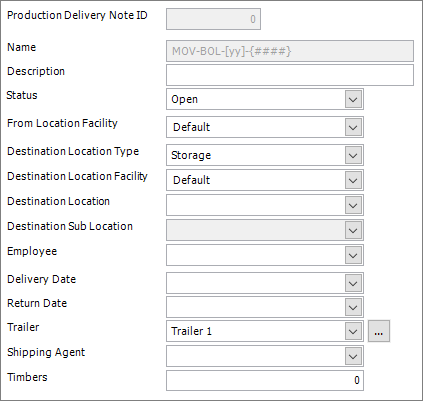
3. Populate the fields.
Details
|
Field
|
Description
|
|
Name
|
This field is automatically populated if the auto-naming/numbering option is turned on in Production Options. The auto-name/number also depends on the destination location type that you select below. If auto-naming/numbering is not turned on, type in a unique name for the delivery note.
|
|
Description
|
This is a free text field where you can optionally enter more details about the delivery note.
|
|
Status
|
The default status for new production delivery notes is open. Set the status to closed when the delivery is complete.
Closed delivery notes are not displayed on the Production Delivery Notes Search form when you select the Only Show Open Notes check box.
|
|
From Location Facility
|
Select a facility from the drop-down list.
|
|
Destination Location Type
|
Select a type of location from the drop-down list.
The destination location type can be a storage, workshop, or subcontractor type location, or an erection site or contract off-site location that is defined in the contract.
If you select an erection site or contract off-site location type, you can also specify the address and contact details for the site. You may have set these details up in the contract. If this is the case, select the relevant contract from the Destination Location drop-down list (below) to automatically populate the address and contact details.
|
|
Destination Location Facility
|
If you selected a storage, workshop, or subcontractor type destination location, select a facility from the drop-down list.
|
|
Destination Location
|
If you selected a storage, workshop, or subcontractor type location, select the destination location from the drop-down list. This is necessary only when you have multiple locations set up for the destination location type.
If you selected an erection site or contract off-site location type, select a contract from the drop-down list. Details from the contract are used to populate the address and contact information.
|
|
Destination Sub Location
|
|
|
Employee
|
An employee timesheet entry is created for the employee that you select from the drop-down list.
|
|
Delivery Date
|
Specify the agreed delivery date for the items on the work order.
|
|
Return Date
|
Use this field to specify when marks and mark items should be returned to your facility. For example if you are delivering material to be galvanised but it needs a final inspection in your workshop.
|
|
Trailer
|
Use this field to record the trailers used to deliver the material.
|
|
Shipping Agent
|
Select a shipping agent from the drop-down list. These are suppliers where the Shipping Agent check box is selected.
|
|
Timbers
|
Use this field to record number of timbers that will be used to protect the material during transport.
|
Work Orders
This form lists the work orders that have been added to the delivery note from the Production Control form. See Add a work order to a delivery note.
4. Click Save.
|

|
§ You can also create a delivery note from the Production Control form. Click Actions (button) > Delivery Notes > New Delivery Note.
§ You can print the delivery note or email it as a PDF. To do this, click Actions (button) > Print or Email as PDF.
|
Add a work order to a delivery note
You must create a delivery note before you can add work orders to it (see Create a delivery note). You can do that from the Production Delivery Notes - Add To form, below.
Use the following instructions to add work orders to a delivery note.
1. Go to Production > Production Control.
The Production Control form is displayed.
2. In the explorer on the left side of the form, select a process or workstation.
The work orders that are currently undergoing the process are displayed in the grid.
3. In the grid on the right side of the form, select one or more work orders that you want to add to a delivery note.
4. Click Actions > Delivery Notes > Add to delivery note.
The Production Delivery Notes - Add To form is displayed.

It lists the selected work orders along with information about the mark or mark item, phase and lot.
5. If necessary, select the process to which you want to delivery the mark or mark item, and adjust the quantity to be delivered.
6. Select the delivery note to which you want to add the work order, or click the ellipsis to create a new one.
The delivery notes that are available in the drop-down list are those that have a destination location that matches the location for the process that is shown in the Deliver to Process column.
7. Click Add To Note.
The work orders are added to the delivery note.
|

|
§ You can batch update the work orders listed on the Production Delivery Notes - Add To form.
To do this:
Select the relevant work orders and click Batch Update.
The Update Delivery Notes form is displayed.

You can batch update the Deliver to Process and Delivery Note columns, and amend the quantity to deliver.
Clear the Only Selected Rows check box to update all of the work orders listed on the Production Delivery Notes - Add To form.
§ You can edit a delivery note from the Production Control form.
To do this:
Select a work order and click Actions (button) > Delivery Notes > Edit Delivery Notes.
The Production Delivery Notes - Edit Items form is displayed.
Select a work order line and click the Edit button.
The Production Delivery Notes form is displayed.
Make the necessary changes and save the form.
§ You can print a delivery note from the Production Control form.
To do this:
Select a work order and click Actions (button) > Delivery Notes > Print Delivery Note.
|
Find and edit a delivery note
1. Open the Search form from the sidebar menu.
To do this, go to Production > Production Delivery Notes.
2. Enter search criteria and click the Search button.
Records that match your search criteria are listed.
3. Double-click a record to edit it.
For complete information, see Find and edit an existing record.
Print a delivery note
There are several ways to print a delivery note. They are listed below:
From the Production Control - Move form:
1. Open the Production Control - Move form.
See Progress work orders through production.
2. Use the Production Delivery Note Options to preview the delivery note, print one or more copies of the delivery note, or open the delivery note for editing. The options are available only when moving items to the process that takes place at the delivery note location.
From the Production Control form:
1. Go to Production > Production Control.
The Production Control form is displayed.
2. Click Actions (button) > Delivery Notes > Print Delivery Note.
Delivery notes are printed.
From the Production Delivery Note form
1. Open a Production Delivery Note form.
See Create a delivery note.
2. Click Actions (button) > Print.
Prints the delivery note. You can also email the delivery note in PDF format.
Delivery note reports
You can access reports from the sidebar menu. Go to Production > Production Reports.
See also:
Work with reports
List of reports
Chapter 14
Sales orders, deliveries and invoices
What's in this chapter?
About sales orders, deliveries and invoices
Process a sales order
Sales orders
Sales order deliveries
Sales invoices
About sales orders, deliveries and invoices
When a customer buys items or services from your company, you can record their requirements on a sales order. You can then manage and record the items that you deliver to the customer on a sales order delivery and invoice them using a sales invoice.
This chapter tells you how to carry out these processes.
Process a sales order
Take a look at the following table. It shows the steps that you need to take to progress a sales order through the system.
|
Action
|
Where?
|
Show me how to...
|
|
1. Create a Sales Order Quote.
Specify a customer and add the products that your customer wants to buy.
The system automatically assigns a status of Preparation.
|
|
Create a sales order quote or sales order
Add steel items
Add non-steel items
Add free line items
Add inventory
|
|
2. Email the quote to your customer for approval.
|
Sales Order/Quote form
Actions (button) > Reports > Email Sales Order/Quotation as PDF
|
Email a quote to a customer
|
|
3. Your customer approves the quote.
|
Outside of the STRUMIS system.
|
|
|
4. Convert the approved quote to a full Sales Order record.
|
Sales Order/Quote form
Sales Order Type field
|
Convert a quote to a sales order
|
|
5. Lock down the sales order.
Change the status of the sales order from Preparation to Released. No more changes can be made to the order.
|
Sales Order form
Status field
|
Change the status of a sales order
|
|
6. Create a Sales Order Delivery record.
This shows you which inventory items are matched to the items ordered by your customer. You can also track the items that have been delivered to your customer.
|
Sales Order form
Actions (button) > Deliver Sales Order
|
Create a sales order delivery record
Assign inventory to sales order items
|
|
7. Complete the Sales Order Delivery.
The items for delivery are removed from the inventory.
|
Sales Order Delivery form
Complete (button)
|
Complete a sales order delivery
|
|
8. Print or email a delivery note and packing slip.
|
Sales Order Delivery form
Actions (button) > Print Delivery Note
Actions (button) > Email Delivery Note
Actions (button) > Print Packing Slip
|
Print a delivery note
|
|
9. Prepare and deliver the order.
|
Outside of the STRUMIS system.
|
|
|
10. Raise an invoice for the delivered goods.
The system assigns an invoice status of Open.
|
Sales Order Delivery form
Actions (button) > Create Invoice
|
Raise an invoice
|
|
11. Have the invoice approved, for example, by your accounts department.
|
Outside of the STRUMIS system.
|
|
|
12. Change the status of the invoice from Open to Approved.
|
Sales Invoice form
Status field
|
Change the status of an invoice
|
|
13. Print or email the invoice.
|
Sales Invoice form
Actions (button) > Reports > Print Invoice
Actions (button) > Reports > Email Invoice
|
Print an invoice
|
|
14. When you receive payment for the delivered goods, note the receipt and change the status of the invoice from Approved to Closed.
|
Sales Invoice form
Information tab > Payment Received field
Details tab > Status field
|
Change the status of an invoice
|
|
15. Close the sales order.
When all of the items in the sales order have been delivered, close the sales order record.
|
Sales Order form
Status field
|
Change the status of a sales order
|
Sales orders
About sales orders
You can raise one of the following types of sales order:
§ Sales order quote
§ Sales order
§ Sales order for a contract
You typically raise a sales order quote or sales order when a customer wants to buy only items that you can supply directly from your inventory without the need for fabrication. A sales order quote is a simple way of providing the customer with a quotation. You can alternatively use the Enquiries & Estimating module if you want to add more detail. You must convert a sales order quote to a full sales order before you can deliver or invoice against it.
If you are fabricating items for the customer and they want to purchase additional items, raise a sales order for a contract. You can then specify the name of the contract and add the additional items to the sales order.
The sales order records the customer's contact details, payment terms, and required products.
Access
To access sales orders, from the sidebar menu, go to Sales & Customers > Sales Order.
When you create or edit a sales order, you will use the Sales Order form.
Create a sales order
1. Go to Sales & Customers > Sales Order.
A list of sales orders is displayed.
2. Click New.
The Sales Order form is displayed.
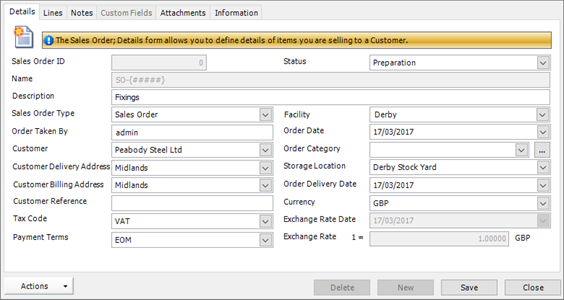
It has the following tabs:
§ Details
Specify basic information for the sales order. This includes the customer's delivery details, payment terms and expected delivery date.
See Sales Order - Details for a full list of the fields and buttons on this tab.
§ Lines
List the products that your customer wants to buy.
See Sales Order - Lines for a full list of the fields and buttons on this tab.
§ Notes
You can add notes to the sales order.
See Add notes to a record for a full list of the fields and buttons on this tab.
§ Custom Fields
If you need to collect data that is relevant to this type of record, but there are no appropriate fields, use this form to define your own custom fields.
See Define custom fields for a record for a full list of the fields and buttons on this tab.
§ Attachments
Use this form to attach external documents to a STRUMIS record.
See Attach external documents to a record for a full list of the fields and buttons on this tab.
§ Information
Use this form to view the creation date of the record, the date when it was last updated, and the users who made the changes.
See View basic information about a record for a full list of the fields and buttons on this tab.
3. Fill in basic information on the Details form and click Save.
4. Add the products that your customer wants to purchase on the Lines form and click Save.
Add inventory
Use the following instructions to add inventory items to a sales order.
1. On the Sales Order - Lines form, click the Add Inventory button.
The Inventory Search form is displayed.
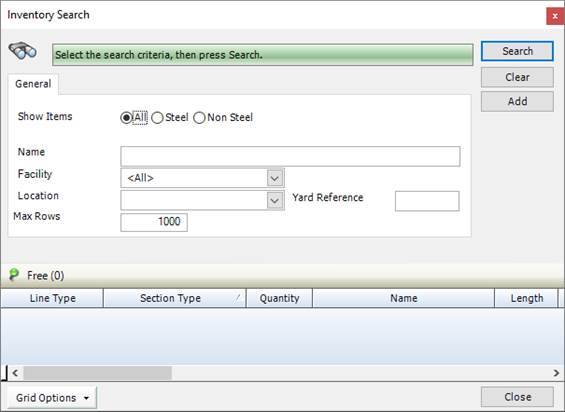
2. Use the options to search the inventory for a steel or non-steel item. Select the item and click Add.
If you selected a steel item, the Sales Order Steel Item form is displayed. See Add steel items for descriptions of the fields on this form.
If you selected a non-steel item, the Sales Order Non Steel Item form is displayed. See Add non-steel items for descriptions of the fields on this form.
3. Complete the fields.
4. Click Save.
The item is added to the sales order.
Add steel items
Use the following instructions to add steel items to a sales order.
1. On the Sales Order - Lines form, click the down-arrow button as shown in the graphic below.

2. Select the Add Steel Item option.
The Sales Order Steel Item form is displayed.
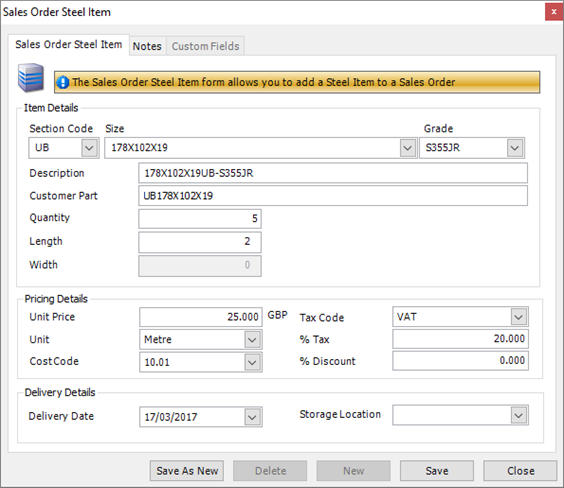
3. Complete the fields.
|
Field
|
Description
|
|
Section Code
Size
Grade
|
Use these fields to specify the item to add to the sales order.
|
|
Description
|
Free text
|
|
Customer Part
|
This is an optional field where you can enter the customer's part number for this item.
|
|
Quantity
|
Enter the number of items that the customer requires.
|
|
Length
Width
|
Specify the steel measurements. Right-click the field to choose between metric or imperial measurements.
|
|
Unit Price
|
The list price of the product in the selected currency.
|
|
Unit
|
For example, tons, millimetres, each.
|
|
Cost Code
|
See About cost codes and cost centres.
|
|
Tax Code
|
See About tax codes.
|
|
% Tax
|
This field is automatically populated depending on the tax code you selected above.
|
|
% Discount
|
The reduction in the list price.
|
|
Delivery Date
|
Defaults to today's date, but you can select an agreed delivery date from the drop-down list.
|
|
Storage Location
|
You can optionally type in a sub-location for storage.
|
4. You can add notes if required.
See Add notes to a record.
5. Click Save.
The item is added to the sales order.
Add non-steel items
Use the following instructions to add non-steel items to a sales order.
1. On the Sales Order - Lines form, click the down-arrow button as shown in the graphic below.
2. Select the Add Non Steel Item option.
The Sales Order Non Steel Item form is displayed.
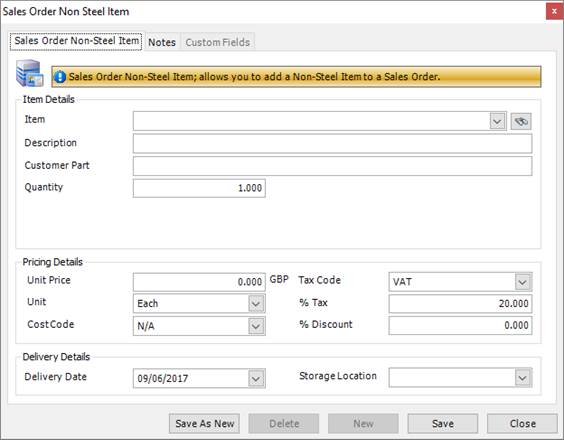
3. Complete the fields.
|
Field
|
Description
|
|
Item
|
Select an item from the drop-down list.
|
|
Description
|
Free text
|
|
Customer Part
|
This is an optional field where you can enter the customer's part number for this item.
|
|
Quantity
|
Enter the number of items that the customer requires.
|
|
Unit Price
|
The list price of the product in the selected currency.
|
|
Unit
|
For example, tons, millimetres, each.
|
|
Cost Code
|
See About cost codes and cost centres.
|
|
Tax Code
|
See About tax codes.
|
|
% Tax
|
This field is automatically populated depending on the tax code you selected above.
|
|
% Discount
|
The reduction in the list price.
|
|
Delivery Date
|
Defaults to today's date, but you can select an agreed delivery date from the drop-down list.
|
|
Storage Location
|
You can optionally type in a sub-location for storage.
|
4. You can add notes if required.
See Add notes to a record.
5. Click Save.
The item is added to the sales order.
Add free line items
Use the following instructions to add free line items to a sales order.
1. On the Sales Order - Lines form, click the down-arrow button as shown in the graphic below.
2. Select the Add Free Line option.
The Sales Order Free Line Item form is displayed.
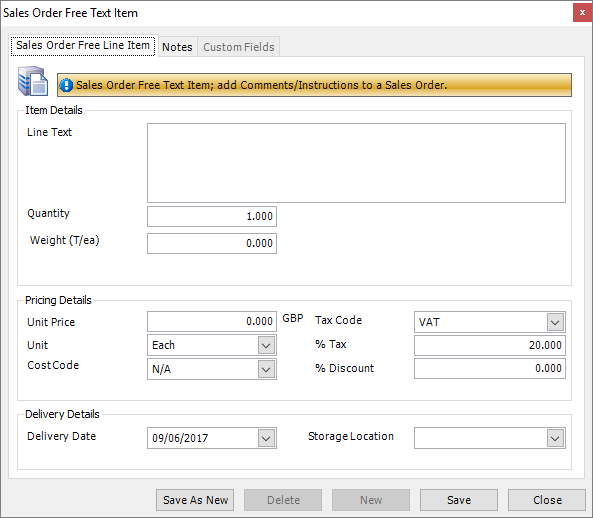
3. Complete the fields.
|
Field
|
Description
|
|
Line Text
|
Type a description for the item. This text appears on the printed order.
|
|
Quantity
|
Enter the number of items that the customer requires.
|
|
Weight
|
Enter the weight of items that the customer requires.
|
|
Unit Price
|
The list price of the product in the selected currency.
|
|
Unit
|
For example, tons, millimetres, each.
|
|
Cost Code
|
See About cost codes and cost centres.
|
|
Tax Code
|
See About tax codes.
|
|
% Tax
|
This field is automatically populated depending on the tax code you selected above.
|
|
% Discount
|
The reduction in the list price.
|
|
Delivery Date
|
Defaults to today's date, but you can select an agreed delivery date from the drop-down list.
|
|
Storage Location
|
You can optionally type in a sub-location for storage.
|
4. You can add notes if required.
See Add notes to a record.
5. Click Save.
The item is added to the sales order.
Update multiple products in the sales order
Use the Sales Order Batch Update form to make changes to multiple Sales Order Items.
1. On the Sales Order - Lines form, select the items that you want to update.
To do this:
§ Press Ctrl A to select all lines, or
§ Press the Ctrl key and click several non-contiguous lines, or
§ Press the Shift key the click the first and last lines in a range.
2. Click Batch Update.
The Sales Order Line Batch Update form is displayed.
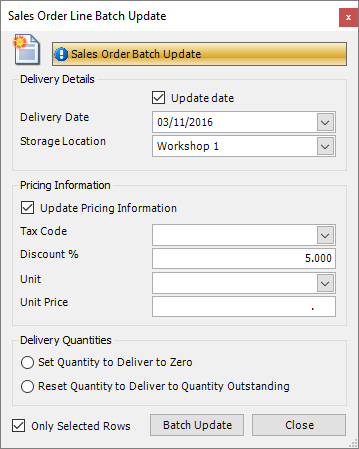
3. Set the properties you want to change.
§ Delivery Date
Storage LocationTax CodeDiscount %UnitUnit PriceYou can also set all the delivery quantities to zero or reset the quantity to deliver to the outstanding quantity.
Select Only Selected Rows to update only the lines that you highlighted. If you do not check this box, all sales order items in the Lines grid will be updated.
4. Click Batch Update to update the selected Sales Order Items.
|

|
If you do not want to update some of the fields, leave them blank.
|
Email a quote to a customer
1. Open a sales order quote.Click Actions (button) > Reports > Email Sales Order As PDF.
A new email opens. The email address of the default contact is pre-populated and a PDF of the quote is attached.
2. Type in a message and send the email.
|

|
Click Actions (button) > Reports > Sales Order/Quotation to review the quote before you send it to your customer.
|
Convert a quote to a sales order
1. Open a sales order quoteIn the Sales Order Type field, select Sales Order.
2. Click Save.
Change the status of a sales order
1. Open a sales order.Select an option in the Status field.
2. Click Save.
|

|
Sales order quotations and sales orders can have the following states:
§ Preparation
This status indicates that you are working on the sales order. For example, it may be that you are waiting for your customer to approve the order and that you anticipate some changes may be needed. When the order is in this state, no actions (using the Actions button) are available.
§ Released
When you change the status of a sales order to Released, this locks down the order, meaning that you can make no further changes to it.
§ Closed
When all of the items on the order have been delivered, set the status to Closed.
|
Find and edit a sales order
1. Open the Search form from the sidebar menu.
To do this, go to Sales & Customers > Sales Order.
2. Enter search criteria and click the Search button.
Records that match your search criteria are listed.
3. Double-click a record to edit it.
For complete information, see Find and edit an existing record.
Sales order reports
You can access reports from the sidebar menu. Go to Sales & Customers > Sales & Customers Reports.
See also:
Work with reports
List of reports
Fields and buttons
Sales Order - Details
Use this form to set up the basic details of a sales order.
Fields
|
Field
|
Description
|
|
Sales Order ID
|
System generated
|
|
Name
|
This field is automatically populated if the auto-naming/numbering option is turned on in Sales & Customers Options; otherwise, type in a unique name for the sales order.
|
|
Description
|
Free text
|
|
Sales Order Type
|
The options are:
§ Sales Order Quote
When a customer asks you to provide a quotation for goods, create a sales order quote. You can convert it to a full sales order later. You can add multiple items to the quote and email it to your customer for approval.
§ Sales Order
You can convert a sales order quote to a full sales order or you can bypass the sales order quote stage and create a sales order from the initial customer enquiry. A sales order contains the customer's details and a list of the goods that they want to buy.
§ Contract
Use this option if you are fabricating items for your customer and they also want to buy additional items. An extra field, Contract, is displayed.
|
|
Order Taken By
|
Auto-populated with the name of the STRUMIS user that created the sales order record. You can edit this field.
|
|
Customer
|
Select a customer from the drop-down list. If there are many customers in the list, type in the first character of the customer's name to find them more quickly.
|
|
Customer Delivery Address
|
Populated from the customer record when you choose a customer above. You can edit this field.
|
|
Customer Billing Address
|
Populated from the customer record when you choose a customer above. You can edit this field.
|
|
Customer Reference
|
Free text. This is a great place to store information such as your customer's purchase order number. In the future, if your customer calls and gives their purchase order number for reference, you can easily find the associated sales order as Customer Reference is one of the available sales order search criteria. See Search for a sales order.
|
|
Tax Code
|
Populated from the customer record when you choose a customer above. You can edit this field.
|
|
Payment Terms
|
Populated from the customer record when you choose a customer above. You can edit this field.
|
|
Status
|
The options are:
§ Preparation
§ Released
§ Closed
|
|
Facility
|
You may have facilities set up in STRUMIS; they are used to store the details of subsidiary companies. If you have a list of facilities, choose one from the drop-down list, otherwise, the field displays default.
|
|
Order Date
|
This field defaults to today's date, but you can edit it.
|
|
Contract
|
This field is available when you select Contract in the Sales Order Type field. Select a contract from the drop-down list.
|
|
Order Category
|
This is a user-defined field where you can store information such as whether the order is for steel or timber. If categories have been defined already, choose one from the drop-down list. You can also define categories by clicking on the elipsis (...) and adding several categories. Mark one of them as the default and click Save. The categories that you define are available to all sales orders.
|
|
Storage Location
|
You may have storage locations set up in STRUMIS; for example, the main yard or warehouse would be typical storage locations. If you have a list of storage locations, choose one from the drop-down list, otherwise, the field displays default.
|
|
Order Delivery Date
|
Select a date when the whole order will have been delivered. When you specify items for the sales order in the Lines tab, you can elect to deliver each item on a different date. The item delivery dates should be prior to the order delivery date that you specify here.
|
|
Currency
Exchange Rate Date
Exchange Rate
|
Choose a currency for the sales order. If the sales order currency matches the customer currency, the exchange rate fields are not available. If the two do not match, specify an exchange rate and the date to which the rate applies.
|
Actions button
|
Option
|
Description
|
|
Deliver Sales Order
|
Creates a sales order delivery record.
|
|
Deliver and Invoice
|
Creates a sales order delivery record, and, subject to available inventory, a sales invoice.
|
|
Reports
|
§ Sales Analysis Report
§ Sales Order/Quotation
Prints the Sales Order or Sales Order Quotation report, depending on the setting in the Sales Order Type field.
§ Picking Slip
Prints the Picking List report, which shows the items you are delivering and can be used by the warehouse to select specific items to deliver.
§ E-Mail Sales Order/Quotation As PDF
Creates an e-mail with the Sales Order or Sales Order Quotation report attached.
|
|
View Deliveries
|
You can view the deliveries made for this sales order.
|
|
View Item Status
|
You can view information about the item’s inventory, production, purchasing and selling.
|
|
Resend EDI Sales Order Quotation
|
Allows you to resend an EDI file to a customer or supplier (this option is only available in supplier mode).
|
Sales Order - Lines
Use this form to check, edit or add items to the sales order.
Grid
The grid lists details of the items that your customer wants to buy. Double-click a line to edit the item. Click a line and press the Delete key to delete it.
Buttons
Sales order deliveries
About sales order deliveries
When you have released a sales order, you can begin to think about supplying the items to your customer. You can record the deliveries that you make in a sales order delivery note. This allows you to match the required items with items from your inventory. As you deliver the items and physically take them from stock, you can complete the sales order delivery note to delete the items from the STRUMIS inventory. You can create several sales order delivery notes for a single sales order. This accommodates situations when you cannot deliver all of the goods to your customer at once.
Access
To access sales order delivery notes, from the sidebar menu, go to Sales & Customers > Sales Order Delivery.
When you create or edit a sales order delivery note, you will use the Sales Order Delivery form.
Create a sales order delivery record
1. Open a sales order.Click Actions (button) > Deliver Sales Order.
A new Sales Order Delivery record is displayed. The following tabs are available:
Sales Order Delivery - Details
Sales Order Delivery - Lines
Sales Order Delivery - Notes
Sales Order Delivery - Information
2. Use the Details tab to view the related sales order and to change the description and delivery date in the Details tab if necessary.

3. Use the Lines tab to assign items that you have in stock to the items that your customer ordered. The page is split into two grids; Sales Order Item at the top and Inventory at the bottom.
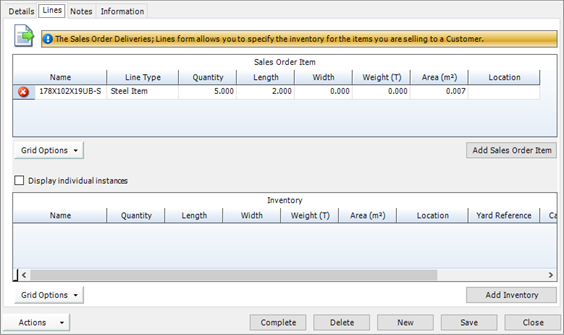
§ The Sales Order Item grid lists the items that your customer wants to buy. These are pre-populated from the sales order.
 indicates that the items have been fully allocated from your inventory.
 indicates that you do not have the required quantity in the inventory; you can manually assign a different inventory item or you can use the purchase order feature in STRUMIS to order the necessary items and assign them later.
§ The Inventory grid shows the inventory items that have been assigned to the a sales order item.
Click a line in the Sales Order Item grid to see the matched inventory item in the Inventory grid.
|

|
§ You can create a sales order delivery record for a sales order but not for a sales order quote.
§ You can create several sales order delivery records for a single sales order. This is because you may want to deliver the items on the sales order at different times.
§ At least one item must be specified in the Lines tab of the Sales Order Delivery record. If this is not the case, the Deliver Sales Order option is not available.
|
Assign inventory to sales order items
When you create a sales order delivery record from a sales order, STRUMIS attempts to automatically assign free inventory to the required items. If this is successful, a icon is displayed next to the item. However, this only works if the Section, Grade and Length match exactly and if you have the item in inventory.
You may choose to manually fill the order using inventory items that are different to those initially specified. An example is if your customer ordered steel items of a particular grade and you do not have that grade in stock; you might decide to fill the order with a different but comparable item. The following instructions tell you how to do this.
1. Open a sales order delivery.On the Sales Order Deliver - Lines form, click a Sales Order Item that has a cross next to it.
2. Click Add Inventory.
The Inventory Search screen is displayed.
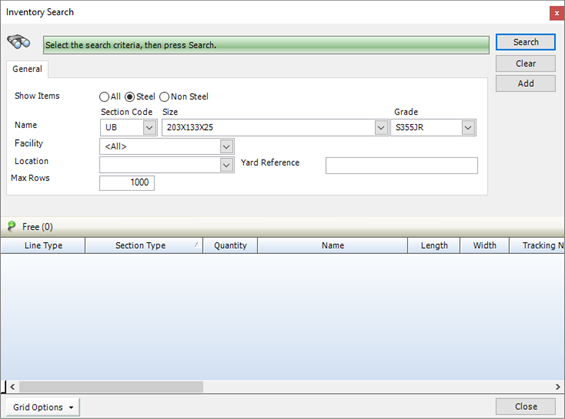
3. Search for the item that you want to deliver.
Items matching your search criteria are listed.
4. Select an item.
If you want to deliver a part quantity, edit the Quantity column.
5. Click Add.
The item is displayed in the Inventory grid.
|

|
§ If you delete an item by mistake or want to deliver more than originally envisaged, click the Add Sales Order Item button. This works in the same way as the Sales Order form, where changing the Quantity to Deliver field, changes the amount you are delivering.
§ You can also automatically assign inventory items to sales order items:
Click Actions (button) > Automatic Inventory Allocation
The system attempts to assign inventory items to all of the sales order items.
Items that can be assigned are indicated by the green tick icon.
|
Complete a sales order delivery
When you have specified the items to take out of the inventory to send to your customer, use the following instructions to complete the sales order delivery record.
1. Open a sales order delivery record.Click the Complete button.
The system issues the following warning if you have items that cannot be allocated from the inventory:
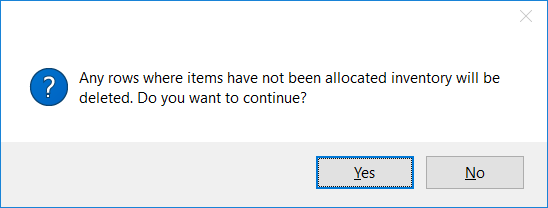
This message is issued when you have items in the sales order delivery record that your customer wants to buy but that you do not have in stock. If you click Yes and continue, these items are deleted from the sales order delivery record and do not appear on delivery notes and packing slips. However, the items remain in the Lines tab of the sales order, which means that in the future, when you have the items in stock again, you can return to the sales order and create another sales order delivery record for later delivery.
|

|
§ You cannot edit the fields in a completed sales order delivery record.
§ When you complete a sales order delivery record, the goods that you are sending to your customer are removed from the inventory.
§ Once you have completed a sales order delivery record, you can raise an invoice against the delivered items.
|
Print a delivery note
1. Open a sales order delivery.Click Actions (button) > Print Delivery Note.
The delivery note is displayed.
2. Use the buttons at the top of the page to modify the view (for example, you can increase the zoom level or view multiple pages), and to print or email the delivery note.
|
|
§ Click the Export button at the bottom of the page to export the delivery note to one of the following file formats:
Excel, PDF, HTML, RTF, TIFF, Text (CSV), Text (tab).
§ You can print a packing slip in a similar way, using the Actions (button) > Print Packing Slip option. A packing slip has no costs or monetary details.
|
Find and edit a sales order delivery
1. Open the Search form from the sidebar menu.
To do this, go to Sales & Customers > Sales Order Delivery.
2. Enter search criteria and click the Search button.
Records that match your search criteria are listed.
3. Double-click a record to edit it.
For complete information, see Find and edit an existing record.
Sales order delivery reports
You can access reports from the sidebar menu. Go to Sales & Customers > Sales & Customers Reports.
See also:
Work with reports
List of reports
Fields and buttons
Sales Order Delivery - Details
Use this form to specify details for a delivery to your customer.
Fields
|
Field
|
Description
|
|
Sales Order Delivery ID
|
System generated
|
|
Name
|
This field is automatically populated if the auto-naming/numbering option is turned on in Sales & Customers Options; otherwise, type in a unique name for the sales order delivery.
|
|
Description
|
Free text
|
|
Sales Order
|
The value from the Name field of the Sales Order with which this record is associated. If you created this sales order delivery record from a sales order, this field is pre-populated; otherwise, select the associated sales order from the drop-down list.
|
|
Delivery Date
|
Choose a delivery date.
|
Actions button
|
Field
|
Description
|
|
Create Invoice
|
Allows you to create a sales invoice for a completed sales order delivery record.
|
|
Automatic Inventory Allocation
|
Attempts to automatically assign inventory to all the unassigned sales order items.
|
|
Print Delivery Note
|
Prints the Delivery Note report, which shows the items that will be delivered with their pricing information.
|
|
Print Packing Slip
|
Prints the Packing Slip report, which shows the items that will be delivered without their pricing information.
|
|
Email Delivery Note
|
Creates an email with the Delivery Note report attached.
|
|
View Deliveries
|
You can view the deliveries made for this sales order.
|
|
View Item Status
|
Allows you to view a history of purchased and sold items as well as items being managed in inventory and production.
|
Sales Order Delivery - Lines
Use this form to check, edit or add items to the sales order delivery record.
Grids
The upper grid lists items from the sales order that you want to deliver to your customer. Double-click a line to edit the item. Click a line and press the Delete key to delete it.
The lower grid lists the items of inventory that will actually be delivered to the customer.
Buttons
Sales invoices
About sales invoices
You can bill a customer for items on a completed sales order delivery record. To do this, create a sales invoice from within a sales order or sales order delivery record. Alternatively, you can manually create one. You can then add items to the invoice, send it to your customer, and record subsequent payments.
Access
To access sales invoices, click the Sales Invoices button on the Contract Ribbon. Alternatively, from the sidebar menu, go to Sales & Customers > Sales Invoice.
When you create or edit a sales invoice, you will use the Sales Invoice form.
Raise an invoice
Use the following instructions to create an invoice.
1. Open a completed sales order delivery record.Click Actions (button) > Create Invoice.
The Sales Invoice form is displayed.

It is automatically assigned a status of Open and it has the following tabs:
§ Details
Specify basic information for the invoice. This includes the customer's billing address and payment terms.
See Sales Invoice - Details for a full list of the fields and buttons on this tab.
§ Lines
List the products for which you are invoicing your customer.
See Sales Invoice - Lines for a full list of the fields and buttons on this tab.
§ Notes
You can add notes to the sales order.
See Add notes to a record for a full list of the fields and buttons on this tab.
§ Custom Fields
If you need to collect data that is relevant to this type of record, but there are no appropriate fields, use this form to define your own custom fields.
See Define custom fields for a record for a full list of the fields and buttons on this tab.
§ Attachments
Use this form to attach external documents to a STRUMIS record.
See Attach external documents to a record for a full list of the fields and buttons on this tab.
§ Information
Use this form to view the creation date of the record, the date when it was last updated, and the users who made the changes.
See Sales Invoice - Information for a full list of the fields and buttons on this tab.
2. Complete the necessary information and click Save.
Most of the basic information on the Details form is pre-populated from the sales order. You can change it if necessary.
|
|
You can only raise an invoice for completed sales order delivery records. On the Sales Order Delivery search form, the Complete column shows the status of the delivery record.
|
Add a free line item to the invoice
The following instructions tell you how to add free line items to a sales invoice.
1. Open a sales invoice.Click the Lines tab.
The Lines tab lists the items for which you want to bill your customer.
2. Click the Add Free Line button.
The Sales Invoice Free Line Item form is displayed.

3. Complete the fields.
Purchase Invoice Non-steel Item tab
|
Field
|
Description
|
|
Line Text
|
Type in a description of the free line item.
|
|
Quantity
|
Enter the quantity of the item for which you are billing your customer.
|
|
Weight
|
If applicable, enter the weight of the item.
|
|
Contract
|
You cannot edit this field. If the Sales Invoice Type field on the Sales Invoice - Details form is set to Contract, the name of the contract is displayed here.
|
|
Contract Milestone
|
When you set up a contract, on the Contract - Invoicing form, you can define a set of contract milestones. These define a schedule of invoices that you expect to send to your customer at various points throughout the project. If you use this facility, select the relevant contract milestone from the drop-down list. When you save the invoice, the value of this free line item is added to the Contract - Invoicing form.
|
|
Unit Price
Unit
|
Enter the unit price and specify the unit.
See About cost prices.
|
|
Cost Code
|
See About cost codes and cost centres.
|
|
Tax Code
|
See About tax codes.
|
|
% Tax
|
This field is automatically populated depending on the tax code you selected above.
|
|
% Discount
|
If you give your customer a discount for this free line item, enter the percentage here.
|
Notes tab
See Add notes to a record.
Custom Fields tab
See Define custom fields for a record.
4. Click Save.
The free line item is added to the grid on the Sales Invoice - Lines form.
Add a mark to the invoice
The following instructions tell you how to add marks to a sales invoice and how to batch update the invoicing information for multiple marks.
To add marks to the invoice
1. Open a sales invoice.Click the Lines tab.
The Lines tab lists the items for which you want to bill your customer.
2. Click the down-arrow button as shown below.
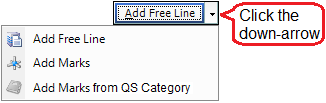
3. Select the Add Marks option.
The Add Marks to a Sales Invoice form is displayed.
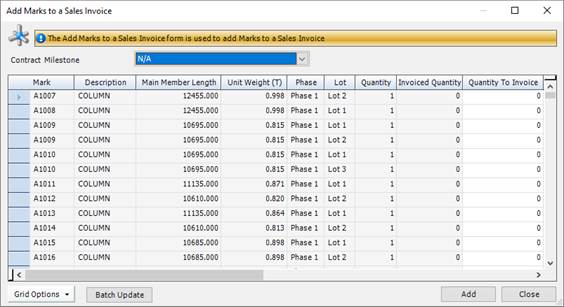
4. If applicable, select a contract milestone.
When you set up a contract, on the Contract - Invoicing form, you can define a set of contract milestones. These define a schedule of invoices that you expect to send to your customer at various points throughout the project. If you use this facility, select the relevant contract milestone from the drop-down list. When you save the invoice, the value of this free line item is added to the Contract - Invoicing form.
5. Complete the fields.
For each mark, you can enter the following information:
|
Field
|
Description
|
|
Quantity
|
Enter the quantity of the item for which you are billing your customer.
|
|
Unit Price
Unit
|
Enter the unit price and specify the unit.
See About cost prices.
|
|
Cost Code
|
See About cost codes and cost centres.
|
|
Tax Code
|
See About tax codes.
|
|
% Tax
|
This field is automatically populated depending on the tax code you selected above.
|
|
% Discount
|
If you give your customer a discount for this free line item, enter the percentage here.
|
6. Select the marks that you want to add to the invoice and click Add.
The marks are added to the Sales Invoice - Lines form.
7. Click Save.
To batch update invoicing information for multiple marks
You can update the invoicing information for multiple marks in the grid. The following instructions tell you how.
1. Select the marks that you want to update.
To do this:
§ Press Ctrl A to select all lines, or
§ Press the Ctrl key and click several non-contiguous lines, or
§ Press the Shift key then click the first and last lines in a range.
2. Click the Batch Update button.
The Sales Invoice Add Marks Batch Update form is displayed.

3. Complete the required fields.
If you do not want to update a piece of information, leave the field blank.
|
Field
|
Description
|
|
Update Pricing Information
|
Select this check box to activate the pricing information fields.
|
|
Unit Price
Unit
|
Enter the unit price and specify the unit.
See About cost prices.
|
|
Tax Code
|
See About tax codes.
|
|
% Tax
|
This field is automatically populated depending on the tax code you selected above.
|
|
% Discount
|
If you give your customer a discount for this free line item, enter the percentage here.
|
|
Cost Code
|
See About cost codes and cost centres.
|
|
Set Quantity to Invoice to Zero
|
Select this option if you want to set the value in the Quantity To Invoice column to 0 for the selected marks.
|
|
Reset Quantity to Invoice to Quantity Outstanding
|
Select this option if you want to set the value in the Quantity To Invoice column to the value that is listed in the Quantity Outstanding column for the selected marks.
|
|
Reset Quantity to Invoice to Quantity Assembled
|
Select this option if you want to set the value in the Quantity To Invoice column to the value that is listed in the Quantity Assembled column for the selected marks. The Quantity Assembled column is not displayed by default. Use Grid Options (button) > Show/Hide Columns to display it.
|
|
Only Selected Rows
|
The Only Selected Rows check box is selected by default. Clear the check box if you want to update all of the marks in the grid.
|
4. Click Batch Update.
The selected marks are updated with the new information.
Add a mark from a QS Analysis
Coming soon!
Print an invoice
1. Open a sales invoice.
(See Find and edit a sales invoice.)
2. Click Actions (button) > Reports > Print Invoice.
The invoice is displayed.
3. Use the buttons at the top of the page to modify the view (for example, you can increase the zoom level or view multiple pages), print or email the invoice.
|

|
Click the Export button at the bottom of the page to export the delivery note to one of the following file formats: Excel, PDF, HTML, RTF, TIFF, Text (CSV), Text (tab).
|
Change the status of an invoice
1. Open a sales invoice.
(See Find and edit a sales invoice.)
2. Select an option in the Status field.
3. Click Save.
|
|
Sales Invoices can have the following states:
§ Open
Invoices are created with a status of Open. Use this status to show that the invoice has not yet been approved by your accounts department and that payment is still due from your customer.
§ Approved
This is an optional status and its use depends on how you use STRUMIS. For example, you may have invoices approved by your finance director before they are sent to customers. In this case, you can email the invoice to the approver. The approver can change the status of the invoice from Open to Approved in STRUMIS, and you can then send it to your customer.
§ Closed
Use this status to show either that the invoice has been paid or that it has been exported to your accounts system. You can make a note of whether payment has been received or whether the sales order has been exported in the Sales Order page > Information tab.
|
Find and edit a sales invoice
1. Open the Search form from the sidebar menu.
To do this, go to Sales & Customers > Sales Invoice.
2. Enter search criteria and click the Search button.
Records that match your search criteria are listed.
3. Double-click a record to edit it.
For complete information, see Find and edit an existing record.
Sales invoice reports
You can access reports from the sidebar menu. Go to Sales & Customers > Sales & Customers Reports.
See also:
Work with reports
List of reports
Fields and buttons
Sales Invoice - Details
Use this form to specify the basic details for the sales invoice..
Fields
|
Field
|
Description
|
|
Name
|
This field is automatically populated if the auto-naming/numbering option is turned on in Sales & Customers Options; otherwise, type in a unique name for the sales invoice.
|
|
Description
|
This is a free text field. Use it to provide more information about the sales invoice.
|
|
Sales Invoice Type
|
You cannot edit this field. It is populated with one of the following options:
§ Sales Order
An invoice for a sales order contains the customer's details and a list of the goods that they want to buy. You can add free line items to the invoice.
§ Contract
An invoice for a contract is the same as for a sales order, plus you can name a contract and add marks to the invoice.
|
|
Customer
|
If you have created this invoice from a sales order or a sales order delivery, this field is pre-populated with the customer's name; otherwise, select a customer from the drop-down list.
|
|
Customer Billing Address
|
Populated from the customer record when you choose a customer above. You can edit this field.
|
|
Purchase Order Number
|
This is a free text field where you can enter your customer's order number.
|
|
Tax Code
|
Populated from the customer record when you choose a customer above. You can edit this field.
|
|
Payment Terms
|
Populated from the customer record when you choose a customer above. You can edit this field.
|
|
Status
|
The options are:
§ Open
§ Approved
§ Closed
|
|
Facility
|
Select a facility from the drop-down list.
|
|
Invoice Date
|
This field defaults to today's date, but you can edit it.
|
|
Contract
|
If the Sales Invoice Type field is set to Contract, select a contract from the drop-down list. On the Lines form, you will be able to add marks from this contract.
|
|
Order Category
|
This is a user-defined field that allows you to categorise sales invoices. Select an existing category from the drop-down list, or click the ellipsis button to create a new one.
|
|
Currency
Exchange Rate Date
Exchange Rate
|
Choose a currency for the sales order. If the sales order currency matches the customer currency, the exchange rate fields are not available. If the two do not match, specify an exchange rate and the date to which the rate applies.
|
Actions button
This Actions button gives you the following menu options:
|
Menu option
|
Description
|
|
Reports
|
§ Print Invoice
Prints the sales invoice to the screen.
§ Email Invoice
Opens your email client and attaches a PDF of the sales invoice.
§ Sales Analysis Report
|
|
View Item Status
|
Allows you to view a history of purchased and sold items as well as items being managed in inventory and production.
|
Sales Invoice - Lines
Use this form to check, edit or add items to the sales invoice.
Grid
The grid lists the items for which you are invoicing your customer. Double-click a line to edit the item. Click a line and press the Delete key to delete it.
Buttons
Sales Invoice - Information
This tab records information about who created or updated the Sales Invoice form and the dates on which these actions took place.
For Sales Invoice forms only, the following additional check boxes are available:
§ Exported
Select this check box when you have exported this sales invoice to your accounts system. Your username and the date are automatically recorded.
§ Payment Received
Select this check box when your customer has paid you for the items on this sales invoice. Your username and the date are automatically recorded.
Chapter 15
What's in this chapter?
About document management
Contacts
Documents
Transmittals
Requests for information (RFI)
About document management
The STRUMIS document management module allows you to import and store documents, and to keep track of any changes that are made to them. Three main types of record are involved in document management. Briefly, these are:
§ Document records
Each file that you import into document management has a document record to which it is attached. The document record stores information such as the name of the file, the contract with which it is associated, its revision history and its status (for example, Awaiting Approval or Issued For Fabrication).
§ Transmittal records
When you distribute documents to a number of involved parties, you do so by using a transmittal record. The transmittal record specifies the documents to be distributed, the parties sending and receiving the documents, and any responses received.
§ Requests for information (RFIs)
If you need to clarify a point or request new drawings or detailed information from one of the other involved parties, you do do by using an RFI. The RFI record is similar to a transmittal but also includes a query to which the recipients are expected to respond.
They are described more fully in the following sections.
Contacts
About contacts
Contacts can be customers or suppliers or people who are involved in sending or receiving documents. You can add contacts in the following places within STRUMIS:
§ The Customer - Addresses/Contacts form in Sales & Customers
§ The Supplier - Addresses/Contacts form in Purchasing & Suppliers
§ The Contacts form in Document Management
Please be aware that contacts are also called recipients if they are involved in document transmittals.
Access
To access contacts, from the sidebar menu, go to Document Management > Contacts.
When you create or edit a contact, you will use the Contact form.
Create a contact
The following instructions tell you how to create a contact.
1. Go to Document Management > Contact.
A list of contacts is displayed.
2. Click New.
The Contact - Details form is displayed.

It has the following tabs:
§ Details
Enter general details such as the name and telephone numbers for the contact.
See Contact - Details for a full list of the fields and buttons on this tab.
§ Address
Specify an address for the contact.
See Contact - Address for a full list of the fields and buttons on this tab.
§ Notes
See Contact - Notes for a full list of the fields and buttons on this tab.
§ Document Management Defaults
Specify document management parameters for the contact. These include the maximum email size that the contact can receive and the number of document copies that should be sent to the contact.
See Contact - Document Management Defaults for a full list of the fields and buttons on this tab.
§ Custom Fields
See Supplier - Custom Fields for a full list of the fields and buttons on this tab.
§ Attachments
See Supplier - Attachments for a full list of the fields and buttons on this tab.
§ Information
See Supplier - Information for a full list of the fields and buttons on this tab.
3. Fill in the basic information on the Contact - Details form and click Save.
4. Add an address on the Contacts - Addresses/Contacts tab and click Save.
|
|
If you are creating multiple contact records, use the Save As New button.
When you have completed and saved the first set of details, you can simply change the name and click Save As New to save the same details under the new name.
|
Find and edit a contact
1. Open the Search form from the sidebar menu.
To do this, go to Document Management > Contact.
2. Enter search criteria and click the Search button.
Records that match your search criteria are listed.
3. Double-click a record to edit it.
For complete information, see Find and edit an existing record.
Contact reports
You can access reports from the sidebar menu. Go to Document Management > Document Reports.
See also:
Work with reports
List of reports
Fields and buttons
Contact Details
Use this form to enter basic contact details.
Fields
|
Field
|
Description
|
|
Name
|
You cannot edit this field. It shows The name of the contact as specified in the First Name and Surname fields, below.
|
|
Contact Type
|
Contacts can be customers or suppliers or people who are involved in sending or receiving documents. Select an option from the drop-down list.
|
|
Contact Company
|
Select a company from the drop-down list. The companies in the list change depending on the option that you selected in the Contact Type field, above.
Contacts can also be added from the Supplier and the Customer forms. When adding from these two forms, the company name is the supplier or customer name.
|
|
Title, First Name, Surname
|
Type in the contact's title and name. This is displayed in the Name field above.
|
|
Job Title
|
Type in the contact's job title.
|
|
Work Number, Home Number, Mobile Number, Fax
|
Specify telephone numbers for the contact.
|
|
Email, Alternative Email
|
Specify email addresses for the contact.
|
Contact - Address
Use this form to specify an address for the contact.
Contact - Document Management Defaults
Use this form to specify default contact information relating to document management.
Fields
|
Field
|
Description
|
|
Default Acknowledgement Required
|
Select this check box if the contact requires an acknowledgement of the transmittal.
|
|
Default Response Days
|
Specify the number of days that the contact has to respond to a transmittal.
|
|
Default Copies
|
Specify the number of copies of each transmittal that are required by the contact.
|
|
Default Reason
|
Select a default reason from the drop-down list. This is used as the default when a transmittal is sent, but it can be changed at that time.
|
|
Default Email Priority
|
Select a default email priority from the drop-down list. The options are:
§ Low
§ Normal
§ High
This is the default level of priority for the contact,s email messages/e-transmittals.
|
|
Default Maximum Email Size
|
Specify the maximum size of any e-mail that a contact can receive. If this value is set to zero, the value set by the Maximum Email Size field in the Document Options is used.
|
|
Email Text/Signature
|
Use the text field to define an email signature for the contact. This is displayed on the cover sheet in the e-transmittal. You can specify:
§ Font Size
§ Font Style
§ Default Font
|
Documents
About documents
In any drawing office, on any construction site, or in fact anywhere where there are large quantities of documents, there will be a document register. With time, documents are revised, new documents are created, and documents become superseded. The document register is continually updated to reflect these changes.
The STRUMIS Document Search form and associated document records comprise such a register. A document record typically has an external file (for example, test certificates, shop drawings and so on) attached to it. A distinction is made throughout this chapter between the document record and the attached file.
You can add files to the document register (and therefore into the document management facility) manually, or more usually by launching the Document Import Wizard to guide you through the process. You can then assign a status (for example, Awaiting Approval or Issued For Fabrication) to a document and revise it when necessary.
Access
To access documents, click the Document Management button on the Contract Ribbon. Alternatively, from the sidebar menu, go to Document Management > Document.
When you create or edit a document record, you will use the Document form.
Add documents to the database using the wizard
The Document Import Wizard allows you to import multiple files into document management. For each imported file, the wizard automatically creates a document record. To launch the Document Import Wizard, go to Document Management > Document Import Wizard.
The wizard is described below.
Screen 1: Document Import Wizard - Welcome to the Document Import Wizard

This is simply a welcome screen and you can click Next immediately to continue to the next screen.
Screen 2: Document Import Wizard - Select Document Import Filters
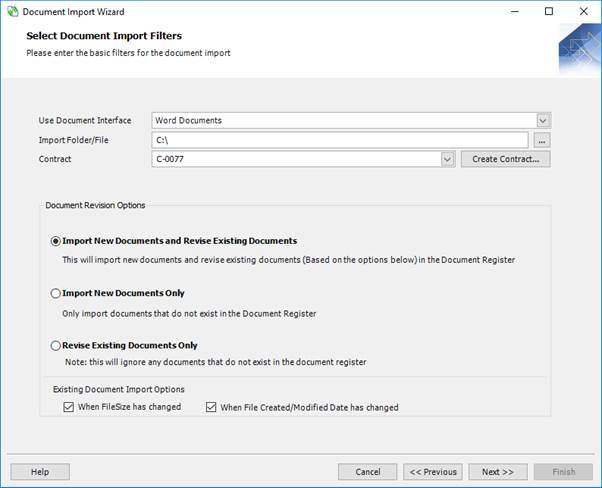
1. Complete the details (see below).
2. Click Next to continue to the next screen.
Fields
|
Field
|
Description
|
|
Use Document Interface
|
Select the type of file that you want to import from the drop-down list. For more information see About document interfaces.
|
|
Import Folder/File
|
Use the ellipsis button to specify the location of the file(s) that you want to import.
|
|
Contract
|
Select a contract from the drop-down list or click the Create Contract button to create a new one.
|
|
Import New Documents and Revise Existing Documents
|
This is the default option. When you import files from the location that you specified above, the following actions take place:
§ For files that are already under document management, the revision number in the document record is increased.
§ Files that are not currently under document management are imported and revision numbers start at the first default number/character.
|
|
Import New Documents Only
|
Select this option to import files that do not exist in the document register. Files that are already under document management are ignored.
|
|
Revise Existing Documents Only
|
Select this option to revise files that exist in the document register and to ignore those that are not under document management.
|
|
When File Size Has Changed
When File Created/Modified Date Has Changed
|
You can revise files when the file size has changed and/or when the date on which the document was last edited has changed. Select the relevant options.
|
Screen 3: Document Import Wizard - Review Documents
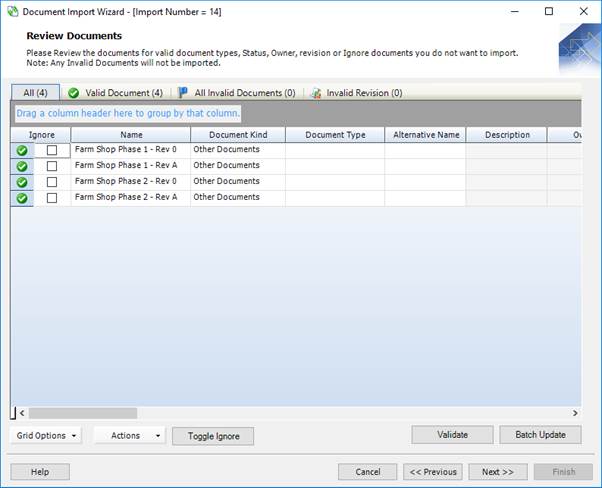
1. Make any necessary adjustments to fix or ignore invalid files.
2. Click Next to continue to the next screen.
Smart filters
|
Smart filter
|
Description
|
|
All
|
Shows all document files listed in the specified folder.
|
|
Valid Document
|
Shows only documents files that may be loaded into the system.
|
|
All Invalid Documents
|
Shows only documents files that cannot be loaded into the system.
|
|
Invalid Revision
|
Shows the document files that have a missing or unrecognised revision code.
|
Buttons
|
Option
|
Description
|
|
Actions
|
See below.
|
|
Toggle Ignore
|
Selects the check box in the Ignore column for the selected files. Ignored files are not imported.
|
|
Validate
|
If you make any updates to the files, click this button to revalidate them.
|
|
Batch Update
|
Opens the Document Import - Batch Update form. This allows you to update the information for multiple document records in the grid.
|
Actions button
|
Option
|
Description
|
|
View File
|
Opens the selected document file.
|
|
Toggle Ignore
|
Selects or clears the Ignore check box for the selected rows in the grid.
|
|
Document Status
|
Opens the Document Status form, which displays the history of the document record.
|
When you have specified the relevant information, click Next to continue to the next screen.
Screen 4: Document Import Wizard - Ready for Import
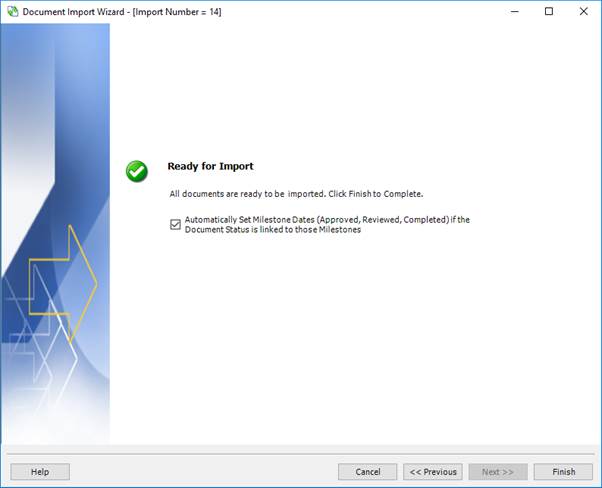
Click Finish to import the documents. STRUMIS automatically creates a record (meaning a Document - Details, Revision Details, and Extra Details form) for each imported document.
Add a document to the database manually
The following instructions tell you how to manually create a document record and attach a file to it.
See also Add documents to the database using the wizard.
1. Go to Document Management > Document.
A list of document records is displayed.
2. Click New.
The Document - Details form is displayed.
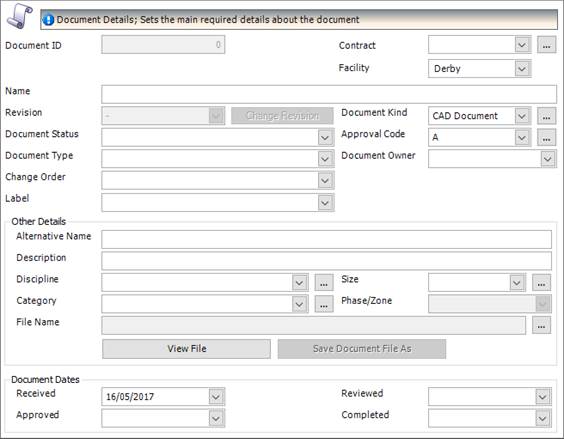
It has the following tabs:
§ Details
Enter general details for the document record and attach a file.
See Document - Details for a full list of the fields and buttons on this tab.
§ Revision Details
Lists details of the revisions that have been made to the document.
See Document - Revision Details for a full list of the fields and buttons on this tab.
§ Notes
See Document - Notes for a full list of the fields and buttons on this tab.
§ Extra Details
Use these fields to record extra information for a document or drawing.
See Document - Extra Details for a full list of the fields and buttons on this tab.
§ Custom Fields
See Document - Custom Fields for a full list of the fields and buttons on this tab.
§ Attachments
See Document - Attachments for a full list of the fields and buttons on this tab.
§ Information
See Document - Information for a full list of the fields and buttons on this tab.
3. Fill in the basic information on the Document - Details form, specifically, the name and location of the file that is attached to this document record, and click Save.
|

|
If you are creating multiple document records, use the Save As New button.
When you have completed and saved the first set of details, you can simply change the name and click Save As New to save the same details under the new name.
|
Find an existing document
Use the following instructions to list document records.
1. Go to Document Management >Document.
A list of document records is displayed.
2. Type your search criteria into the fields at the top of the page.
You can search for document records using the parameters on the General, Details, Contract/Ownership, and Document Dates tabs. For example, the following search returns a list of document records that were created in April 2017.
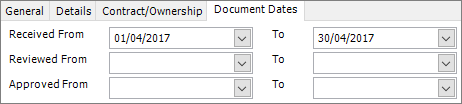
3. Click the Search button.
Document records matching your search criteria are listed.
At this point, you can either double-click a document record in the list to edit it, or you can click the Actions button on the search form and use one of the following options:
Actions button
|
Option
|
Description
|
|
Revise Document
|
See Revise a document.
|
|
View Transmittals for Document
|
Allows you to view transmittals sent for the selected document record.
See About transmittals.
|
|
Add Documents to Transmittal Wizard
|
Launches the Document Transmittal Wizard and adds the selected document records to the appropriate screen.
See Create transmittals using the wizard.
|
|
Reports
|
Select one of the following reports:
§ Document Status Report
§ Document Register Report
|
|
Print Document File(s)
|
Allows you to print the file attached to one or more document records.
|
|
View Document File
|
Opens the file attached to the selected document record.
|
|
View Document Status Summary
|
Allows you to view the status history of the selected document record.
See View document status.
|
|
Batch Update
|
Opens the Document - Batch Update form, where you can change the properties of multiple document records at once.
See Batch update document records.
|
|
|
§ If you leave the search fields blank, all records for the module are listed.
§ Click Clear to reset the search criteria.
§ Search criteria are not case sensitive.
§ You can use the following characters in the search fields:
*
Use the asterisk as a wildcard. If, for example, you wanted to show every member with a grade of –S275, type in *-S275. Every record in the module that ends with -S275 is displayed.
_
Use an underscore to represent any character; for example, _275 lists all records in the module with four characters that end with 275.
%
Use a percent sign to match any character that occurs multiple consecutive times. For example, C%per* would find both Cooper Steel Construction and Caper Fabrication Ltd.
[ ]
Use square brackets to denote a character range; for example, *U[B-C]* lists all UB codes and UC codes.
|
View the status history of a document record
You can view the status of a document record from the following places:
§ On the Document - Search form
Select a document record and click Actions > View Document Status Summary
§ On the Document - Details form
Click Actions > View Document Status
In both cases, the Document Summary View form is displayed.
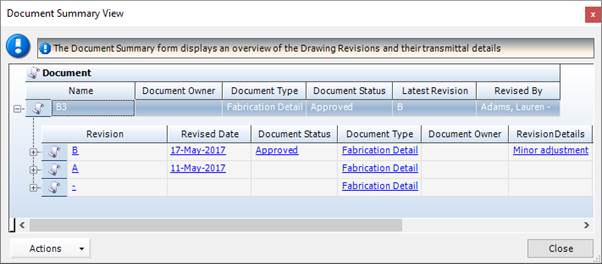
Details of the document record's revisions are listed. These include the date of revision, status, the name of the person who made the revision, and the name of the attached file.
The following options are available from the Actions button:
|
Option
|
Description
|
|
View Document
|
Opens the document record.
|
|
View File
|
Opens the file that is attached to the document record.
|
|
Print File
|
Prints the document file.
|
|
View Transmittal
|
Opens the Document Transmittal Search form, where you can find and open a document transmittal.
|
Batch update document records
Use the following instructions to update the details of multiple document records at the same time.
1. On the Document - Search form, select the document records that you want to update.
To search for document records, see Find a document.
To select document records:
§ Press Ctrl A to select all lines, or
§ Press the Ctrl key and click several non-contiguous lines, or
§ Press the Shift key then click the first and last lines in a range.
2. Click Actions > Batch Update.
The Document - Batch Update form is displayed.
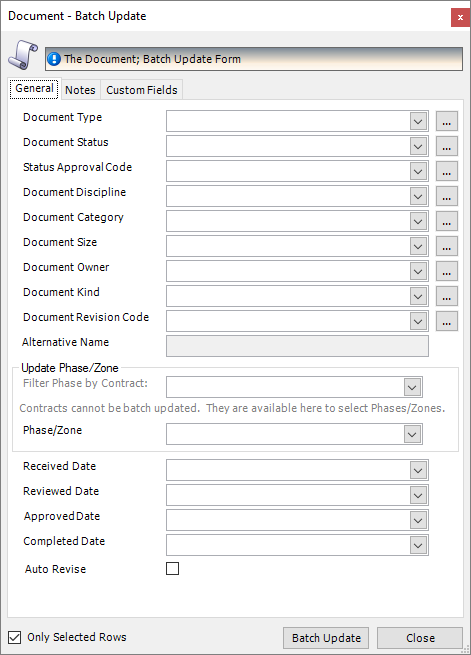
3. Make the necessary changes to fields on the General, Notes, and Custom Fields tabs.
Select the Auto Revise check box if you want to move each of the selected document records to the next revision. This also enables theRevision Details field on the Notes tab to allow you to enter details about the revision.
These changes are applied to the selected document records, or to all documents if you clear the Only Selected Rows check box.
4. Click the Batch Update button.
The document records are updated.
Revise a document record
You can revise a document record in one of the following ways:
§ Using the Document Import Wizard
§ Using the Batch Update option from the Actions button on the Document - Search form
§ Using the Revise Document option from the Actions button on the Document - Search form
§ Using the Change Revision button on the Document - Details form
These options are covered more fully in the sections below.
Revise a document record using the Document Import Wizard
On Screen 2 of the Document Import Wizard, there are options to re-import updated document files that already exist in the database.
See Add documents to the database using the wizard.
Revise a document record using the batch update facility
See Batch update document records.
You cannot change the file that is attached to the document record if you use this method.
Revise a document record using the Revise Document facility
Use the following instructions to revise a document record.
1. On the Document - Search form, select the document record that you want to revise.
To search for documents, see Find a document.
2. Click Actions > Revise Document.
The Document Revision form is displayed.
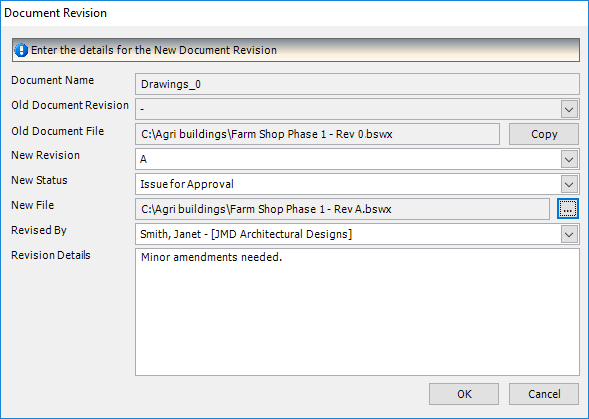
3. Complete the details.
|
Field
|
Description
|
|
Document Name
Old Document Revision
Old Document File
|
You cannot edit these fields. They show the current state of the document record.
|
|
New Revision
|
Select a revision from the drop-down list.
|
|
New Status
|
Select a status from the drop-down list.
|
|
New File
|
If the file that is attached to the document record has not changed, click the Copy button (to the right of the Old Document File field) to use the current filename in this field.
If the file has changed, use the ellipsis button to browse for the new file.
|
|
Revised By
|
Select a contact from the drop-down list.
|
|
Revision Details
|
This is a free text field; use it to record details of the revision.
|
4. Click OK.
The document record is revised.
Revise a document record on the Document - Details form
On the Document - Details form, click the Change Revision button. The Document Revision form is displayed. See above.
Document reports
You can access reports from the sidebar menu. Go to Document Management > Document Reports.
See also:
Work with reports
List of reports
Fields and buttons
Document - Details
Use this form to add a document record to the document register or to review the details of an existing document record.
Fields
|
Field
|
Description
|
|
Contract
|
Select a contract from the drop-down list. This is the contract to which the document file relates.
|
|
Facility
|
Select a facility from the drop-down list.
|
|
Name
|
Type in the name of the document record.
|
|
Revision
Change Revision
|
Shows the document revision.
When a new version of the document file is imported using the Document Import Wizard, the revision number is updated automatically. You can also manually change the revision number. To do this, click the Change Revision button. See Revise a document.
|
|
Document Status
|
Select the status of the document record from the drop-down list.
|
|
Document Type
|
Select a document type from the drop-down list.
|
|
Change Order
|
If the document file that you are bringing under document management is related to a change order, select the change order from the drop-down list.
|
|
Label
|
In change order management, you can apply categorisation labels to correspondence. Examples are Drawings, Scope Documents, and so. If the document file that you are bringing under document management is a change order, you can select a label for it from the drop-down list.
|
|
Document Kind
|
Select a document kind from the drop-down list or click the ellipsis button to create a new one.
|
|
Approval Code
|
Approval codes indicate the level of approval that is required for a document.
Select an approval code from the drop-down list or click the ellipsis button to create a new one.
|
|
Document Owner
|
Select a contact name from the drop-down list.
|
|
Other Details
|
|
|
Alternative Name
Description
|
Specify an alternative name and description for the document record.
|
|
Discipline
|
Record the type of discipline.
Select a discipline from the drop-down list or click the ellipsis button to create a new one.
|
|
Category
|
Record the type of category.
Select a category from the drop-down list or click the ellipsis button to create a new one.
|
|
Size
|
Record the document file paper size, for example, A4 or Letter.
Select a size from the drop-down list or click the ellipsis button to create a new one.
|
|
Phase/Zone
|
Select the phase or zone from the drop-down list.
|
|
File Name
View File
Save Document File As
|
Use the ellipsis button to browse for the document file that you want to bring under document management.
Files are either stored in your file system or in the STRUMIS database; this is controlled by the setting of the Store Documents In the STRUMIS Database field in the Document Options.
When you have specified the file, you can use the View File button or the Save Document File As button to view it or save it in another format.
|
|
Document Dates
|
These date fields are used in conjunction with document statuses to specify when the document has passed through each status.
Select the dates on which the document was received, approved, reviewed and completed.
|
Actions button
|
Option
|
Description
|
|
View Document Status
|
Opens the Document Summary View form. See Document Summary View.
|
|
View Transmittals
|
Opens the Document Transmittal Search form, where you can find and open a document transmittal.
|
|
Print Document File
|
Prints the document file that is associated with this document record.
|
Document - Revision Details
This form shows details of the latest revision that was made to the document record. The fields are updated automatically when you run the Document Import Wizard.
Document - Extra Details
This form shows additional information that can be imported using a document interface.
Transmittals
About transmittals
A document transmittal is the controlled distribution of formal documents to involved parties such as engineers, sub-contractors, vendors, and fabricators. A transmittal has a cover page identifying the information that is included in the contractual documents being delivered.
Changes to documents or drawings often signify important changes to the contract and if these changes are not communicated quickly, additional costs could be incurred.
In addition to the sender and the receiver, a document transmittal also contains a descriptive list of what is being transmitted, along with document reference numbers. Specific details or instructions for the receiver can be included as well as a date by which a response is required. An acknowledgment request should always be included in a document transmittal to ensure there is no doubt that the document is received.
You can create a transmittal manually, or more usually by launching the Document Transmittal Wizard to guide you through the process.
Access
To access transmittals, from the sidebar menu, go to Document Management > Document Transmittal.
When you create or edit a transmittal, you will use the Document Transmittal form.
Create transmittals using the wizard
The Transmittal Wizard leads you through the process of creating and sending a transmittal. You can specify the documents to send, the recipients, the transmittal details, and the method that you want to use to send the transmittal.
You can launch the Transmittal Wizard in the following ways:
§ On the Document - Search form, select the documents that you want to send, click Actions > Add Documents to Transmittal Wizard
§ Go to Document Management > Transmittal Wizard
The wizard is described below.
Screen 1: Transmittal Wizard - Welcome to the Transmittal Wizard
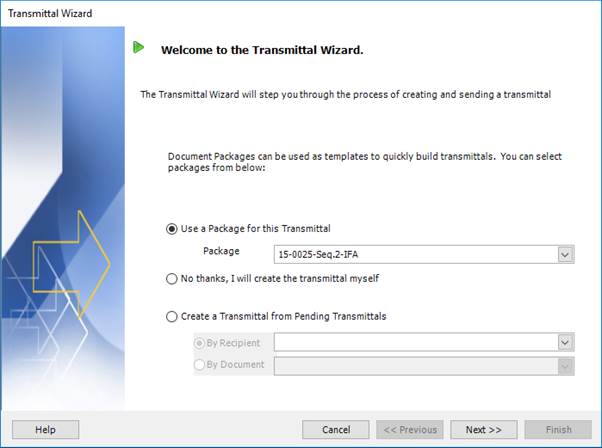
1. Select the method that you want to use to create the transmittal (see below).
2. Click Next to continue to the next screen.
Fields
|
Field
|
Description
|
|
Use a Package for this Transmittal
Package
|
See About Document Packages.
If you want to use a package, enable the option and select a document package from the drop-down list.
|
|
No thanks, I will create the transmittal myself
|
Use this option if you want to specify documents and recipients on an ad hoc basis.
|
|
Create a Transmittal from Pending Transmittals
By Recipient
By Document
|
Use this option if you want to select either a recipient or document from pending transmittals. Select the recipient or document from the drop-down list.
|
Screen 2: Transmittal Wizard - Select Transmittal Recipients
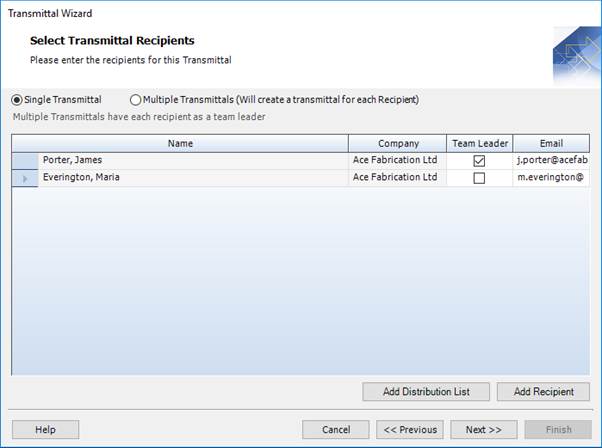
1. Specify recipients (see below).
2. Click Next to continue to the next screen.
Fields
|
Field
|
Description
|
|
Single Transmittal
|
Select this option to send a single transmittal to the contact tagged as the team leader in the grid.
|
|
Multiple Transmittals
|
Select this option to send a transmittal to every recipient listed in the grid. All recipients must be tagged as team leaders.
|
Grid
The grid lists the details (name, company and email address) for transmittal recipients. For single transmittals, you must specify one team leader. For multiple transmittals, every recipient must be tagged as a team leader.
Buttons
|
Button
|
Description
|
|
Add Distribution List
|
Opens the Select a Distribution List form. Use this form to select a distribution list to add to the transmittal. The contacts from the distribution list are displayed in the grid.
|
|
Add Recipient
|
Opens the Contact Search - Add to Package form, where you can find and select contacts to add to the transmittal as recipients.
|
Screen 3: Transmittal Wizard - Select Transmittal Details

1. Complete the details (see below).
2. Click Next to continue to the next screen.
Fields
|
Field
|
Description
|
|
Name
|
Type in a name for the document transmittal. This field is automatically populated if Transmittal – Autonaming in Document Options is selected.
|
|
Facility
|
Select a facility from the drop-down list.
|
|
Contract
|
Select a contract from the drop-down list.
|
|
Sent By
|
Select a person from the drop-down list. This is the person who is sending the transmittal.
|
|
Reason
|
Select a reason from the drop-down list. This is the reason why the transmittal is being sent.
|
|
Acknowledgement Required
|
Select the check box if you require an acknowledgement.
If you send an e-transmittal, this adds a message to the email. The extra message asks the recipient to return an email to acknowledge receipt of the transmittal. Your email account also receives a Delivery Status Notification, to inform you when the email is received by the main email provider. A Delivery Status Notification message does not automatically mean the email has been received and read. It simply tells you if the email account actually exists.
|
|
Acknowledged Received On
|
The date on which the transmittal acknowledgement is received.
|
|
Response Required
|
Select this check box if you need the recipient to respond.
|
|
Requires Response By
|
Specify the date by which a response is required.
|
|
Response Instruction Message
|
This field allows you to create standard instructions for transmittals. Select a message from the drop-down list or click the ellipsis button to create a new one.
|
|
Response Received On
|
Specify the date on which the response is received.
|
|
Transmittal Copies
|
Specify the number of copies of each document that should be sent to the recipients.
|
|
Notes
Predefined Notes
|
You can type notes directly into the text box or you can click the button to add predefined notes.
|
Screen 4: Transmittal Wizard - Select Transmittal Documents

1. Use the Add Document button to find and select documents to add to the transmittal.
2. Make any necessary amendments to fix invalid documents.
3. Click Next to continue to the next screen.
Fields
|
Field
|
Description
|
|
Progress Bar
|
When you send an e-transmittal, be aware that the recipients may have a maximum receivable email size. You can set the default email size using the Maximum E-Mail Size in Document Options. You can also set this parameter for each contact on the Contact - Document Management Defaults form. The recipient with the lowest maximum e-mail size is used to determine the e-mail size limit.
As you add documents to the transmittal, the percentage counter increases so that you can see when the transmittal is approaching the maximum size allowed.
|
Smart filters
|
Smart filter
|
Description
|
|
All
|
Shows all document files for this transmittal.
|
|
Invalid Document File
|
Shows invalid document files for this transmittal.
Documents that do not have valid files linked to them cannot be added to e-transmittals. If you try to send an e-transmittal with missing files, you receive a warning message asking if you still want to send. If you click Yes, the email is sent, but without the missing files. If you click No, you must ensure that only documents with valid files are listed.
|
|
Valid Document File
|
Shows valid document files for this transmittal.
|
Buttons
|
Button
|
Description
|
|
Validate Document Files
|
If you make any updates to the documents, click this button to revalidate them.
|
|
Add Document
|
Opens the Document Search - Add to Transmittal Wizard form, where you can find and select documents to add to the transmittal.
|
Screen 5: Transmittal Wizard - Finishing
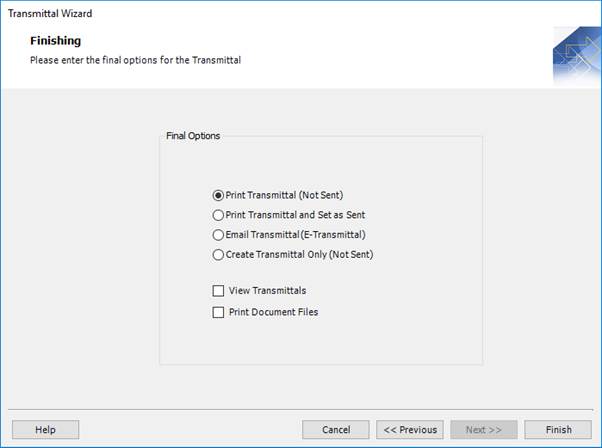
1. Select the method that you want to use to send the transmittal (see below).
2. Click Finish to create the transmittal and optionally send it to the specified recipients.
Fields
|
Field
|
Description
|
|
Print Transmittal (Not Sent)
|
Prints the transmittal but the status remains Not Sent.
|
|
Print Transmittal and Set as Sent
|
Prints the transmittal and changes the status to Sent.
|
|
Email Transmittal (E-Transmittal)
|
Emails the transmittal and changes the status to Sent.
|
|
Create Transmittal Only (Not Sent)
|
Creates the transmittal within STRUMIS but the status remains Not Sent.
|
|
View Transmittals
|
Select the check box to view the transmittals after they have been created.
|
|
Print Document Files
|
Select the check box to print a copy of each document attached to the transmittal to your default printer.
|
Create transmittals manually
The following instructions tell you how to manually create a transmittal record.
See also Create transmittals using the wizard.
1. Go to Document Management > Document Transmittal.
A list of transmittal records is displayed.
2. Click New.
The Transmittal - Details form is displayed.
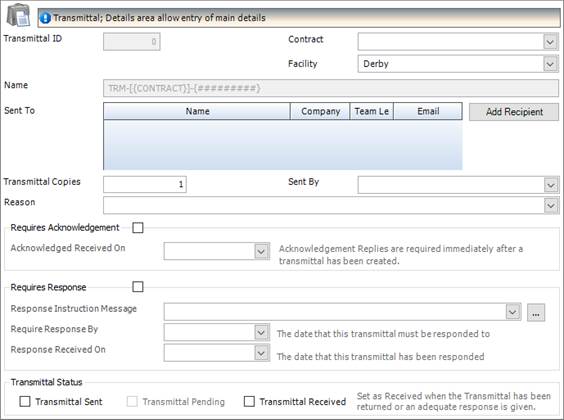
It has the following tabs:
§ Details
Enter general details such as the name and telephone numbers for the contact.
See Document Transmittal - Details for a full list of the fields and buttons on this tab.
§ Responses
Use this form to record any responses that you receive.
See Document Transmittal - Responses for a full list of the fields and buttons on this tab.
§ Documents
Use this form to specify the documents that are to be sent with the transmittal.
See Document Transmittal - Documents for a full list of the fields and buttons on this tab.
§ Notes
See Document Transmittal - Notes for a full list of the fields and buttons on this tab.
§ Custom Fields
See Document Transmittal - Custom Fields for a full list of the fields and buttons on this tab.
§ Information
See Document Transmittal - Information for a full list of the fields and buttons on this tab.
3. On the Document Transmittal - Details form, fill in the basic information, add one or more recipients (see Add recipients), and click Save.
4. On the Document Transmittal - Documents form, add the documents that are to be sent with the transmittal (see Add documents) and click Save.
|

|
§ You can copy the transmittal information, recipients and documents from another transmittal record. To do this, go to the Document Transmittal - Details form and click Actions > Copy From Transmittal. The Add Document Transmittal form is displayed.

Select the transmittal record from which you want to copy, specify whether you want to copy recipients and documents, and click OK.
§ If you are creating multiple transmittal records, use the Save As New button.
When you have completed and saved the first set of details, you can simply change the name and click Save As New to save the same details under the new name.
|
Add recipients to a transmittal record
You can add recipients to a transmittal record in the following ways:
§ By adding individual contacts to the transmittal record
§ By adding a distribution list to the transmittal record
§ By adding a package to the transmittal record
§ By copying recipients from another transmittal record
See Create transmittals manually
Further details are given in the sections below.
Add individual contacts
Use the following instructions to add individual contacts to a transmittal record.
1. On the Document Transmittal - Details form, click the Add Recipient button.
The Contact Search - Add to Transmittal form is displayed. It lists all of the contacts in the STRUMIS system.
2. If necessary, you can use the fields on the General and Details tabs to filter the contacts in the list. See Find and edit an existing record.
3. Select one or more contacts in the list. To do this:
§ Press Ctrl A to select all lines, or
§ Press the Ctrl key and click several non-contiguous lines, or
§ Press the Shift key then click the first and last lines in a range.
4. Click the Add button.
The selected contacts are added to the transmittal as recipients.
Add a distribution list to a transmittal record
Use the following instructions to add a distribution list to a transmittal record.
See About document distribution lists.
1. On the Document Transmittal - Details form, click Actions > Add Distribution List.
The Select a Distribution List form is displayed.

2. Select a distribution list from the drop-down list and click OK.
The contacts from the distribution list are added to the transmittal as recipients.
Add a package to a transmittal record
Use the following instructions to add a package to a transmittal record.
See About Document Packages.
1. On the Document Transmittal - Details form, click Actions > Add Package.
The Add Document Package form is displayed.

2. Select a package from the drop-down list, select the Copy Recipients check box (and the Copy Documents check box if required), and click OK.
The contacts from the package are added to the transmittal as recipients.
Add documents to a transmittal record
You can add documents to a transmittal record in the following ways:
§ By adding individual documents to the transmittal record
§ By adding a package to the transmittal record
See Add a package to a transmittal record
§ By copying documents from another transmittal record
See Create transmittals manually
Further details are given in the sections below.
Add individual documents
Use the following instructions to add individual documents to a transmittal record.
1. On the Document Transmittal - Documents form, click the Add Document button.
The Document Search - Add to Transmittal form is displayed. It lists all of the documents in the STRUMIS system.
2. If necessary, you can use the fields on the General, Details, Contract/Ownership and Document Dates tabs to filter the documents in the list. See Find and edit an existing record.
3. Select one or more documents in the list. To do this:
§ Press Ctrl A to select all lines, or
§ Press the Ctrl key and click several non-contiguous lines, or
§ Press the Shift key then click the first and last lines in a range.
4. Click the Add button.
The selected documents are added to the transmittal.
|

|
When you have added documents to the transmittal record, on the Document Transmittal - Documents form, you can:
§ Select one or more documents in the grid and click the Update Document Status button. This allows you to batch update the document status and approval code.
§ Click Check E-transmittal File Size. This helps you to avoid sending emails that are too big for the recipient to receive.
|
Send transmittals
Before sending a transmittal, you may want to review the associated documents. To do this:
§ On the Document Transmittal - Documents form, select a document and click Actions > View Document
This allows you to review the document record.
§ On the Document Transmittal - Documents form, select a document and click Actions > Print Document Files
This allows you to print the file that is associated with the document record.
You can then send transmittals by post or by email. To do this, on the Document Transmittal - Details form, click the Actions button and use one of the following options:
|
Option
|
Description
|
|
Print
|
Generates the Document Transmittal Report.
|
|
Print and Send
|
Generates the Document Transmittal Report and marks the document transmittal as sent.
|
|
Send E-Transmittal
|
Creates an E-transmittal, which sends an e-mail to the recipients with the documents and a Document Transmittal Report attached.
|
|
Email as PDF
|
Creates a PDF version of the report, which is attached to a blank email using your default email system (for example, Microsoft Outlook).
|
Add responses to a transmittal
Use the following instructions to add responses to a transmittal record.
1. On the Document Transmittal - Responses form, click the Add Response button.
The Document Transmittal Response form is displayed.
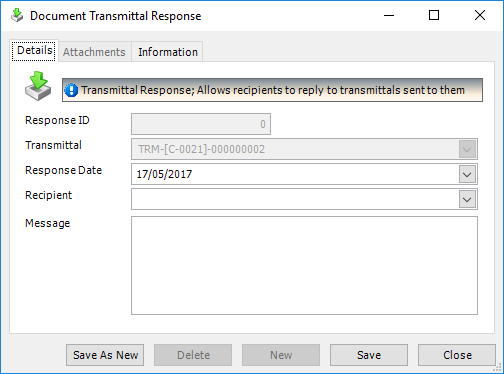
2. Populate the fields on the Details tab.
|
Field
|
Description
|
|
Transmittal
|
This is the name of the transmittal record. You cannot edit it.
|
|
Response Date
|
This is the date on which the response was received. It defaults to today's date but you can select any date from the drop-down list.
|
|
Recipient
|
Select a recipient from the drop-down list. This is the recipient who sent the response.
|
|
Message
|
This is a free text field. Use it to record the recipient's response.
|
3. Click Save.
The response is added to the transmittal.
About pending transmittals
After documents have been sent to a recipient, there is still a high likelihood of them being revised. Revised copies of the documents need to be re-transmitted to the recipient; these are known as pending transmittals.
A pending transmittal is automatically created if the document has been transmitted using the previous transmittal details.
Find a pending transmittal
Use the following instructions to list pending transmittals.
1. Go to Document Management >Document Pending Transmittals.
A list of pending transmittals is displayed.
2. Type your search criteria into the fields at the top of the page.
Use the fields on the General, Details, and Transmittal Dates forms to specify pending transmittal search criteria. For example, the following search returns a list of pending transmittals for contract C-0077.
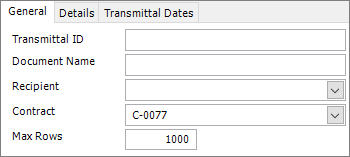
3. Click the Search button.
Pending transmittals matching your search criteria are listed.
At this point, you can either double-click a record in the list to edit it, or you can click the Actions button on the search form and use one of the following options:
Actions button
Disable or enable pending transmittals
Disable pending transmittals
Use the following instructions to disable pending transmittals, meaning that they cannot be re-sent.
1. On the Document Pending Transmittal Search - General form, select the pending transmittals that you want to disable and click Actions > Disable Resend.
A message is displayed, asking you to confirm the action.
2. Click Yes.
The selected pending transmittals are removed from the grid.
Enable pending transmittals
Use the following instructions to enable pending transmittals, meaning that the associated documents can be re-sent to the recipients.
On the Document Pending Transmittal Search - Details form, select the pending transmittals that you want to enable and click Actions > Enable.
The pending transmittals are displayed on the Document Pending Transmittal Search - General form. They can now be added to a new transmittal and re-sent.
Re-send pending transmittal documents
Use the following instructions to re-send the documents associated with the transmittal to the recipients.
On the Document Pending Transmittal Search - General form, select the pending transmittals that you want to re-send and click Actions > Add To Transmittal Wizard.
The Transmittal Wizard is launched and the pending transmittals are added to the relevant screen. See Create transmittals using the wizard. Pending documents are also displayed on the first screen of the Document Transmittal Wizard, where you can elect to create a new transmittal using only recipients that require the revised document.
Find and edit a transmittal
1. Open the Search form from the sidebar menu.
To do this, go to Document Management > Document Transmittal.
2. Enter search criteria and click the Search button.
Records that match your search criteria are listed.
3. Double-click a record to edit it.
For complete information, see Find and edit an existing record.
Transmittal reports
You can access reports from the sidebar menu. Go to Document Management > Document Reports.
See also:
Work with reports
List of reports
Fields and buttons
Transmittal - Details
Use this form to specify the basic requirements for a transmittal.
Fields
|
Field
|
Description
|
|
Contract
|
Select a contract from the drop-down list.
|
|
Facility
|
Select a facility from the drop-down list.
|
|
Name
|
This field is automatically populated if the auto-naming/numbering option is turned on in Document Options; otherwise, type in a unique name for the transmittal.
|
|
Sent To
Add Recipient
|
This grid lists the contacts to whom the transmittal is sent. Click the Add Recipient button to select contacts to add to the list.
See Add recipients.
|
|
Transmittal Copies
|
Enter the number of copies to send to each recipient.
|
|
Sent By
|
Select a person from the drop-down list. This is the person who is sending the transmittal.
|
|
Reason
|
Select a reason from the drop-down list. This is the reason why the transmittal is being sent.
|
|
Requires Acknowledgement
|
Select the check box if you require an acknowledgement.
If you send an e-transmittal, this adds a message to the email. The extra message asks the recipient to return an email to acknowledge receipt of the transmittal. Your email account also receives a Delivery Status Notification, to inform you when the email is received by the main email provider. A Delivery Status Notification message does not automatically mean the email has been received and read. It simply tells you if the email account actually exists.
|
|
Acknowledged Received On
|
The date on which the transmittal acknowledgement is received.
|
|
Requires Response
|
Select this check box if you need the recipient to respond.
|
|
Response Instruction Message
|
This field allows you to create standard instructions for transmittals. Select a message from the drop-down list or click the ellipsis button to create a new one.
|
|
Requires Response By
|
Specify the date by which a response is required.
|
|
Response Received On
|
Specify the date on which the response is received.
|
|
Transmittal Status
|
The following check boxes are available:
§ Transmittal Sent
Select this check box when the transmittal has been sent.
§ Transmittal Pending
This check box prompts you to resend updated/revised documents that have been sent on the transmittal.
§ Transmittal Received
Select this check box when you receive a response from the recipient.
|
Actions button
|
Field
|
Description
|
|
Print
|
Generates the Document Transmittal Report.
|
|
Print and Send
|
Generates the Document Transmittal Report and marks the document transmittal as sent.
|
|
Send E-Transmittal
|
Creates an E-transmittal, which sends an e-mail to the recipients with the documents and a Document Transmittal Report attached.
|
|
Email as PDF
|
Creates a PDF version of the report, which is attached to a blank email using your default email system (for example, Microsoft Outlook).
|
|
Add Document
|
Opens the Add Document to a Transmittal form to allow you to add one or more documents to the document transmittal.
See Add documents.
|
|
Add Distribution List
|
Add recipients to the transmittal record. Select a distribution list from the drop-down list.
See Add recipients.
|
|
Add Package
|
Select a document package from the drop-down list. Specify whether you want to copy the documents, recipients or both.
See Add a package.
|
|
View Document
|
Allows you to view a document.
|
|
Print Document File(s)
|
Allows you to print a specified document.
|
|
Copy From Transmittal
|
Allows you to populate the recipients and documents for the current transmittal by copying another one.
See Copy transmittals.
|
Transmittal - Responses
Use this form to record responses from recipients.
See Add responses.
Grid
The grid lists messages from recipients. Click the Add Response button to add a message to the list.
Buttons
|
Field
|
Description
|
|
Actions
|
See Transmittal - Details.
|
|
Add Response
|
Opens the Transmittal Response form, where you can select a recipient and record their response.
|
Transmittal - Documents
Use this form to add documents to a transmittal and to batch update the document status and approval code.
See Add documents.
Grid
The grid lists the documents that are associated with this transmittal. For each document, the revision number, file name, dependant files, status and approval code are displayed.
Buttons
|
Field
|
Description
|
|
Actions
|
See Transmittal - Details.
|
|
Update Document Status
|
Opens the Document Status - Batch Update form.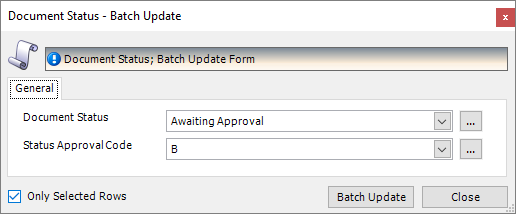
Use this form to update the status and approval code for documents that are selected in the grid. For each field, you can select an option from the drop-down list or click the ellipsis button to create a new status or code.
|
|
Check E-Transmittal File Size
|
Click this button to check that recipients are able to receive the files. You can set the default email size using the Maximum E-Mail Size in Document Options. You can also set this parameter for each contact on the Contact - Document Management Defaults form.
|
|
Add Document
|
Opens the Document Search - Add to Transmittal form, where you can select documents to add to the transmittal.
|
Requests for information (RFI)
About requests for information (RFI)
A document request for information (RFI) is the accepted method for engineers, sub-contractors, vendors, fabricators, and so on, to raise a technical question or to confirm the interpretation of a detail, specification or note on construction drawings. They can also be used to confirm directives from the architect or client on changes to the scope of work.
In addition to the sender and the receiver, a document RFI contains details of the question, along with document reference numbers. Specific details or instructions for the receiver can also be included along with a date by which a response is required. An acknowledgment request should always be included in a document RFI to ensure there is no doubt that the document is received.
Access
To access requests for information, from the sidebar menu, go to Document Management > Document RFI.
When you create or edit an RFI, you will use the RFI form.
Create RFIs using the wizard
The RFI Wizard leads you through the process of creating and sending an RFI. You can specify the nature of the request, the documents to send, the recipients, and the method that you want to use to send the RFI.
To launch the Transmittal Wizard, go to Document Management > RFI Wizard
The wizard is described below.
Screen 1: RFI Wizard - Welcome to the Request For Information (RFI) Wizard
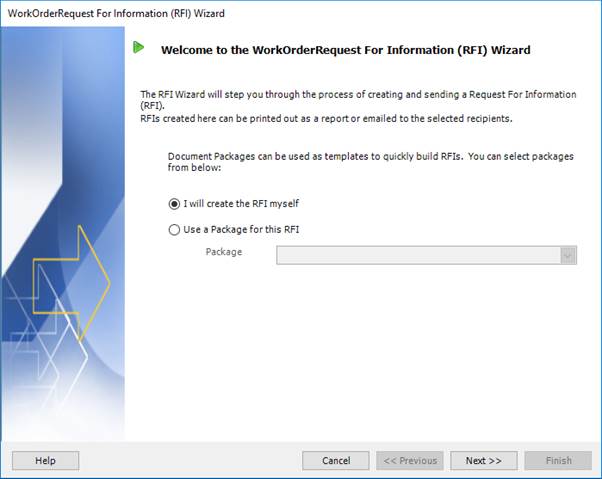
1. Select the method that you want to use to create the RFI (see below).
2. Click Next to continue to the next screen.
Fields
|
Field
|
Description
|
|
I will create the RFI myself
|
Use this option if you want to specify documents and recipients on an ad hoc basis.
|
|
Use a Package for this RFI
Package
|
See About Document Packages.
If you want to use a package, enable the option and select a document package from the drop-down list.
|
Screen 2: RFI Wizard - Select RFI Recipients
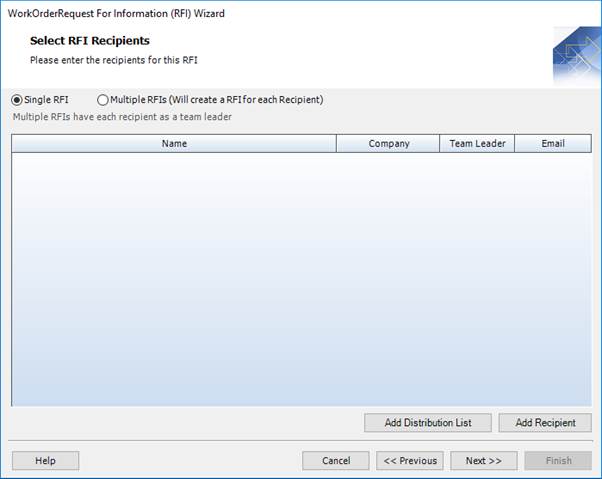
1. Specify recipients (see below).
2. Click Next to continue to the next screen.
Fields
|
Field
|
Description
|
|
Single RFI
|
Select this option to send a single RFI to the contact tagged as the team leader in the grid.
|
|
Multiple RFIs
|
Select this option to send an RFI to every recipient listed in the grid. All recipients must be tagged as team leaders.
|
Grid
The grid lists the details (name, company and email address) for RFI recipients. For single RFIs, you must specify one team leader. For multiple RFIs, every recipient must be tagged as a team leader.
Buttons
|
Button
|
Description
|
|
Add Distribution List
|
Opens the Select a Distribution List form. Use this form to select a distribution list to add to the RFI record. The contacts from the distribution list are displayed in the grid.
|
|
Add Recipient
|
Opens the Contact Search - Add to Package form, where you can find and select contacts to add to the RFI record as recipients.
|
Screen 3: RFI Wizard - Select RFI Details

1. Complete the details (see below).
2. Click Next to continue to the next screen.
Fields
|
Field
|
Description
|
|
Name
|
Type in a name for the RFI. This field is automatically populated if RFI – Autonaming in Document Options is selected.
|
|
Facility
|
Select a facility from the drop-down list.
|
|
Sent By
|
Select a person from the drop-down list. This is the person who is sending the RFI.
|
|
Contract
|
Select a contract from the drop-down list or click the Create Contract button to create a new one.
|
|
Change Order
|
If this RFI is related to a change order, select the change order from the drop-down list.
|
|
Label
|
In change order management, you can apply categorisation labels to correspondence. Examples are Drawings, Scope Documents, and so. If this RFI is related to a change order, you can select a label for it from the drop-down list.
|
|
Response Required By
|
Specify the date by which a response is required.
|
|
Response Instructions
|
This field allows you to create standard instructions for RFIs. Select a message from the drop-down list or click the ellipsis button to create a new one.
|
|
Subject
|
Type in the subject matter for the RFI or select a predefined standard text. To do the latter, click the Predefined Subject button.
|
|
Details
|
Type in the contents or question of the RFI or select predefined standard text. To do the latter, click the Predefined Details button.
|
Screen 4: RFI Wizard - Select RFI Files (Optional)
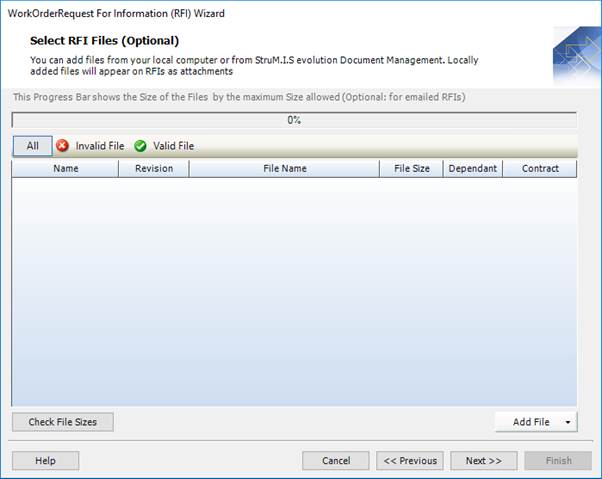
1. Use the Add File button to find and select documents to add to the RFI. You can select files from document management or from your computer. At the end of the wizard, when the RFI record is created, files from document management are added to the RFI - Documents form and files from your computer are added to the RFI - Attachments form.
2. Make any necessary amendments to fix invalid documents.
3. Click Next to continue to the next screen.
Fields
|
Field
|
Description
|
|
Progress Bar
|
When you send an RFI by email, be aware that the recipients may have a maximum receivable email size. You can set the default email size using the Maximum E-Mail Size in Document Options. You can also set this parameter for each contact on the Contact - Document Management Defaults form. The recipient with the lowest maximum e-mail size is used to determine the e-mail size limit.
As you add documents to the RFI, the percentage counter increases so that you can see when the RFI is approaching the maximum size allowed.
|
Smart filters
|
Smart filter
|
Description
|
|
All
|
Shows all files for this RFI.
|
|
Invalid File
|
Shows invalid files for this RFI.
Documents that do not have valid files linked to them cannot be added to an RFI. If you try to send an RFI with missing files, you receive a warning message asking if you still want to send. If you click Yes, the email is sent, but without the missing files. If you click No, you must ensure that only documents with valid files are listed.
|
|
Valid File
|
Shows valid document files for this RFI.
|
Buttons
|
Button
|
Description
|
|
Check File Sizes
|
Populates the progress bar. See above.
|
|
Add Document
|
The following options are available:
§ Add File From Document Management
Opens the Document Search - Add to Transmittal Wizard form, where you can find and select documents to add to the transmittal.
§ Add File From Computer
Allows you to browse for any file.
|
Screen 5: RFI Wizard - Finishing
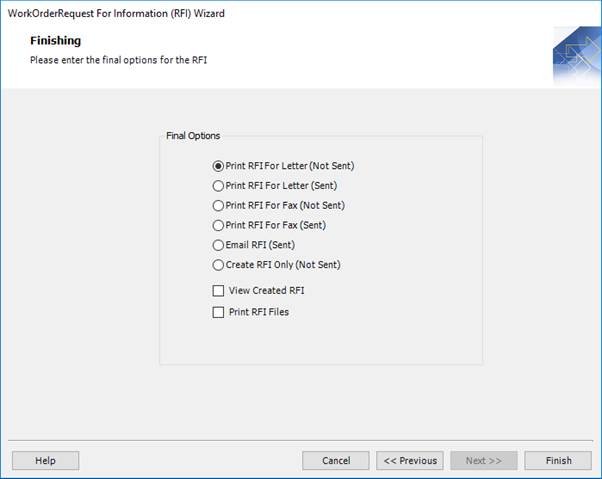
1. Select the method that you want to use to send the RFI (see below).
2. Click Finish to create the RFI and optionally send it to the specified recipients.
Fields
|
Field
|
Description
|
|
Print RFI For Letter (Not Sent)
|
Prints the RFI as a letter but the status remains Not Sent.
|
|
Print RFI For Letter (Sent)
|
Prints the RFI as a letter and changes the status to Sent.
|
|
Print RFI For Fax (Not Sent)
|
Prints the RFI as a fax but the status remains Not Sent.
|
|
Print RFI For Fax (Sent)
|
Prints the RFI as a fax and changes the status to Sent.
|
|
Email RFI (Sent)
|
Emails the RFI and changes the status to Sent.
|
|
Create RFI Only (Not Sent)
|
Creates the RFI within STRUMIS but the status remains Not Sent.
|
|
View Created RFI
|
Select the check box to view the RFIs after they have been created.
|
|
Print RFI Files
|
Select the check box to print a copy of each document attached to the RFI to your default printer.
|
Create RFIs manually
The following instructions tell you how to manually create a request for information.
See also Create RFIs using the wizard.
1. Go to Document Management > Document RFI.
A list of RFIs is displayed.
2. Click New.
The RFI - Details form is displayed.

It has the following tabs:
§ Details
Specify RFI details, in particular the person who is sending the RFI, the recipients, and the question/content of the RFI.
See RFI - Details for a full list of the fields and buttons on this tab.
§ Responses
Use this form to record any responses that you receive.
See RFI - Responses for a full list of the fields and buttons on this tab.
§ Documents
Use this form to specify the documents that are to be sent with the RFI.
See RFI - Documents for a full list of the fields and buttons on this tab.
§ Notes
See RFI - Notes for a full list of the fields and buttons on this tab.
§ Custom Fields
See RFI - Custom Fields for a full list of the fields and buttons on this tab.
§ Information
See RFI - Information for a full list of the fields and buttons on this tab.
3. On the RFI - Details form, fill in the basic information, add one or more recipients (see Add recipients), specify a summarised and detailed request, and click Save.
4. On the RFI - Documents form, add the documents that are to be sent with the RFI (see Add documents) and click Save.
|
|
§ You can copy the RFI information, recipients and documents from another RFI record. To do this, go to the RFI - Details form and click Actions > Copy From RFI. The Add Document RFI form is displayed.
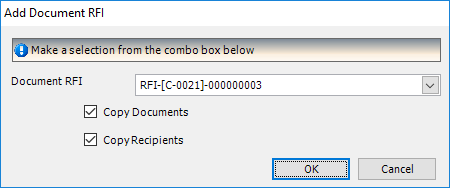
Select the RFI from which you want to copy, specify whether you want to copy recipients and documents, and click OK.
§ If you are creating multiple RFIs, use the Save As New button.
When you have completed and saved the first set of details, you can simply change the name and click Save As New to save the same details under the new name.
|
Add recipients to an RFI
You can add recipients to an RFI in the following ways:
§ By adding individual contacts to the RFI
§ By adding a distribution list to the RFI
§ By adding a package to the RFI
§ By copying recipients from another RFI
See Create RFIs manually
Further details are given in the sections below.
Add individual contacts
Use the following instructions to add individual contacts to an RFI.
1. On the RFI - Details form, click the Add Recipient button.
The Contact Search - Add to RFI form is displayed. It lists all of the contacts in the STRUMIS system.
2. If necessary, you can use the fields on the General and Details tabs to filter the contacts in the list. See Find and edit an existing record.
3. Select one or more contacts in the list. To do this:
§ Press Ctrl A to select all lines, or
§ Press the Ctrl key and click several non-contiguous lines, or
§ Press the Shift key then click the first and last lines in a range.
4. Click the Add button.
The selected contacts are added to the RFI as recipients.
Add a distribution list to an RFI
Use the following instructions to add a distribution list to an RFI.
See About document distribution lists.
1. On the RFI - Details form, click Actions > Add Distribution List.
The Select a Distribution List form is displayed.
2. Select a distribution list from the drop-down list and click OK.
The contacts from the distribution list are added to the RFI as recipients.
Add a package to an RFI
Use the following instructions to add a package to an RFI.
See About Document Packages.
1. On the RFI - Details form, click Actions > Add Package.
The Add Document Package form is displayed.
2. Select a package from the drop-down list, select the Copy Recipients check box (and the Copy Documents check box if required), and click OK.
The contacts from the package are added to the RFI as recipients.
Add a message to an RFI
When you create an RFI to raise a question or to confirm technical details with other parties, enter your query as free text into the Subject field and the Details field on the RFI - Details form. The subject of the RFI should be a one-line summary of the query. Use the Details field to enter more comprehensive text.
You can type directly into both fields or you can select predefined notes to populate the fields. To select predefined notes, click the Predefined Subject or Predefined Details buttons. In both cases, the Predefined Notes form is displayed. Select a note and click the Add button to add it to the RFI. For more information about the Predefined Notes form, see Add notes to a record.
Add documents to an RFI
You can add documents to an RFI in the following ways:
§ By adding individual documents to the RFI
§ By adding a package to the RFI
See Add recipients
§ By copying documents from another RFI
See Create RFIs manually
Further details are given in the sections below.
Add individual documents
Use the following instructions to add individual documents to an RFI.
1. On the RFI - Documents form, click the Add Document button.
The Document Search - Add to RFI form is displayed. It lists all of the documents in the STRUMIS system.
2. If necessary, you can use the fields on the General, Details, Contract/Ownership and Document Dates tabs to filter the documents in the list. See Find and edit an existing record.
3. Select one or more documents in the list. To do this:
§ Press Ctrl A to select all lines, or
§ Press the Ctrl key and click several non-contiguous lines, or
§ Press the Shift key then click the first and last lines in a range.
4. Click the Add button.
The selected documents are added to the RFI.
|
|
When you have added documents to the RFI, on the RFI - Documents form, you can click Check File Sizes. This populates the bar at the top of the grid and helps you to avoid sending emails that are too big for the recipient to receive.
|
Send RFIs
Before sending an RFI, you may want to review the associated documents. To do this:
§ On the RFI - Documents form, select a document and click Actions > View Document
This allows you to review the document record.
§ On the RFI - Documents form, select a document and click Actions > Print Document Files
This allows you to print the file that is associated with the document record.
You can then send RFIs by post or by email. To do this, on the RFI - Details form, click the Actions button and use one of the following options:
|
Option
|
Description
|
|
Print
|
Generates the Document RFI Report.
|
|
Print and Send
|
Generates the Document RFI Report and marks the RFI as sent.
|
|
Send Email RFI
|
Creates and sends an e-mail to the recipients with the documents and a Document RFI Report attached.
|
|
Email as PDF
|
Creates a PDF version of the report, which is attached to a blank email using your default email system (for example, Microsoft Outlook).
|
Add responses to an RFI
Use the following instructions to add responses to an RFI.
1. On the RFI - Responses form, click the Add Response button.
The Document RFI Response form is displayed.

2. Populate the fields on the Details tab.
|
Field
|
Description
|
|
RFI
|
This is the name of the RFI. You cannot edit it.
|
|
Response Date
|
This is the date on which the response was received. It defaults to today's date but you can select any date from the drop-down list.
|
|
Recipient
|
Select a recipient from the drop-down list. This is the recipient who sent the response.
|
|
Message
|
This is a free text field. Use it to record the recipient's response.
|
3. Click Save.
The response is added to the RFI.
Revise an RFI
You can keep track of the changes that you make to an RFI using revision numbers. Every time you make a change, move the RFI on to the next revision number and add text to describe the change.
Assign a revision number to an RFI
Use the following instructions to assign a revision number to the RFI.
1. On the RFI - Details form, click the Create Revision button.
The RFI Revision form is displayed.

2. Complete the details.
|
Field
|
Description
|
|
Document Name
Old RFI Revision
|
You cannot edit these fields. They show the current state of the RFI.
|
|
New Revision
|
Select a revision from the drop-down list.
|
|
Revised By
|
Select a contact from the drop-down list.
|
|
Revision Details
|
This is a free text field; use it to record details of the revision.
|
3. Click OK.
The RFI is revised.
View and access previous revisions
Use the following instructions to show a list of revisions for the RFI and to open the corresponding details.
1. On the RFI - Details form, click the Revision Details button.
The RFI Revision List form is displayed.

This form lists the previous revisions of the RFI along with any comments that you recorded.
2. Double-click a revision line to open the corresponding version of the RFI.
Find and edit an RFI
1. Open the Search form from the sidebar menu.
To do this, go to Document Management > Document RFI.
2. Enter search criteria and click the Search button.
Records that match your search criteria are listed.
3. Double-click a record to edit it.
For complete information, see Find and edit an existing record.
RFI reports
You can access reports from the sidebar menu. Go to Document Management > Document Reports.
See also:
Work with reports
List of reports
Fields and buttons
RFI - Details
Use this form to specify the basic requirements for an RFI.
Fields
|
Field
|
Description
|
|
Contract
|
Select a contract from the drop-down list or click the ellipsis button to create a new one.
|
|
Facility
|
Select a facility from the drop-down list.
|
|
Name
|
This field is automatically populated if the auto-naming/numbering option is turned on in Document Options; otherwise, type in a unique name for the RFI.
|
|
RFI Category
|
Select a category from the drop-down list or click the ellipsis button to create a new one.
|
|
RFI Priority
|
Select a priority from the drop-down list or click the ellipsis button to create a new one.
|
|
Vendor RFI Number
|
Type in the vendor's RFI number.
|
|
Main Contractor/Supplier RFI Number
|
Type in the contractor's RFI number.
|
|
Sent By
|
Select a person from the drop-down list. This is the person who is sending the RFI.
|
|
Sent Via
|
Select the method by which the RFI will be distributed. The options in the drop-down list are letter, fax and email.
|
|
Sent To
Add Recipient
|
This grid lists the contacts to whom the transmittal is sent. Click the Add Recipient button to select contacts to add to the list.
See Add recipients.
|
|
Response Instructions
|
This field allows you to create standard instructions for RFIs. Select a message from the drop-down list or click the ellipsis button to create a new one.
|
|
Acknowledge Received On
|
The date on which the transmittal acknowledgement is received.
|
|
Response Required By
|
Specify the date by which a response is required.
|
|
Response Received On
|
Specify the date on which the response is received.
|
|
Subject
|
The subject matter for the RFI.
You can create predefined notes by clicking the Predefined Subject button.
|
|
Details
|
Type in the contents or question of the RFI.
You can create predefined notes by clicking the Predefined Details button.
|
|
Revision
Create Revision
Revision Details
|
You can record revision details for an RFI. See Revise an RFI.
|
|
Change Order
|
If this RFI is related to a change order, select the change order from the drop-down list.
|
|
Label
|
In change order management, you can apply categorisation labels to correspondence. Examples are Drawings, Scope Documents, and so. If this RFI is related to a change order, you can select a label for it from the drop-down list.
|
|
RFI Status
|
The options are:
§ RFI Sent
Select this check box when the RFI has been sent.
§ RFI Received
Select this check box when you have received a response from the recipient.
|
Actions button
|
Field
|
Description
|
|
Print
|
Generates the Document RFI Report.
|
|
Print and Send
|
Generates the Document RFI Report and marks the RFI as sent.
|
|
Send Email RFI
|
Creates an email to send to the recipients with the documents and a Document RFI Report attached.
|
|
Email as PDF
|
Creates a PDF version of the report, which is attached to a blank email using your default email system (for example, Microsoft Outlook).
|
|
Add Document
|
Opens the Add Document to an RFI form to allow you to add one or more documents to the RFI.
See Add documents.
|
|
Add Distribution List
|
Add recipients to the RFI. Select a distribution list from the drop-down list.
See Add recipients.
|
|
Add Package
|
Select a document package from the drop-down list. Specify whether you want to copy the documents, recipients or both.
See Add a package.
|
|
View Document
|
Allows you to view a document.
|
|
Print Document File(s)
|
Allows you to print a specified document.
|
|
Copy From RFI
|
Allows you to populate the recipients and documents for the current RFI copying another one.
See Copy transmittals.
|
RFI - Responses
Use this form to record responses from recipients.
See Add responses.
Grid
The grid lists messages from recipients. Click the Add Response button to add a message to the list.
Buttons
|
Field
|
Description
|
|
Actions
|
See RFI - Details.
|
|
Add Response
|
Opens the Document - RFI Response form, where you can select a recipient and record their response.
|
RFI - Documents
Use this form to add documents to an RFI.
See Add documents.
Grid
The grid lists the documents that are associated with this RFI. For each document, the revision number, file name, and dependant files are displayed.
Buttons
|
Field
|
Description
|
|
Actions
|
See RFI - Details.
|
|
Check File Sizes
|
Click this button to check that recipients are able to receive the files. You can set the default email size using the Maximum E-Mail Size in Document Options. You can also set this parameter for each contact on the Contact - Document Management Defaults form.
|
|
Add Document
|
Opens the Document Search - Add to RFI form, where you can select documents to add to the RFI.
|


