
The illustration below shows the main STRUMIS screen. Each of the labelled items is described in detail below.
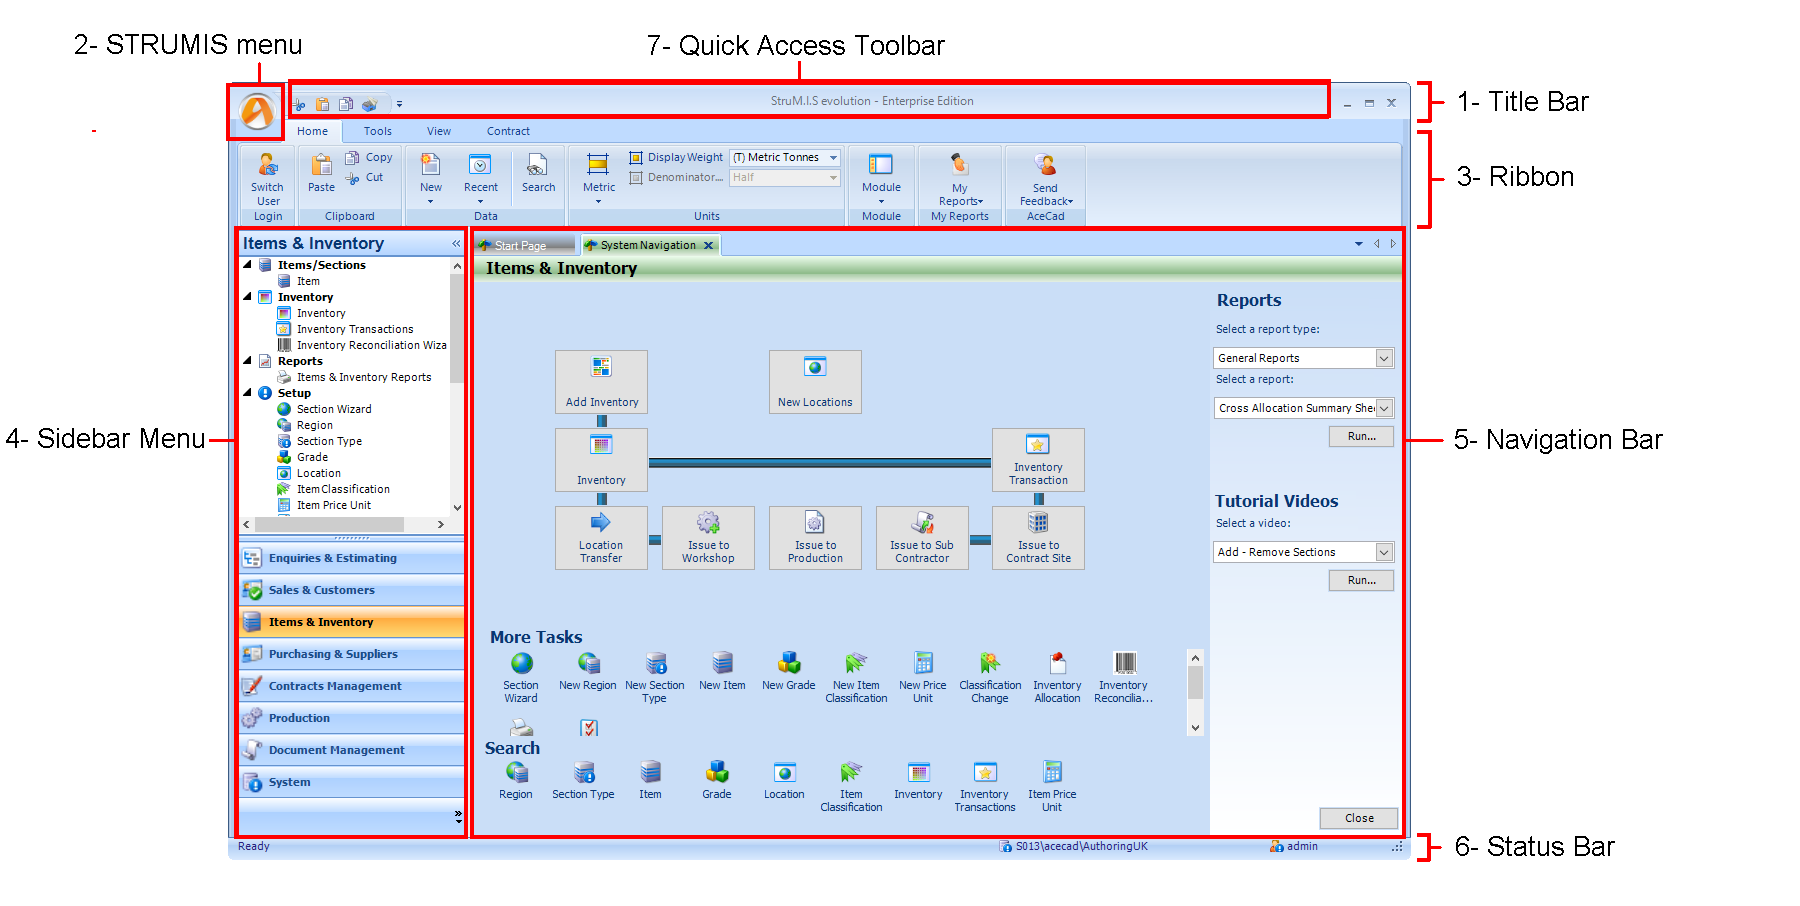
The title bar tells you which edition of STRUMIS you are running and has the standard controls to minimise, maximise and close the screen.
When you click the STRUMIS logo, the following menu is displayed:
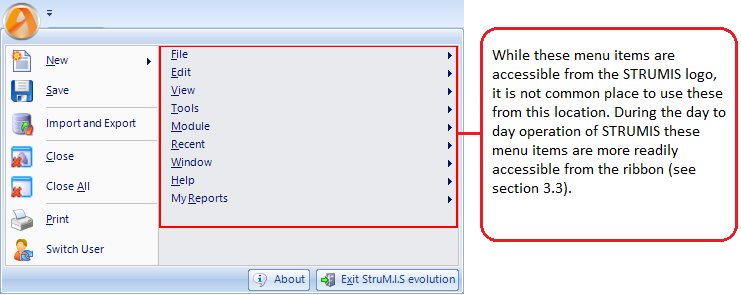
The available options are listed in the table below:
Icon |
Option |
Description |
|
New |
Allows you to create new records. |
|
Save |
Saves the active open record. |
|
Import and Export |
Opens the Import and Export Wizard, which allows you to import files into, or export files from STRUMIS. |
|
Close |
Closes the active open record. |
|
Close All |
Closes all currently open records. |
|
Saves a screen capture of the active open form to a PDF file. |
|
|
Switch User |
Restarts STRUMIS so that you can log in as a different user. |
|
About |
Click this button to: § View STRUMIS contact details. § View your licence details and a list of software versions that you have installed (with access to release notes) including any hotfix releases that may have been applied to the database. § Upgrade or activate your licence.
|
|
Exit STRUMIS |
Click this button to close the STRUMIS software. |
There are four tabs on the main menu; Home, Tools, View, and Contract. More detail is given in the tables below:

Option |
Description |
Login |
The Switch User option restarts STRUMIS so that you can log in as a different user. |
Clipboard |
Use these options to Cut, Copy and Paste to the clipboard. |
Data |
§ New § Recent § Search |
Select the units for use throughout the system. The options are: § Metric - all dimensions will be shown in millimetres. § Imperial-
all dimensions will be shown in feet and inches. § Imperial Decimal Inch - all dimensions will be shown in decimal inches. You can also select Weight Units - kilograms, metric tonnes, imperial tons, pounds. All of the above can be changed at any time and all values on screen will be refreshed to display in the selected units. |
|
Module |
Click this button to display a particular module in the sidebar menu. |
My Reports |
Click this button to list your favourite reports by module. Reports are only visible in this menu once a they have been added to it using the "add to my reports" function. See add a report to your list of favourites. |
AceCad |
Click the Send Feedback button to send an email to STRUMIS support. |
Option |
Description |
Data Tools |
The Data Tools options allows you to: § Run the Setup Wizard. § Backup your SQL database. § Install a hotfix. § Run the Import and Export Wizard. |
Local Data |
The Local Data options allow you to: § Reset all grid layouts to default factory settings. § Refresh the data in drop-down lists (combos). |

Option |
Description |
View |
The View option allows you to: § Toggle the sidebar menu on and off. § Toggle the System Navigation screen on and off. |
CAD/CAM Viewers |
This option allows you to view model data using one of the following viewers: § Use the BIMReview Viewer to view a 3D representation of a Contract. § Use the StruCNC CAM Viewer / Editor to view or edit a CAM / DSTV / NC file. § Use the Drawing Viewer to view a DXF or DWG file. |
| Window | The Window option allows you to: § Display the welcome screen and videos. § Configure the display area to show tabbed or non-tabbed windows. § Launch the on-line help system. § Display the start page. |

The options on the Contract Ribbon are very useful when you are carrying out a lot of work on one particular contract. You can specify the contract on which you are working and the facility with which the contract is associated, and then use the buttons along the Contract Ribbon to access various aspects of work particular to the selected contract. For example, if you are working with a contract called C-0100, select it from the Contract drop-down list, ensuring the correct facility is also active. If you want to view the detailed listing for C-0100, simply click the Detailed Listing button; you do not have to go through the menu system or search forms.
The various buttons will become enabled as the contract progresses and pertinent data has been entered into the system relative to each module. Use the Refresh Contract Information button to update the status of each icon in the contract ribbon.
Click a module in the sidebar menu to display a list of associated tasks and records in the upper half of the sidebar menu.
When you select a menu option that requires a form, the form is displayed here.
Shows the status of the STRUMIS system, the database that you are using, and the user that is currently logged in.
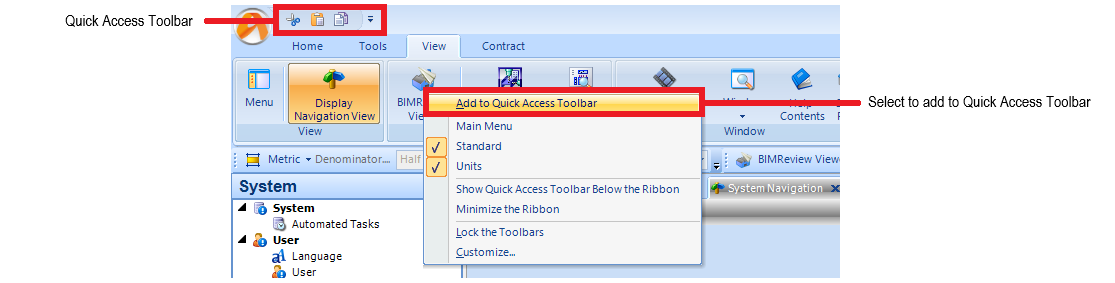
The Quick Access Toolbar is located at the top of the screen next to the STRUMIS icon and allows tools within the ribbon to be pinned to it.
To pin a tool to the Quick Access Toolbar, the user can right click on any icon in the Ribbon and select the Add to Quick Access Toolbar option at the top of the opened menu. When a module or tool is shown here, it does not become inactive in the Ribbon and can still be found and accessed from its original location.
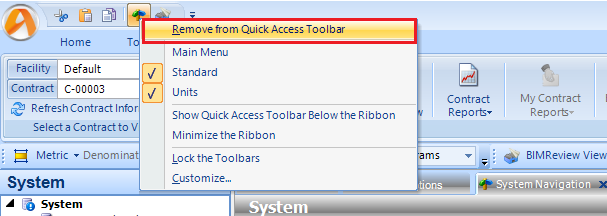
To remove items from the Quick Access Toolbar, right click on the icon representing the module or tool to be removed, then click Remove from Quick Access Toolbar in the opened menu.
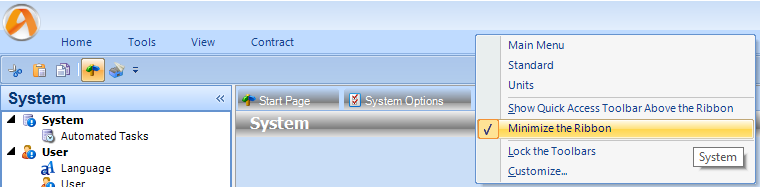
By right clicking on the mouse with the cursor anywhere in the Ribbon, a secondary menu will appear allowing access to a number of different options (see image below).

There are three divisions to this menu. The top section are features available to populate in a separate tool bar below the Ribbon for quick access including Main Menu, Standard and Units. The second option group allows for manipulation of ribbon locations and visibility on screen. The third option group can be used to prevent manipulation of tool bars and by using the Customize option, take full control of all the options for the Ribbon and menu sections.
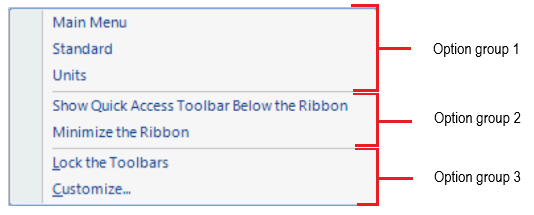
Option Group 1
Within Option Group 1, if any of these options are selected, a new bar appears below the Ribbon containing the active features. These can be used as independent items or combined to have multiple options selected at once. With any item selected from this menu, an arrow is populated next to the active components.
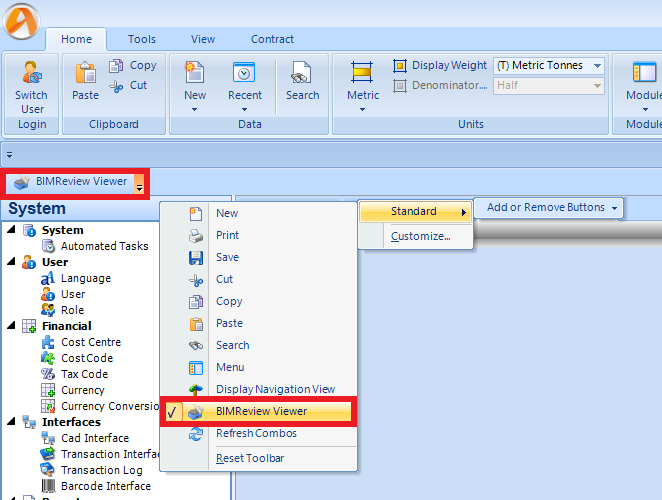
Once the selection has been made, the small arrow at the end of the row can be used to add or remove elements from the selected to further customize of the displayed elements. An example of this would be wanting the BIMReview Viewer locked to the top bar without the other options in the "standard" menu. All other elements can be removed at the user's discretion.
To deactivate and remove an item from the tool bar, the item should be selected a second time. This will remove the designated item from the bar and also remove the tick next to it in the menu window.

The options available in this section of the menu are as follows:
Option |
Description |
| Main Menu | Functionality found to the right of the menu accessible from
the STRUMIS icon in the top left of the screen including:
All these options, are available from within the ribbon as well. For further information see STRUMIS menu |
| Standard | This displays a mix of functionality found in the "Home"
tab of the ribbon and the "View" tab. Functionality
in this menu are as follows:
For further information on these functions see STRUMIS menu. |
| Units |
This selection shows the measurement units seen in the "Home" tab in the ribbon. Functionality is as follows:
For further information please see Units. |
Option Group 2
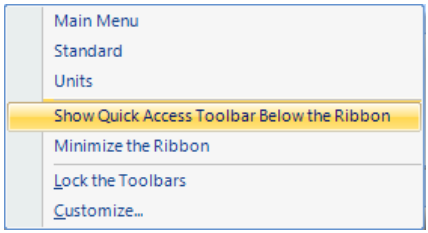
Option Group 2 in the right click menu contains the options to move the quick access toolbar beneath the ribbon and minimize the ribbon.
To move the Quick Access Toolbar below the ribbon, select the option Show Quick Access Toolbar Below the Ribbon. For further information, see Quick Access Toolbar.
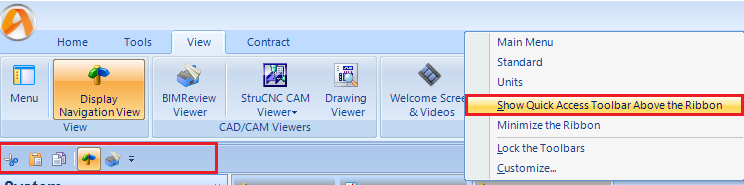
To move the Quick Access Toolbar back above the Ribbon, by right clicking to reopen the menu, the option will have changed to Show Quick Access Toolbar Above the Ribbon. This will move it back to the original position above the Ribbon. The below image shows the option change in the menu and the location of the Quick Access Toolbar in it's position beneath the Ribbon.
The other selection in option group 2 is the ability to Minimize the Ribbon. This function allows the user to remove the Ribbon completely from view to expand the working area. This can be restored by selecting the option in the menu again to remove the tick and bring the Ribbon back in to view again.
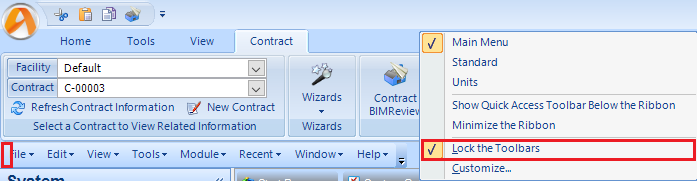
Option group 3
Within option group 3 there is the function to prevent manipulation of the applied menu selections chosen from option group 1. For example, if Main Menu is selected from option group 1 this can be moved to another location in the bar or even pulled out to its own window to be moved around the screen on top of STRUMIS (see image below). This can be moved or pulled from the bar using the dots on the left of the tool bar.

With the option to Lock the Toolbars selected, this will not be able to occur. This function removes the dots from the side of the menu bar and prevents movements and separation of items completely (see below). If however, the menu has been pulled into it's own window (see above) before lock was enabled, then the window will not be able to be integrated back in to the Toolbar. This will only be able to be moved back once the lock has been removed.
Customize is also available from the bottom of the "right click" menu. This function allows access to Toolbars and their visibility, Commands and their arrangements on screen as well as options for the ribbon and surrounding Toolbars.
The first tab in the customize window shows the Toolbars visible within option group 1 including Main Menu, Standard and Units. These can all be activated or deactivated from this window. There is also the ability to create a new customized Toolbar with it's own set of commands from this window using the New option.
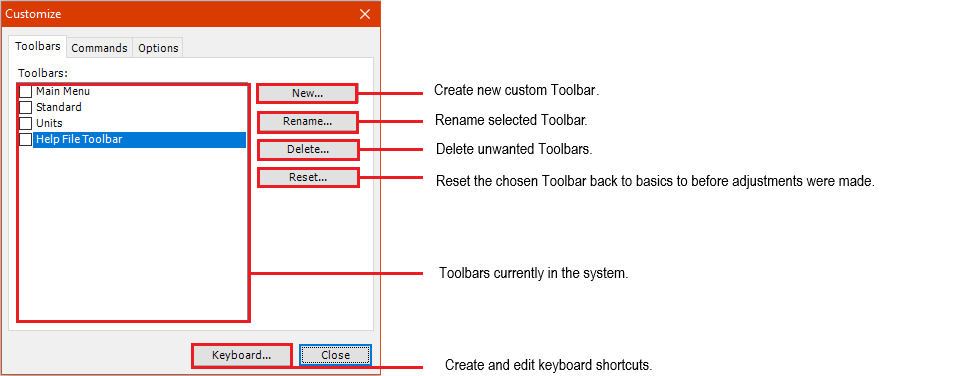
Within the "new" window, a name will need to be given to the Toolbar as well as a location orientation. This will determine where the Toolbar will appear on the screen. The options are:
Option |
Description |
| Docked Top | The Toolbar will be locked to the top of the screen, beneath the ribbon. |
| Docked Bottom | The Toolbar will be locked to the bottom of the screen, on top of the status bar. |
| Docked Left | The Toolbar will be to the left of the ribbon. |
| Docked Right | The Toolbar will be located on the right of the screen. |
| Floating | The Toolbar will be visible in it's own window and can be moved around the screen independent to activity on STRUMIS. |
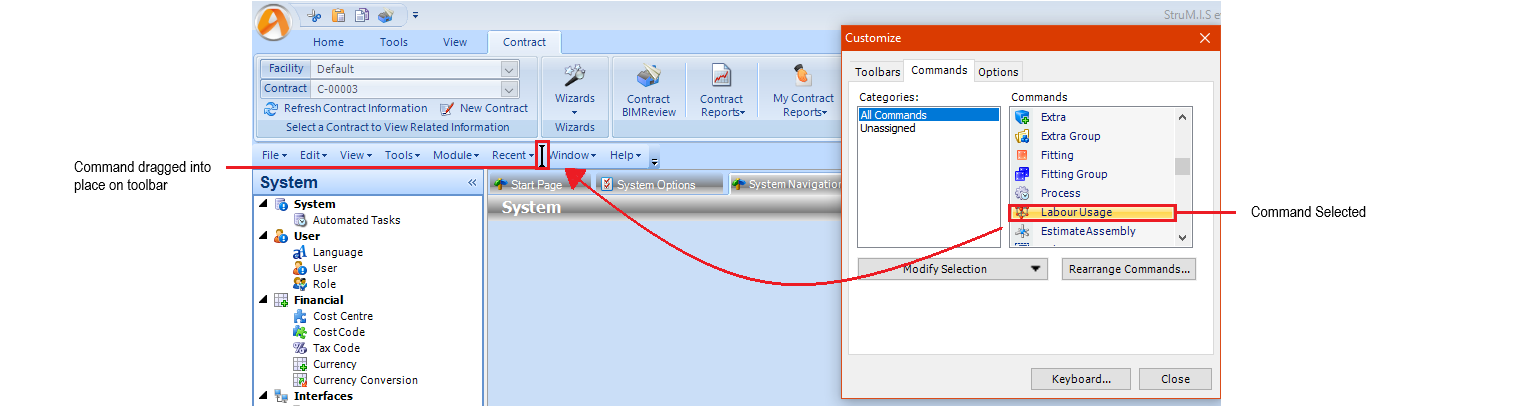
The Commands tab displays categories for both all and undefined commands. These can be sorted and rearranged to adjust the order in which they appear within the selection box on the right of the window. If a command is needed in a Toolbar and is not currently active within STRUMIS, a command can be found and dragged into the relative position within the Toolbar itself. However, once this is done the command cannot be used until the Customize window has been
closed.
The Options tab contains the following features which can be used to enhance the user experience of STRUMIS.
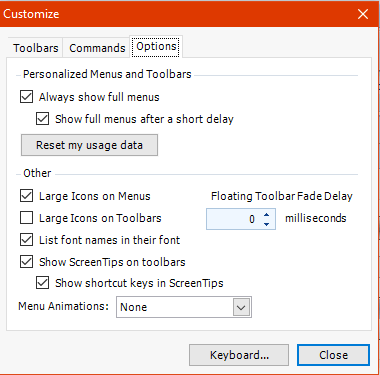
Option |
Description |
| Always show full menus | |
| Show full menus after short delay | |
| Reset my usage data | Delete the records of commands used and restores defaults to menus and Toolbars. |
| Large icon on menus | Icon size is nearly doubled on all menus. |
| Large icons on toolbars | Icon size is nearly doubled on all Toolbars. |
| List font names in their font | |
| Show screen tips on toolbars | When hovering over an element in a toolbar with the mouse, STRUMIS will indicate the function of that item with a pop up window. |
| Show shortcut keys in screen tips | Providing that a shortcut key has been assigned to the function, STRUMIS will indicate the assigned key when hovering over the chosen element in the Toolbar. |
| Menu animations | Causes the menu behind each function in the Toolbar, when clicked, to appear with the chosen animation effect. |
| Floating toolbar fade delay | Time in milliseconds it takes for the Toolbar to begin to fade. |