
Use this form to record the goods that you have received from a particular supplier.
Field |
Description |
Number |
This field is automatically populated if the auto-naming/numbering option is turned on in Purchasing & Suppliers Options; otherwise, type in a unique name for the Purchase Order Receipt. |
Supplier |
If you created a Purchase Order Receipt from within a Purchase Order, this field is pre-populated; otherwise, select a supplier from the drop-down list. This is the supplier from whom you have received goods. |
Supplier Delivery Note |
This is a free text field. Use it to store the reference number from the supplier's delivery note. This is a mandatory field as the receipt cannot be saved without it. |
Receive Date |
This is the date on which the goods were received. It defaults to the day the receipt was created, but you can select a different date from the drop-down list. |
Receive to Facility |
If your business has multiple locations and you are receiving goods to one of these, select a different facility; otherwise use the default setting. |
Currency |
The facility currency is automatically loaded from the facility record. You cannot change it here. |
Details of the items that you have received are listed in the grid.
The Display Individual Instances check box influences the way in which items are listed. It applies only to steel items. If you specified a quantity of, for example, 5 items in the Purchase Order, select this check box to list each of the 5 items on a separate line. If you clear the check box, the items appear on a single line with a quantity of 5.
Use the Add Line button to add items from any Purchase Order associated with the supplier you selected above. This is only necessary when the receipt covers items from other Purchase Orders or you are creating a new receipt that was not generated form the Purchase Order record. See Record items that you receive for more information.
The following non-standard buttons are available on the Purchase Order Receipt - Details form:
§ Complete
§ Actions
There are two Actions buttons on the Purchase Order Receipt - Details form. These
are labelled in the illustration below:
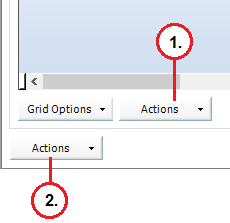
The buttons are described in the following sections.
When you have finished recording the items that you received from your supplier, click this button to complete the purchase order receipt. When you complete a Purchase Order Receipt:
§ You can no longer edit fields or add items.
If you want to record more received items, you have to raise another receipt.
§ Received items are added to the inventory.
§ The originating purchase order
is updated.
The outstanding quantities for items not fully received is updated to reflect
the balance. If the balance is zero, the purchase order is closed.
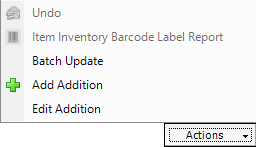
This Actions button gives you the following menu options:
Menu option |
Description |
Undo |
If a purchase order receipt is completed, but one of the items was received in error, use this option to undo the delivery of that one item and update the purchase order accordingly. These items can then be received with a second Purchase Order Receipt. |
Item Inventory Barcode Label Report |
When the purchase order receipt is completed, you can generated an Item Barcode Label report. A unique barcode is created for each item, based on its Inventory tracking number. |
Batch Update |
|
Add Addition |
During the process of receiving the goods from the Purchase Order, additional costs may have been incurred that need to be captured. This can be done using Additions. |
Edit Addition |
In order to make adjustments to the Additions added to the Purchase Order Receipt, the edit function can be used. See Edit Additions for more information. |
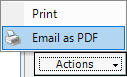
This Actions button gives you the following menu options:
Menu option |
Description |
Prints the Purchase Order Receipt to the screen. |
|
Opens your email client and attaches a PDF of the Purchase Order Receipt. See Email a receipt to your supplier. |